Olympus Stylus 1200 Black Stylus 1200 Instruction Manual (English)
Olympus Stylus 1200 Black - Stylus 1200 12MP Digital Camera Manual
 |
UPC - 050332161405
View all Olympus Stylus 1200 Black manuals
Add to My Manuals
Save this manual to your list of manuals |
Olympus Stylus 1200 Black manual content summary:
- Olympus Stylus 1200 Black | Stylus 1200 Instruction Manual (English) - Page 1
Master Getting to know your camera better Appendix ( Thank you for purchasing an Olympus digital camera. Before you start to use your new camera, please read these instructions carefully to enjoy optimum performance and a longer service life. Keep this manual in a safe place for future reference - Olympus Stylus 1200 Black | Stylus 1200 Instruction Manual (English) - Page 2
Guide P. 3 Button operations Menu operations Printing pictures Using OLYMPUS Master Getting to know your camera better Appendix P. 11 P. 19 P. 39 Test out the functions of the camera buttons by following along with the illustrations. Learn about the menus that control the functions and settings - Olympus Stylus 1200 Black | Stylus 1200 Instruction Manual (English) - Page 3
Gather these items (box contents) Digital Camera Strap LI-42B Lithium Ion Battery LI-40C Battery Charger USB Cable AV Cable OLYMPUS Master 2 Software CD-ROM Items not shown: Instruction Manual (this manual) and warranty card. Contents may vary depending on purchase location. Attach the - Olympus Stylus 1200 Black | Stylus 1200 Instruction Manual (English) - Page 4
the camera a. Charge the battery. Power Cable 3 Lithium Ion Battery 2 AC Wall Outlet ( Battery comes partially charged. Battery 1 Charger Charging Indicator Light On (Red): Charging Light Off: Charging complete (Charging time: Approx. 5 hours) b. Insert the battery and an xD-Picture Card - Olympus Stylus 1200 Black | Stylus 1200 Instruction Manual (English) - Page 5
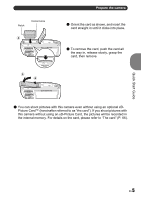
even without using an optional xDPicture Card™ (hereinafter referred to as "the card"). If you shoot pictures with this camera without using an xD-Picture Card, the pictures will be recorded in the internal memory. For details on the card, please refer to "The card" (P. 66). Quick Start Guide EN 5 - Olympus Stylus 1200 Black | Stylus 1200 Instruction Manual (English) - Page 6
pictures (shooting mode) When shooting movies (shooting mode) Quick Start Guide When viewing pictures (playback mode) Still picture shooting modes K h s g This function allows you to shoot with the camera's automatic settings. This function reduces the blur incurred by a moving subject, or - Olympus Stylus 1200 Black | Stylus 1200 Instruction Manual (English) - Page 7
D-M-Y) CANCEL MENU Exits a setting. a. Press the 1F button and the 2Y button to select [Y]. • The first two digits of the year are fixed. 1F Button X Y M D TIME Y/M/D 2Y Button b. Press the 3# button. CANCEL MENU Quick Start Guide 3# Button c. - Olympus Stylus 1200 Black | Stylus 1200 Instruction Manual (English) - Page 8
Quick Start Guide Set date and time e. Press the 1F button and the 2Y button to select [D]. X Y M D TIME 12 Y/M/D f. Press the 3# button. g. Press the 1F button and the 2Y - Olympus Stylus 1200 Black | Stylus 1200 Instruction Manual (English) - Page 9
Take a picture a. Hold the camera Horizontal grip Vertical grip Quick Start Guide b. Focus c. Shoot Shutter Button (Pressed halfway) Shutter Button (Pressed completely) Place this mark over your up, and the shutter speed and aperture value are displayed. The card access lamp blinks. EN 9 - Olympus Stylus 1200 Black | Stylus 1200 Instruction Manual (English) - Page 10
Quick Start Guide Arrow Pad Mode Dial Next Picture [IN] HQ Prev. Picture '07.12.26 12:30 100-0001 1 Erase pictures a. Press the 4& button and the 3# button to display the picture that you want to erase. b. Press the f/S button. ERASE [IN] f/S Button BACK MENU YES NO SET OK c. Press - Olympus Stylus 1200 Black | Stylus 1200 Instruction Manual (English) - Page 11
×3000 4 1 o button Power on: Shooting mode • Lens extends • Monitor turns on Turning the camera on and off Playback mode • Monitor turns on 2 Shutter button Shooting pictures Shooting still pictures Set the mode dial to K, h, s or g, and lightly press the shutter button (halfway). When the - Olympus Stylus 1200 Black | Stylus 1200 Instruction Manual (English) - Page 12
Switching between shooting and playback modes Set the mode dial to the desired shooting or playback mode. K Shooting still pictures The camera determines the optimum settings for the shooting conditions automatically. h Shooting pictures using digital image stabilization This function reduces the - Olympus Stylus 1200 Black | Stylus 1200 Instruction Manual (English) - Page 13
playback. g "MOVIE PLAY Playing back movies" (P. 28) Viewing panoramic pictures taken with [COMBINE IN CAMERA 1/2] (Panorama playback) • Use the arrow pad to select a panoramic picture, and then press e. automatically" (P. 28) "ADD FAVORITE Adding favorite images" (P. 30) EXIT MENU SET OK EN 13 - Olympus Stylus 1200 Black | Stylus 1200 Instruction Manual (English) - Page 14
"My Favorite" does not erase the original picture recorded in the internal memory or to the card. 4 Arrow pad (1243) Use the arrow pad to select scenes, The camera automatically sets white balance and ISO sensitivity in addition to the aperture and shutter speed. Other functions you can set - Olympus Stylus 1200 Black | Stylus 1200 Instruction Manual (English) - Page 15
7 Zoom button Zooming while shooting/close-up playback Shooting mode: Zooming in on your subject Optical zoom ratio: 3× Zoom out: Press W on the zoom button. P [] [IN] HQ 4000×3000 4 P [] [IN] HQ 4000×3000 4 Zoom in: Press T on the zoom button. Playback mode: Changing the picture - Olympus Stylus 1200 Black | Stylus 1200 Instruction Manual (English) - Page 16
your selection. Self-timer shooting Y OFF Y ON Cancel the self-timer. Set the self-timer. • After pressing the shutter button completely, the self-timer as close as 10 cm/3.9 in. from your subject. If the distance between the camera and the subject is over 60 cm/23.6 in., the picture will be out - Olympus Stylus 1200 Black | Stylus 1200 Instruction Manual (English) - Page 17
is deactivated. SHADOW ADJ. ON Shadow Adjustment Technology is activated. • There may be cases in which the camera cannot detect a face. • When [SHADOW ADJ. ON] is selected, the following setting restrictions apply. • [ESP/n] is fixed at [ESP]. • [AF MODE] is fixed at [FACE DETECT]. • When [DRIVE - Olympus Stylus 1200 Black | Stylus 1200 Instruction Manual (English) - Page 18
, hold down g/E to display the menu guide. Release g/E to close the menu Sets picture brightness for taking pictures. guide. Button operations Checking the time While the camera is off, press g/E to display the time (and alarm set time when [ALARM CLOCK] is set). The time will be displayed for - Olympus Stylus 1200 Black | Stylus 1200 Instruction Manual (English) - Page 19
DRIVE AUTO o FINE ZOOM OFF DIGITAL ZOOM OFF BACK MENU SET OK • When [CAMERA MENU], [PLAYBACK MENU], [EDIT], [ERASE], or [SETUP] is selected, the menu corresponding to the respective functions is displayed. • When your camera is set, following the shooting guide displayed, with the mode dial - Olympus Stylus 1200 Black | Stylus 1200 Instruction Manual (English) - Page 20
display. Press 12 to change the page. To select an item or function, press 3 or e. EXIT MENU SET OK CAMERA MENU 1 WB AUTO 2 ISO DRIVE AUTO o FINE ZOOM OFF DIGITAL ZOOM OFF BACK MENU SET OK Page display: The page display mark is displayed when there are additional menu items on the next - Olympus Stylus 1200 Black | Stylus 1200 Instruction Manual (English) - Page 21
CAMERA FINE ZOOM DIS MOVIE MODE* RESET MENU SETUP DIGITAL ZOOM 3 PANORAMA SILENT MODE 6 * This is displayed only when the movie is selected. EXIT MENU SET SQ1 SQ2 3264 × 2448 2560 × 1920 2304 × 1728 2048 × 1536 1600 × 1200 1280 × 960 1024 × 768 640 × 480 16:9 1920 × 1080 Standard • This - Olympus Stylus 1200 Black | Stylus 1200 Instruction Manual (English) - Page 22
shoots and combines pictures in the camera. Manually shoots and automatically combines pictures in the camera. Manually shoots pictures that are to be combined on a PC. • An Olympus xD-Picture Card is required for shooting. • When the card capacity is insufficient, this function cannot - Olympus Stylus 1200 Black | Stylus 1200 Instruction Manual (English) - Page 23
. To combine only two pictures, press e before shooting the third picture. [COMBINE IN CAMERA 2] Take pictures manually for a panoramic picture and combine the pictures for a single panoramic picture using your camera. Only combined pictures are saved. 1st 2nd 3rd EXIT OK EXIT OK EXIT OK - Olympus Stylus 1200 Black | Stylus 1200 Instruction Manual (English) - Page 24
] Create a panoramic picture using the OLYMPUS Master software from the provided CD-ROM. Connects COMBINE IN CAMERA2] mode, [IMAGE QUALITY] cannot be changed. • In [COMBINE IN CAMERA1] mode, camera settings are automatically optimized for this mode. In [COMBINE IN CAMERA2] or [COMBINE IN PC] mode, - Olympus Stylus 1200 Black | Stylus 1200 Instruction Manual (English) - Page 25
to be erased. [S SMILE SHOT] When the camera detects a smiling face in shooting standby mode, 3 mode automatically. You can also shoot pictures manually by pressing the shutter button in this which may give it a grainy appearance. • When [DRIVE] is set to [W], [ISO] is fixed at [AUTO]. • When [3200 - Olympus Stylus 1200 Black | Stylus 1200 Instruction Manual (English) - Page 26
image quality setting. You can take a sequence of pictures at one time by holding down the shutter button. The camera will take is limited to [2048 × 1536] or lower. • [FINE ZOOM], [DIGITAL ZOOM], and [R] cannot be set. FINE ZOOM Zooming in on your subject without reducing image quality OFF /ON - Olympus Stylus 1200 Black | Stylus 1200 Instruction Manual (English) - Page 27
you want to record. DIS MOVIE MODE Shooting in digital image stabilization movie mode OFF /ON Recording movies with digital image stabilization. • When set to [ON], images will appear slightly magnified. • Images may not be correctable if the camera is severely shaken or the subject's motion is - Olympus Stylus 1200 Black | Stylus 1200 Instruction Manual (English) - Page 28
MENU 0 y*2 R*2 *1 A card is required. *2 This is not displayed when a movie is selected. 5 EDIT INDEX EDIT 2 MOVIE PLAY EDIT PRINT ORDER PERFECT PLAYBACK FIX MENU SETUP g "SETUP menus" (P. 34) "SILENT MODE Turning ADD FAVORITE ERASE EXIT MENU SILENT MODE SET OK off camera sounds" (P. 27 - Olympus Stylus 1200 Black | Stylus 1200 Instruction Manual (English) - Page 29
to edit, and press e. Correcting pictures PERFECT FIX [IN] ALL DIS EDIT LIGHTING FIX REDEYE FIX BACK MENU SET OK ALL DIS EDIT LIGHTING FIX REDEYE FIX Digital image stabilization edit, lighting fix and redeye fix are activated together. Retouches unanticipated blurry images. The underexposed - Olympus Stylus 1200 Black | Stylus 1200 Instruction Manual (English) - Page 30
BACK MENU SET OK • Registered pictures cannot be erased even by formatting the internal memory. • A card, transferred to a computer, or played back on a computer. 5 EDIT Q ...Changing the size of pictures 640 × 480 /320 × 240 This changes the image size of a picture and saves it as a new file - Olympus Stylus 1200 Black | Stylus 1200 Instruction Manual (English) - Page 31
calendar format, integrate the calendar with a picture, and save it as a new file. CALENDAR • Select the picture with 43, and press e. • Select the SET OK LAYOUT Arranging and integrating multiple pictures ALL IMAGES CALENDAR SEL. IMAGE Arranges and integrates all pictures saved in the card - Olympus Stylus 1200 Black | Stylus 1200 Instruction Manual (English) - Page 32
and press e. • There may be cases in which the camera cannot detect a face. FACE FOCUS Highlighting a face in SET OK EDIT ...Cutting a part of the movie Select a part of the movie you wish to save, overwrite the original file with it, or save it as a new file. 00:00 / 00:36 • Select [NEW FILE - Olympus Stylus 1200 Black | Stylus 1200 Instruction Manual (English) - Page 33
succession. R...Adding sound to still pictures YES /NO R [IN] BACK MENU YES NO SET OK Sound is recorded for about 4 seconds. • Select a picture with 43, and use internal memory, do not insert the card into the camera. • When erasing the picture from the card, insert a card into the camera in - Olympus Stylus 1200 Black | Stylus 1200 Instruction Manual (English) - Page 34
MENU SILENT MODE SET OK * A card is required. SETUP MEMORY FORMAT (FORMAT*) BACKUP* W PW ON SETUP MENU THEME BEEP 8 SHUTTER SOUND VOLUME REC VIEW FILE NAME PIXEL MAPPING s X DUALTIME ALARM CLOCK VIDEO OUT POWER SAVE MEMORY FORMAT (FORMAT Formatting the internal memory or card All existing data - Olympus Stylus 1200 Black | Stylus 1200 Instruction Manual (English) - Page 35
languages to your camera with the provided OLYMPUS Master software. PW ON SETUP Setting the startup screen and volume SCREEN OFF (No picture is displayed.) / 1 / 2 /MY FAVORITE VOLUME OFF (No sound) / LOW / HIGH • Select [2] and press 3 to set a still picture in the internal memory or card as the - Olympus Stylus 1200 Black | Stylus 1200 Instruction Manual (English) - Page 36
multiple cards. File names and their folder names for recorded pictures are automatically generated by the camera. File names and folder names respectively include file numbers (0001 to 9999) and folder names (100 to 999), and are named as follows. Folder name File name \DCIM\***OLYMP\Pmdd - Olympus Stylus 1200 Black | Stylus 1200 Instruction Manual (English) - Page 37
the time. Pictures are recorded with the date and time set in [DUALTIME]. D U A LT I M E Y M D TIME 12 m: Cancels the setting. CANCEL MENU • The date format is the same as that set with [X]. • The first two digits of the year are fixed. • The time is displayed in the 24-hour format . ALARM CLOCK - Olympus Stylus 1200 Black | Stylus 1200 Instruction Manual (English) - Page 38
) terminals. Menu operations AV cable (provided) Settings on the camera Press o in playback mode to turn the camera on. • The last picture instruction manual. • Images and the information displayed on the screen may become cropped depending on the TV's settings. POWER SAVE Setting the camera - Olympus Stylus 1200 Black | Stylus 1200 Instruction Manual (English) - Page 39
according to these settings. Refer to the printer's instruction manual for its standard settings or contact the printer manufacturer. 1 In playback mode, display the picture you want to print out on the monitor. 2 Turn the printer on and plug the USB cable provided with the camera into the multi - Olympus Stylus 1200 Black | Stylus 1200 Instruction Manual (English) - Page 40
or in shooting mode. With the camera turned off or in shooting mode, connect the USB cable. The selection screen for the USB connection is displayed. Select [EASY PRINT]. g "EASY PRINT" Step 3 (P. 40), "CUSTOM PRINT" Step 2 (P. 40) Other print modes and print settings (CUSTOM PRINT) 1 Follow Steps - Olympus Stylus 1200 Black | Stylus 1200 Instruction Manual (English) - Page 41
can also use the zoom button and select a picture from the index display. Setting the number of prints and data to be printed PRINT INFO < x DATE FILE NAME P [IN] 1 WITHOUT WITHOUT BACK MENU SET OK - Olympus Stylus 1200 Black | Stylus 1200 Instruction Manual (English) - Page 42
DPOFcompatible printer or at a photo store that supports DPOF. DPOF is a standard format used to record automatic print information from digital cameras. Only the images stored on the card can be reserved to print. Insert a card with recorded pictures into the camera before making print reservations - Olympus Stylus 1200 Black | Stylus 1200 Instruction Manual (English) - Page 43
use print services without using DPOF • Pictures stored in the internal memory cannot be printed at a photo store. The pictures need to be copied to a card beforehand. g"BACKUP Copying pictures in the internal memory to the card" (P. 34) Single-frame reservation Follow the operation guide to make - Olympus Stylus 1200 Black | Stylus 1200 Instruction Manual (English) - Page 44
frame reservation Reserves all the pictures stored on the card. The number of prints is set at one print per picture. 1 Press m in the playback mode and display the top menu. 2 Select [PRINT ORDER] [U], and press e. 3 Select the date and time setting, and press e. NO The pictures are printed without - Olympus Stylus 1200 Black | Stylus 1200 Instruction Manual (English) - Page 45
before starting. Install the OLYMPUS Master software gP. 46 OLYMPUS Master 2 USB cable CD-ROM Connect the camera to the computer using the gP. 48 USB cable Start up the OLYMPUS Master software gP. 49 Computer that meets the operating environment (P. 46) Download image files to the computer gP - Olympus Stylus 1200 Black | Stylus 1200 Instruction Manual (English) - Page 46
not guaranteed when using an added USB port or IEEE 1394 port. • To install the software, you must log on as a user with administrators' privileges. Macintosh OS the cable connecting the camera to the computer • Turn off the camera • Open the camera's battery/card compartment cover 46 EN - Olympus Stylus 1200 Black | Stylus 1200 Instruction Manual (English) - Page 47
". 3 Click "Next" and follow the on-screen instructions. • When the OLYMPUS Master licensing agreement is displayed, read the agreement and click "Yes" to proceed with the installation. 4 When the user information screen is displayed, enter your "Name", select your "Region" and click "Next". 5 When - Olympus Stylus 1200 Black | Stylus 1200 Instruction Manual (English) - Page 48
using OLYMPUS Master. Connecting the camera to a computer 1 Make sure the camera is turned off. • The monitor is off. • The lens is retracted. 2 Connect the multi-connector on the camera to the USB port on the computer using the provided USB cable. • Refer to your computer's instruction manual to - Olympus Stylus 1200 Black | Stylus 1200 Instruction Manual (English) - Page 49
, the OLYMPUS Master initial setting screen and user registration screen are displayed before the browse window. Follow the on-screen instructions. To exit OLYMPUS Master 1 Click "Exit" on any window. • OLYMPUS Master is exited. Displaying camera images on a computer Downloading and saving - Olympus Stylus 1200 Black | Stylus 1200 Instruction Manual (English) - Page 50
4 Click "Browse images now". • The downloaded images are displayed in the browse window. To disconnect the camera 1 Make sure that the card access lamp has stopped blinking. Card access lamp 2 Make the following preparations for disconnecting the USB cable. Windows 1 Click the "Unplug or Eject - Olympus Stylus 1200 Black | Stylus 1200 Instruction Manual (English) - Page 51
the bottom of the screen. Using OLYMPUS Master To download and save images to a computer without using OLYMPUS Master This camera is compatible with USB mass storage. You can connect the camera to your computer using the USB cable provided with the camera to download and save images without using - Olympus Stylus 1200 Black | Stylus 1200 Instruction Manual (English) - Page 52
Using OLYMPUS Master To increase the number of languages Please take care that your battery is fully charged! 1 Make sure that your computer is connected to the Internet. 2 Plug the USB cable into the USB port on the computer. 3 Plug the other end of the USB cable into the camera's USB connector. • - Olympus Stylus 1200 Black | Stylus 1200 Instruction Manual (English) - Page 53
the battery with the charger. The battery is temporarily unable to function because of the cold • Battery performance declines in low temperatures, and the charge may not be sufficient to turn on the camera. Remove the battery and warm it by putting it in your pocket for a while. The card cannot - Olympus Stylus 1200 Black | Stylus 1200 Instruction Manual (English) - Page 54
• No date and time have been set for the camera at the time of purchase. Set the date and time before using the camera. g "Turn the camera on" (P. 6) "X Setting the date and time" (P. 36) The battery has been pulled out of the camera • The date and time settings will be returned to the factory - Olympus Stylus 1200 Black | Stylus 1200 Instruction Manual (English) - Page 55
with both hands and press the shutter button slowly so as to avoid moving the camera. You can also reduce blur by setting the mode dial to h before shooting the picture. g "h Shooting pictures using digital image stabilization" (P. 12) Pictures are more likely to be blurry when: • images are shot at - Olympus Stylus 1200 Black | Stylus 1200 Instruction Manual (English) - Page 56
" (P. 17) • With [ESP/n] set to [n], the picture can be taken memory. Using a card (optional) • Pictures are recorded to the card when inserted in the camera. When the card is full, you can download the pictures to a computer, and then either erase the pictures from the card or use a new card - Olympus Stylus 1200 Black | Stylus 1200 Instruction Manual (English) - Page 57
min. 9 min. 28 sec. 29 min. Using a new card • When using a non-Olympus card or a card used for other purposes with a computer, etc., use the [FORMAT] function to format the card. g "MEMORY FORMAT (FORMAT) Formatting the internal memory or card" (P. 34) Getting to know your camera better EN 57 - Olympus Stylus 1200 Black | Stylus 1200 Instruction Manual (English) - Page 58
movie is being recorded or downloaded (when connected to a computer). • Do not do any of the following while the card access lamp is blinking. Doing so may prevent the image data from being saved and render the internal memory or card unusable. • Open the battery/card compartment cover. • Remove the - Olympus Stylus 1200 Black | Stylus 1200 Instruction Manual (English) - Page 59
• Set the image will appear mostly black. 2 If the guide/Checking the time" (P. 18) Playback help and troubleshooting memory capacity or the card capacity is insufficient. • the image was extracted from a movie, the image was shot with another camera, or the image was already fixed with Digital - Olympus Stylus 1200 Black | Stylus 1200 Instruction Manual (English) - Page 60
browsing software • Install the OLYMPUS Master 2 software from the provided CD-ROM. Change the monitor setting • The icons on the computer desktop may be rearranged. For details on changing the settings on your computer, refer to the computer's instruction manual. Getting to know your camera better - Olympus Stylus 1200 Black | Stylus 1200 Instruction Manual (English) - Page 61
] and press e. All data on the card is erased. MEMORY SETUP [IN] POWER OFF MEMORY FORMAT SET OK There is an error in the internal memory. Select [MEMORY FORMAT] [YES] and press e. All data in the internal memory is erased. NO CONNECTION NO PAPER The camera is not connected to the computer or - Olympus Stylus 1200 Black | Stylus 1200 Instruction Manual (English) - Page 62
modes and scene modes Some functions cannot be set in certain shooting modes. For more details - - - - 9 P. 27 SILENT MODE 9 9 9 9 9 P. 27 * The optical zoom is not available during movie recording. Set [DIGITAL ZOOM] to [ON] to enable the zoom function for shooting. Getting to know your - Olympus Stylus 1200 Black | Stylus 1200 Instruction Manual (English) - Page 63
9 9*4 P. 21 PANORAMA 9*6 9*6 9*6 9*6 9*6 9*6 9*6 9*6 9*6 - - - - P. 22 FINE ZOOM 9 9 9 - - 9 9 9 9 9 - 9 - P. 26 DIGITAL ZOOM 9 9 9 - - 9 9 9 9 9 - 9 - P. 26 ESP/n 9 9 9 9 - 9 9 9 9 9 9 9 - P. 26 AF MODE 9 9 9 [640 × 480]. *6 [COMBINE IN CAMERA 1] is not available. Getting to know your - Olympus Stylus 1200 Black | Stylus 1200 Instruction Manual (English) - Page 64
and card, and keep in a cool, dry place that is well ventilated. • Periodically insert the battery and test the camera functions. Note • Avoid leaving the camera in places where chemical products are handled since this may result in corrosion. Battery and charger ( This camera uses one Olympus - Olympus Stylus 1200 Black | Stylus 1200 Instruction Manual (English) - Page 65
Representative plug of power supply cord of countries/regions around the world A Type B Type BF Type B3 Type C Type SE Type O Type (American Type) (British Type) (British Type) (British Type) (CEE Type) (CEE Type) (Oceania Type) The representative supply voltage and plug type are described - Olympus Stylus 1200 Black | Stylus 1200 Instruction Manual (English) - Page 66
Use of the accessories The card Pictures can be recorded on the optional card. The internal memory and card are the camera's media for recording pictures, similar to film in a film camera. Pictures recorded to the internal memory or card can be easily erased on the camera or processed using a - Olympus Stylus 1200 Black | Stylus 1200 Instruction Manual (English) - Page 67
cover or connector cover are not firmly closed. Battery/Card Compartment Cover Appendix Connector Cover ( Do not open or close the battery/card compartment cover or connector cover while the camera is wet. ( The rechargeable battery and other camera accessories are not weatherproof. EN 67 - Olympus Stylus 1200 Black | Stylus 1200 Instruction Manual (English) - Page 68
USER-SERVICEABLE PARTS INSIDE. REFER SERVICING TO QUALIFIED OLYMPUS SERVICE PERSONNEL. DANGER WARNING CAUTION An exclamation mark enclosed in a triangle alerts you to important operating and maintenance instructions the product, use only accessories recommended by Olympus. Water and Moisture - - Olympus Stylus 1200 Black | Stylus 1200 Instruction Manual (English) - Page 69
electrical shocks or burns. DANGER • The camera uses a lithium ion battery specified by Olympus. Charge the battery with the specified charger. Do not use any other chargers. • Never heat or incinerate batteries. • Take precautions when carrying or storing batteries to prevent them from coming into - Olympus Stylus 1200 Black | Stylus 1200 Instruction Manual (English) - Page 70
batteries recommended for use with this product. • Insert the battery carefully as described in the operating instructions. • If rechargeable batteries remove it immediately after using the camera. • Always unload the battery from the camera before storing the camera for a long period. Caution for - Olympus Stylus 1200 Black | Stylus 1200 Instruction Manual (English) - Page 71
battery specified by Olympus. Do not use any other type of battery. For safe and proper use, read the battery's instruction manual carefully before using it. • If the battery's terminals get wet or greasy, camera contact failure may result. Wipe the battery technology. However, black spots or bright - Olympus Stylus 1200 Black | Stylus 1200 Instruction Manual (English) - Page 72
camera to USB enabled personal computers (PC). Any unauthorized changes or modifications to this equipment would void the user's authority to operate. For customers in North and South America For customers in USA Declaration of Conformity Model Number : Stylus 1200/µ 1200 Trade Name : OLYMPUS - Olympus Stylus 1200 Black | Stylus 1200 Instruction Manual (English) - Page 73
of Apple Inc. • xD-Picture Card™ is a trademark. • All other company and product names are registered trademarks and/or trademarks of their respective owners. • The standards for camera file systems referred to in this manual are the "Design Rule for Camera File System/DCF" standards stipulated by - Olympus Stylus 1200 Black | Stylus 1200 Instruction Manual (English) - Page 74
Camera File system (DCF)) : Exif 2.2, Digital Print Order Format (DPOF), PRINT Image Matching III, PictBridge : Wave format : AVI Motion JPEG : Internal memory xD-Picture Card 16 MB to 2 GB (Type H/M, Standard) : 12,000,000 pixels : 1/1.72" CCD (primary color filter), 12,400,000 (gross) : Olympus - Olympus Stylus 1200 Black | Stylus 1200 Instruction Manual (English) - Page 75
6 mm (1.2 × 1.5 × 0.2 in.) : Approx. 15 g (0.5 oz) (Battery charger (LI-40C) Power requirements Output Charging time Operating environment Temperature Dimensions Weight : AC 100 × 0.9 × 3.5 in.) : Approx. 65 g (2.2 oz) Design and specifications subject to change without notice. Appendix EN 75 - Olympus Stylus 1200 Black | Stylus 1200 Instruction Manual (English) - Page 76
CAMERA DIAGRAM Camera Multi-Connector (P. 38, 39, 48) Self-Timer Lamp (P. 16, 58) Shutter Button (P. 9, 11) o Button (P. 6, 11) Microphone (P. 27) Flash (P. 16) Connector Cover Strap Eyelet (P. 38, 39, 48) (P. 3) Monitor (P. 36, 77) Card Socket Speaker Battery/Card Compartment Cover (P. 4) - Olympus Stylus 1200 Black | Stylus 1200 Instruction Manual (English) - Page 77
D, G, etc. 2 Battery check 3 Green lamp e = full power, f = low power { = Auto Focus Lock 4 Flash standby # (Lit) Camera movement warning/ # (Blinks 20 Flash mode [IN] (Recording pictures to the internal memory), [xD] (Recording pictures to the card) R l k !, #, $ 21 Exposure compensation -2.0 - Olympus Stylus 1200 Black | Stylus 1200 Instruction Manual (English) - Page 78
00 00:36 6 4 5 6 Still picture Movie Item 1 Battery check 2 Silent mode Indication e = full power, f = frames Elapsed time/ Total recording time 7 File number 4 00:00/00:36 M100 Current memory [IN] (Playing back the picture in the internal memory), [xD] (Playing back the picture in the card) - Olympus Stylus 1200 Black | Stylus 1200 Instruction Manual (English) - Page 79
cable 3, 38 B BACKUP 34 Battery 4, 64 Battery charger 3, 4, 64, 67 Battery check 77 Battery/card compartment cover 4 BEEP 35 BGM 28 C CALENDAR 31 Calendar display 15 CAMERA MENU 21, 25 Card 22, 34, 66 Card F FACE DETECT (AF MODE 27 FILE NAME 36, 41 File name 36 Fill-in flash 16 FINE - Olympus Stylus 1200 Black | Stylus 1200 Instruction Manual (English) - Page 80
ion battery 3, 4, 64 Low compression 21 M Macro mode 11, 16 MEMORY FORMAT 34 Memory gauge 53 Menu 19 m button (MENU 14 Menu guide 25 Turn the camera on 6 TYPE 28 U USB cable 3, 39, 45, 48, 50 V VIDEO OUT 38 VOLUME 35 W Warning sound 8 35 White balance WB 25 X xD-Picture Card 22, 66 - Olympus Stylus 1200 Black | Stylus 1200 Instruction Manual (English) - Page 81
EN 81 - Olympus Stylus 1200 Black | Stylus 1200 Instruction Manual (English) - Page 82
82 EN - Olympus Stylus 1200 Black | Stylus 1200 Instruction Manual (English) - Page 83
EN 83 - Olympus Stylus 1200 Black | Stylus 1200 Instruction Manual (English) - Page 84
Printed in Japan 1AG6P1P3699-- VS182201
-
 1
1 -
 2
2 -
 3
3 -
 4
4 -
 5
5 -
 6
6 -
 7
7 -
8
-
9
-
10
-
11
-
12
-
13
-
14
-
15
-
16
-
17
-
18
-
19
-
20
-
21
-
22
-
23
-
24
-
25
-
26
-
27
-
28
-
29
-
30
-
31
-
32
-
33
-
34
-
35
-
36
-
37
-
38
-
39
-
40
-
41
-
42
-
43
-
44
-
45
-
46
-
47
-
48
-
49
-
50
-
51
-
52
-
53
-
54
-
55
-
56
-
57
-
58
-
59
-
60
-
61
-
62
-
63
-
64
-
65
-
66
-
67
-
68
-
69
-
70
-
71
-
72
-
73
-
74
-
75
-
76
-
77
-
78
-
79
-
80
-
81
-
82
-
83
-
84
 |
 |

DIGITAL CAMERA
Instruction
Manual
Getting to know your
camera better
Quick Start Guide
Get started using your
camera right away.
Button operations
Menu operations
Printing pictures
Using OLYMPUS Master
(
Thank you for purchasing an Olympus digital camera. Before you start to use your new camera, please
read these instructions carefully to enjoy optimum performance and a longer service life. Keep this manual
in a safe place for future reference.
(
We recommend that you take test shots to get accustomed to your camera before taking important
photographs.
(
In the interest of continually improving products, Olympus reserves the right to update or modify
information contained in this manual.
(
The screen and camera illustrations shown in this manual were produced during the development stages
and may differ from the actual product.
Appendix