Olympus Stylus 1200 Black Stylus 1200 Instruction Manual (English) - Page 31
Adding frames to pictures, Add a label to your picture, Create a calendar print with a picture,
 |
UPC - 050332161405
View all Olympus Stylus 1200 Black manuals
Add to My Manuals
Save this manual to your list of manuals |
Page 31 highlights
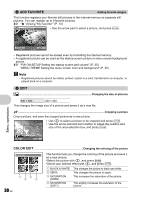
FRAME Adding frames to pictures This function lets you select a frame, integrate the frame with an image, and save it as a new picture. FRAME • Select a frame with 43 and press e. • Select the picture to be integrated with the frame with 43, and press e. (Press 12 to turn the picture 90 degrees clockwise or 90 degrees counterclockwise.) O W T MOVE • Press the arrow pad and the zoom button to adjust the position and size of the picture, and press e. SET OK LABEL Add a label to your picture This function lets you select a label, integrate the label with an image, and save it as a new picture. LABEL • Select the picture with 43, and press e. • Select the label with 43, and press e. (Press 12 to turn the label 90 degrees clockwise or 90 degrees counterclockwise.) SET OK • Press the arrow pad and the zoom button to adjust the position and size of the label, and press e. • Set the color of the label with the arrow pad, and press e. CALENDAR Create a calendar print with a picture This function lets you select a calendar format, integrate the calendar with a picture, and save it as a new file. CALENDAR • Select the picture with 43, and press e. • Select the calendar with 43, and press e. (Press 12 to turn the picture 90 degrees clockwise or 90 degrees counterclockwise.) • Set the date of the calendar, and press e. SET OK LAYOUT Arranging and integrating multiple pictures ALL IMAGES CALENDAR SEL. IMAGE Arranges and integrates all pictures saved in the card. Selects pictures stored on a day from the calendar displayed to arrange and integrate. Selects pictures individually to arrange and integrate. L AY O U T ALL IMAGES CALENDAR SEL. IMAGE • Use 43 to select a layout pattern and press e. • Select the image selection method and press e. • Select the picture and press e. (When [SEL. IMAGE] is selected, press 12 to turn the picture 90 degrees clockwise or 90 degrees counterclockwise.) BACK MENU SET OK Menu operations EN 31
-
 1
1 -
2
-
3
-
4
-
5
-
6
-
7
-
8
-
9
-
10
-
11
-
12
-
13
-
14
-
15
-
16
-
17
-
18
-
19
-
20
-
21
-
22
-
23
-
24
-
25
-
 26
26 -
 27
27 -
 28
28 -
 29
29 -
 30
30 -
 31
31 -
 32
32 -
 33
33 -
 34
34 -
 35
35 -
 36
36 -
37
-
38
-
39
-
40
-
41
-
42
-
43
-
44
-
45
-
46
-
47
-
48
-
49
-
50
-
51
-
52
-
53
-
54
-
55
-
56
-
57
-
58
-
59
-
60
-
61
-
62
-
63
-
64
-
65
-
66
-
67
-
68
-
69
-
70
-
71
-
72
-
73
-
74
-
75
-
76
-
77
-
78
-
79
-
80
-
81
-
82
-
83
-
84
 |
 |
