Olympus Stylus Stylus 750 Instruction Manual (English) - Page 19
Scene, CAMERA MENU
 |
UPC - 050332158542
View all Olympus Stylus manuals
Add to My Manuals
Save this manual to your list of manuals |
Page 19 highlights
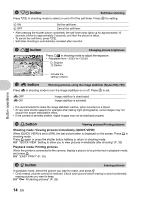
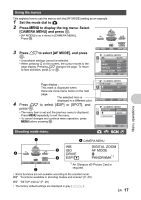
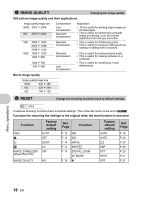
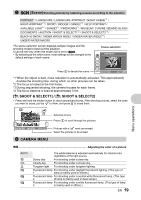
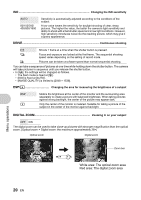
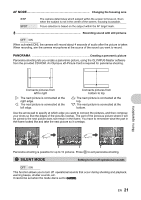
3 s (Scene)Shooting pictures by selecting a scene according to the situation PORTRAIT / LANDSCAPE / LANDSCAPE+PORTRAIT / NIGHT SCENE*1 / NIGHT+P0RTRAIT*1 / SPORT / INDOOR / CANDLE*1 / SELF PORTRAIT / AVAILABLE LIGHT*1 / SUNSET*1 / FIREWORKS*1 / MUSEUM / CUISINE / BEHIND GLASS / DOCUMENTS / AUCTION / SHOOT & SELECT1*2 / SHOOT & SELECT2*3 / BEACH & SNOW / UNDER WATER WIDE1 / UNDER WATER WIDE2*4 / UNDER WATER MACRO The scene selection screen displays sample images and the shooting mode to best suit the situation. It can be set only when the mode dial is set to s. • By switching to the other scene, most settings will be changed to the default settings of each scene. Press o to decide the scene. Scene selection 1 PORTRAIT B F D G U BACK MENU SET OK *1 When the object is dark, noise reduction is automatically activated. This approximately doubles the shooting time, during which no other pictures can be taken. *2 The focus is locked at the first frame. *3 During sequential shooting, the camera focuses for each frame. *4 The focus distance is fixed at approximately 5.0m. [e SHOOT & SELECT1] / [f SHOOT & SELECT2] • Press and hold the shutter button to shoot sequential pictures. After shooting pictures, select the ones you want to erase, put the R to them, and press S to erase them. e Selected picture Press 43 to scroll through the pictures. BACK MENU OK GO S Pictures with a R mark are erased. Select the pictures to be erased. 4 CAMERA MENU Menu operations WB Adjusting the color of a picture AUTO 5 3 1 w x y The white balance is adjusted automatically for natural color, regardless of the light source. Sunny day For shooting under a clear sky. Cloudy day For shooting under a cloudy sky. Tungsten light For shooting under tungsten lighting. Fluorescent lamp For shooting under daylight fluorescent lighting. (This type of 1 lamp is mainly used in homes.) Fluorescent lamp For shooting under a neutral white fluorescent lamp. (This type 2 of lamp is mainly used in desk lamps.) Fluorescent lamp For shooting under a white fluorescent lamp. (This type of lamp 3 is mainly used in offices.) EN 19
-
 1
1 -
2
-
3
-
4
-
5
-
6
-
7
-
8
-
9
-
10
-
11
-
12
-
13
-
 14
14 -
 15
15 -
 16
16 -
 17
17 -
 18
18 -
 19
19 -
 20
20 -
 21
21 -
 22
22 -
 23
23 -
 24
24 -
25
-
26
-
27
-
28
-
29
-
30
-
31
-
32
-
33
-
34
-
35
-
36
-
37
-
38
-
39
-
40
-
41
-
42
-
43
-
44
-
45
-
46
-
47
-
48
-
49
-
50
-
51
-
52
-
53
-
54
-
55
-
56
-
57
-
58
-
59
-
60
-
61
-
62
-
63
-
64
-
65
-
66
-
67
-
68
-
69
-
70
-
71
-
72
-
73
-
74
-
75
-
76
-
77
-
78
-
79
-
80
 |
 |
