Onkyo A-9755 Owner Manual
Onkyo A-9755 Manual
 |
View all Onkyo A-9755 manuals
Add to My Manuals
Save this manual to your list of manuals |
Onkyo A-9755 manual content summary:
- Onkyo A-9755 | Owner Manual - Page 1
connections and plugging in the unit. Following the instructions in this manual will enable you to obtain optimum performance and listening enjoyment from your new Integrated Amplifier. Please retain this manual for future reference. Troubleshooting 18 Specifications ...... Back cover page En - Onkyo A-9755 | Owner Manual - Page 2
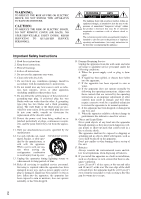
. Install in accordance with the manufacturer's instructions. 8. Do not install near any heat into your outlet, consult an electrician for replacement of the obsolete outlet. 10. Protect the exhibits a distinct change in performance this indicates a need for service. 16. Object and Liquid - Onkyo A-9755 | Owner Manual - Page 3
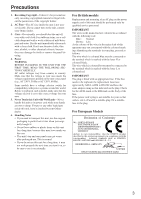
fit a suitable plug. Fit a suitable fuse in the plug. For European Models Declaration of Conformity We, ONKYO EUROPE ELECTRONICS GmbH LIEGNITZERSTRASSE 6, 82194 GROEBENZELL, GERMANY declare in own responsibility, that the ONKYO product described in this instruction manual is in compliance with the - Onkyo A-9755 | Owner Manual - Page 4
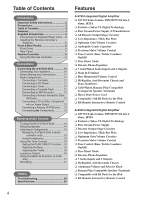
Recording 17 Others Troubleshooting 18 Specifications 20 Features A-9755 Integrated Digital Amplifier ❑ 150 W/Ch into 8 ohms, DIN/300 W/Ch into 4 ohms, JEITA ❑ Exclusive Onkyo VL Digital Technology ❑ Pure Stream Power Supply (2 Transformers) ❑ All Discrete Output Stage Circuitry ❑ Low-Impedance - Onkyo A-9755 | Owner Manual - Page 5
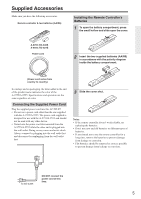
9555 while the other end is plugged into the wall outlet. Doing so may cause an electric shock. Always connect by plugging into the wall outlet last and disconnect by unplugging from the wall outlet first. 3 Slide the cover shut. Notes: • If the remote controller doesn't work reliably, try replacing - Onkyo A-9755 | Owner Manual - Page 6
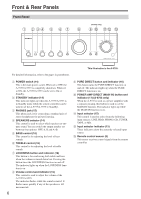
9555 is in Standby mode (Only the remote controller can be used to set the A-9755/A-9555 to Standby). C PHONES jack (15) This phone jack is for connecting a standard pair of stereo headphones is on. J POWER AMP DIRECT (MAIN IN) Remote control sensor (9) This sensor receives control signals from the - Onkyo A-9755 | Owner Manual - Page 7
is for connecting a turntable's ground wire. B PHONO (MM) input This analog audio input is for connecting a turntable with a moving-magnet REMOTE CONTROL jacks These (Remote Interactive) jacks can be con- nected to the jacks on your other Onkyo audio components. The A-9755/A-9555's remote - Onkyo A-9755 | Owner Manual - Page 8
Onkyo products connected to the A-9755/A-9555 via connection. Note also that some of the connected products may not be controlled with these buttons. For detailed information, refer to the relevant manuals provided for the individual products. A STANDBY . See the instruction manual supplied with each - Onkyo A-9755 | Owner Manual - Page 9
the option on the HDD component menu. Using the Remote Controller Point the remote controller toward the remote control sensor. Remote control sensor About 5 m (16 feet) Notes: • The remote controller may not work reliably if the A-9755/A-9555 is subjected to bright light, such as direct sunlight - Onkyo A-9755 | Owner Manual - Page 10
ohms. If you use speakers with a lower impedance, and use the A-9755/A-9555 at high volume levels for a long period of time, the built-in protection from the wall outlet before making any connections. • Read the instructions supplied with your speakers. • Pay close attention to speaker wiring - Onkyo A-9755 | Owner Manual - Page 11
9555-Continued Before Making any Connections • Always refer to the instructions from the tuner's antenna. RCA Audio Connection Color Coding • Red connectors are used for the right channel Right! Wrong! Audio Components Connecting a Turntable The A-9755/A-9555's PHONO input jacks are for use with - Onkyo A-9755 | Owner Manual - Page 12
output jacks, and use another analog audio cable to connect the A-9755/A-9555's TAPE OUT L/R jacks to the cassette deck's analog audio input jacks, as shown. Remote Interactive Dock R ---- L AUDIO OUT Note: If you use the Onkyo Remote Interactive Dock (DSA1), flip the RI MODE switch to "HDD" which - Onkyo A-9755 | Owner Manual - Page 13
components. Connecting them to another manufacturer's component may cause the A-9755/A-9555 to malfunction. • Some components may not support all functions. See the manuals supplied with your other Onkyo components for more information. • When using the A-9755 as a power amplifier (MAIN IN function - Onkyo A-9755 | Owner Manual - Page 14
A-9755/A-9555 switches to Standby mode. You will then be able to turn on the A-9755/A-9555 and all system components with just one press of the remote controller's [ON] button. If you want to restore the setting to the original state, reset the A-9755/A-9555. For information about how to reset, see - Onkyo A-9755 | Owner Manual - Page 15
be cancelled if the remote controller's VOLUME buttons are pressed or the A-9755/A-9555 is set to Standby. • When using the A-9755 as a power amplifier (MAIN IN function), the Muting function is disabled. Using Headphones You can connect a pair of stereo headphones (1/4-inch phone plug) to the A-9755 - Onkyo A-9755 | Owner Manual - Page 16
Enjoying Audio Sources-Continued Using the Tone Controls While the MAIN IN function is on, the A-9755's tone controls have no effect. PURE DIRECT TREBLE BASS Setting the PURE DIRECT Function The [PURE DIRECT] button turns the PURE DIRECT function on and off. When the PURE DIRECT function is off, - Onkyo A-9755 | Owner Manual - Page 17
To turn the MAIN IN function off, press the [POWER AMP DIRECT (MAIN IN)] button for 3 seconds until the MAIN and muting. The [STANDBY] and [ON] buttons on the remote controller will work even when level on the recorder. • See the recorder's manual for more information. 3 Start playback on the - Onkyo A-9755 | Owner Manual - Page 18
Troubleshooting If you have any trouble using the A-9755/A-9555, look for a solution here. If you can't resolve the issue yourself, contact your Onkyo dealer. Power Can't turn on the A-9755/A-9555. • Make sure that the power cord is properly plugged into the wall outlet. (page 5) • Unplug the - Onkyo A-9755 | Owner Manual - Page 19
again. Onkyo is reset: To reset the A-9755/A-9555 9555 enters On mode. A-9755/A-9555 BLOCK DIAGRAM PHONO CD TUNER IN TAPE OUT IN MD OUT HDD IN LINE HEADPHONE SELECTOR VOLUME ON OFF BASS, TREBLE PURE DIRECT ON OFF BASS, TREBLE MAIN IN ON OFF DIGITAL AMPLIFIER L-ch LOW PASS FILTER POWER AMP - Onkyo A-9755 | Owner Manual - Page 20
outputs: Speaker outputs: Phones: PHONO, CD, TUNER cations and features are subject to change without notice. A-9555 100 W + 100 W (8 Ω, 1 kHz, Sales & Product Planning Div. : 2-1, Nisshin-cho, Neyagawa-shi, OSAKA 572-8540, JAPAN Tel: 072-831-8023 Fax: 072-831-8124 ONKYO onkyo.com/ ONKYO EUROPE UK
-
 1
1 -
 2
2 -
 3
3 -
 4
4 -
 5
5 -
 6
6 -
 7
7 -
8
-
9
-
10
-
11
-
12
-
13
-
14
-
15
-
16
-
17
-
18
-
19
-
20
 |
 |

E
n
Integrated Amplifier
A-9755/A-9555
Instruction Manual
Thank you for purchasing an Onkyo Integrated Ampli-
fier. Please read this manual thoroughly before making
connections and plugging in the unit.
Following the instructions in this manual will enable
you to obtain optimum performance and listening
enjoyment from your new Integrated Amplifier.
Please retain this manual for future reference.
Contents
Introduction
....................................
2
Connections
.................................
10
Enjoying Audio Sources
..............
14
Troubleshooting
...........................
18
Specifications
......
Back cover page