Onkyo HT-SP904 Owner Manual
Onkyo HT-SP904 Manual
 |
View all Onkyo HT-SP904 manuals
Add to My Manuals
Save this manual to your list of manuals |
Onkyo HT-SP904 manual content summary:
- Onkyo HT-SP904 | Owner Manual - Page 1
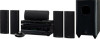
5.1ch Home Theater System HT-SP904 AV Receiver (HT-R557) Front Speakers (SKF-750F) Center Speaker (SKC-750C) Surround Speakers (SKM-750S) Powered Subwoofer (SKW-750) Remote Interactive Dock (DS-A1X) Instruction Manual Contents Introduction 2 Connection 18 Turning On & First Time Setup..... 36 - Onkyo HT-SP904 | Owner Manual - Page 2
the presence of important operating and maintenance (servicing) instructions in the literature accompanying the appliance. Important Safety Instructions 1. Read these instructions. 2. Keep these instructions. 3. Heed all warnings. 4. Follow all instructions. 5. Do not use this apparatus near - Onkyo HT-SP904 | Owner Manual - Page 3
If water or any other liquid gets inside this unit, have it checked by your Onkyo dealer. 6. Handling Notes • If you need to transport this unit, use the and, if not installed and used in accordance with the instructions, may cause harmful interference to radio communications. However, there - Onkyo HT-SP904 | Owner Manual - Page 4
neutralizes the magnetic field, thereby removing any discoloration effects. If discoloration problems persist, try moving the speakers away from your TV or monitor. Package Contents Make sure you have the following items: AV receiver (HT-R557) Remote controller and two batteries (AA/R6) Indoor FM - Onkyo HT-SP904 | Owner Manual - Page 5
Package Contents-Continued Front speakers (SKF-750F) Center speaker (SKC-750C) Surround speakers (SKM-750S) Base for horizontal mounting (For the center speaker) Rubber spacers [20] (For the speakers) DS-A1X (see page 46 for package contents) * In catalogs and on packaging, the letter at the end - Onkyo HT-SP904 | Owner Manual - Page 6
XM*7 Satellite Radio *XM Passport System required; sold separately. • SIRIUS*8 Onkyo audio sys- tem and enjoy great sound • Control your iPod with your Onkyo remote control- ler • Watch iPod videos and slideshows on your TV • Supports . *5 Theater-Dimensional is a trademark of Onkyo Corporation. - Onkyo HT-SP904 | Owner Manual - Page 7
Contents Introduction Important Safety Instructions 2 Precautions 3 Speaker Precautions 4 Package Contents 4 Features 6 63 Remote Control Codes for Onkyo Components Connected via 64 Resetting REMOTE MODE Buttons 64 Resetting the Remote Controller 64 Troubleshooting 66 If you can't resolve - Onkyo HT-SP904 | Owner Manual - Page 8
A few simple settings to get the very best from your system. ☞ page 37 HDMI Video Setup Automatic Speaker Setup Digital Input Input Display 4. Playing Your AV Components Enjoying movies and music. ☞ page 42 5. Using the Listening Modes Time to really enjoy your home theater system! ☞ page 51 8 - Onkyo HT-SP904 | Owner Manual - Page 9
(49) Adjusts the display brightness. O MEMORY button (45) Used when storing or deleting radio presets. P TUNING MODE button (44) Selects the Auto or Manual tuning mode for AM and FM radio. Q SETUP button Used to access the setup menus. R SETUP MIC (38) The automatic speaker setup microphone connects - Onkyo HT-SP904 | Owner Manual - Page 10
up when tuned to a stereo FM station. AUTO (44): For AM and FM radio, lights up when Auto Tuning mode is selected, and disappears when Manual Tuning mode is selected. TUNED (44): Lights up when tuned to a radio station. 5 SLEEP indicator (50) Lights up when the Sleep function has been set - Onkyo HT-SP904 | Owner Manual - Page 11
OUT jack. C COMPONENT VIDEO A DVD player, TV, or other component that supports component video can be connected here. D AM ANTENNA These push terminals are for SIRIUS instructions). H XM antenna This jack is for connecting an XM Passport System, sold separately (see the separate XM instructions). - Onkyo HT-SP904 | Owner Manual - Page 12
Remote Controller Installing the Batteries 1 To open the battery compartment, press the small hollow and slide open the cover. Aiming the Remote Controller When using the remote controller, point it toward the AV receiver's remote control sensor, as shown below. Remote control sensor STANDBY - Onkyo HT-SP904 | Owner Manual - Page 13
control the AV receiver and an Onkyo cassette recorder connected via . VCR CABLE SAT 2 Use the buttons supported by that mode to control the compo- operations described in this manual may not work as TUN --/--- ENT DIMMER SLEEP TV VOL INPUT GUIDE TOP MENU CH DISC ALBUM VOL PREVIOUS MENU - Onkyo HT-SP904 | Owner Manual - Page 14
Remote Controller-Continued For detailed information, see the pages in parentheses. A STANDBY/ON button (36) Sets the AV receiver to On or Standby. B INPUT SELECTOR buttons (42) Used to select the input sources. C MULTI CH button (43) Selects the multichannel DVD input. D DIMMER button (49) Adjusts - Onkyo HT-SP904 | Owner Manual - Page 15
Mode By default, the remote controller is set to control an Onkyo DVD player. To select your DVD player as the input source 12 CABLE CLR SAT D TUN --/--- ENT DIMMER SLEEP TV VOL INPUT GUIDE TOP MENU CH DISC ALBUM VOL PREVIOUS MENU SP A / B PLAYLIST/ supported by the DV-SP405 DVD Player. 15 - Onkyo HT-SP904 | Owner Manual - Page 16
you must change the Input Display (see page 41). In order to control an Onkyo MD recorder, CD recorder, or RI Dock, you must first enter the appropriate D 12 CABLE CLR SAT D TUN --/--- ENT DIMMER SLEEP TV VOL INPUT GUIDE TOP MENU CH DISC ALBUM VOL PREVIOUS MENU SP A / B PLAYLIST/CAT ENTER - Onkyo HT-SP904 | Owner Manual - Page 17
Speakers Subwoofer (SKW-750) For detailed information, see the pages in parentheses. ■ Front 1 ■ Rear A STANDBY/ON indicator Red: Subwoofer in standby mode Green: Subwoofer on With the Auto Standby function, the SKW-750 automatically turns on when an input signal is detected in Standby mode. When - Onkyo HT-SP904 | Owner Manual - Page 18
theater or concert hall. You can enjoy DVDs featuring DTS and Dolby Digital. With analog and digital TV, you can enjoy Dolby Pro Logic II and Onkyo speakers (SKF-750F) These output the overall sound. Their role in a home theater is to provide a solid anchor for the sound image. They should be - Onkyo HT-SP904 | Owner Manual - Page 19
Connecting Your Speakers-Continued Speaker Connection Precautions Read the following before connecting your speakers: • You can connect speakers with an impedance of between 8 and 16 ohms. If you use speakers with a lower impedance, and use the amplifier at high volume levels for a long period of - Onkyo HT-SP904 | Owner Manual - Page 20
speaker rotates so that you can position the speakers upside down. Caution: A mounting screw's ability to support a speaker depends on how well it's anchored to the wall. If you have hollow walls, head, as shown. (We recommend that you con- sult a home installation professional.) 1/4" - 5/16" - Onkyo HT-SP904 | Owner Manual - Page 21
Connecting Antennas This section explains how to connect the supplied indoor FM antenna and AM loop antenna, and how to connect commercially available outdoor FM and AM antennas. The AV receiver won't pick up any radio signals without any antenna connected, so you must connect the antenna to use - Onkyo HT-SP904 | Owner Manual - Page 22
. ■ Using a TV/FM Antenna Splitter It's best not to use the same antenna for both FM and TV reception, as this can cause interference problems. If circumstances demand it, use a TV/FM antenna splitter, as shown. Outdoor AM antennas work best when installed horizontally outside, but good results can - Onkyo HT-SP904 | Owner Manual - Page 23
Connecting Your Components About AV Connections • Before making any AV connections, read the manuals supplied with your other AV components. • Don't connect the power cord until you've completed and double-checked all AV connections. Optical Digital Jacks The - Onkyo HT-SP904 | Owner Manual - Page 24
formats for compatibility with a wide range of AV equipment. The format you choose will depend on the formats supported by your other components. Use the following sections as a guide. For video components, such as a DVD player, you must make an audio connection and a video connection. Audio - Onkyo HT-SP904 | Owner Manual - Page 25
Connecting Your Components-Continued Connecting a TV or Projector Step 1: Choose a video connection from A , B , and C . Step 2: Choose an audio connection from a , b , and c . • With connection a , you can listen to and record audio from your TV and listen via speaker set B. • To enjoy Dolby - Onkyo HT-SP904 | Owner Manual - Page 26
Connecting Your Components-Continued Connecting a DVD player Step 1: Choose a video connection from A , B , and C . You must connect the AV receiver to your TV via the same type of connection. Step 2: Choose an audio connection from a , b , and c . • With connection a , you can listen to and record - Onkyo HT-SP904 | Owner Manual - Page 27
Connecting Your Components-Continued Hooking Up the Multichannel DVD Input If your DVD player supports multichannel audio formats such as DVD-Audio or SACD, and it has a multichannel analog audio output, you can connect it to the AV receiver's multichannel - Onkyo HT-SP904 | Owner Manual - Page 28
operation with such an adapter is not guaranteed. In addition, video signals from a PC are not supported. • To watch an HDMI source that's connected via the AV receiver's HDMI jacks, the AV receiver via HDMI, check its setup. Refer to the connected component's instruction manual for details. 28 - Onkyo HT-SP904 | Owner Manual - Page 29
Connecting Your Components-Continued Connecting a VCR or DVD Recorder for Playback Hint! With this hookup, you can use your VCR's tuner to listen to your favorite TV programs via the AV receiver, useful if your TV has no audio outputs. Step 1: Choose a video connection from A , B , and C . You - Onkyo HT-SP904 | Owner Manual - Page 30
Connecting Your Components-Continued Connecting a VCR or DVD Recorder for Recording Step 1: Choose a video connection from A and B . The video source to be recorded must be connected to the AV receiver via the same type of connection. Step 2: Make the audio connection a . DIGITAL IN ASSIGNABLE - Onkyo HT-SP904 | Owner Manual - Page 31
Connecting Your Components-Continued Connecting a Satellite, Cable, Set-top box, or Other Video Source Hint! With this hookup, you can use your satellite or cable receiver to listen to your favorite TV programs via the AV receiver, useful if your TV has no audio outputs. Step 1: Choose a video - Onkyo HT-SP904 | Owner Manual - Page 32
Connecting Your Components-Continued Connecting a CD Player or Turntable ■ CD Player or Turntable (MM) with Built-in Phono Preamp Step 1: Choose a connection that matches your CD player ( a , b , or c ). Use connection a for a turntable with a built-in phono preamp. Connect one or the other - Onkyo HT-SP904 | Owner Manual - Page 33
the DS-A1X RI Dock for the iPod ■ If Your iPod Supports Video: 1. Using the supplied AV cable, connect the RI Dock's Connect the supplied AC adapter to the RI Dock's DC IN jack. ■ If Your iPod Doesn't Support Video: 1. Using the supplied AV cable, connect the RI Dock's AUDIO OUT L/R jacks to the - Onkyo HT-SP904 | Owner Manual - Page 34
Connecting Your Components-Continued Connecting a Cassette, CDR, MiniDisc, or DAT Recorder Step 1: Choose a connection that matches the recorder ( a , b , or c ), and then make the connection. Connect one or the other These connections must be assigned (see page 41) b COAXIAL 2 (CBL/SAT) c OPTICAL - Onkyo HT-SP904 | Owner Manual - Page 35
components may cause a malfunction. • Some components may not support all functions. Refer to the manuals supplied with your other Onkyo components. REMOTE CONTROL DIGITAL IN ASSIGNABLE COAXIAL 1 (DVD the same circuit. If this is a problem, plug the AV receiver into a different branch circuit. 35 - Onkyo HT-SP904 | Owner Manual - Page 36
C D 12 CABLE CLR SAT D TUN --/--- ENT DIMMER SLEEP TV VOL INPUT GUIDE TOP MENU CH DISC ALBUM VOL PREVIOUS MENU SP A / B MUTING 1 AV see "Digital Audio Input Setup" on page 41. OPTICAL ■ Have you connected an Onkyo MD recorder, CD recorder, or RI Dock? If you have, see "Changing the - Onkyo HT-SP904 | Owner Manual - Page 37
, connect and position all of the supplied speakers. Measurement Points To create a listening area in which several people can enjoy home theater simultaneously, the Audyssey 2EQ function takes measurements at three points within the listening area: A First measurement point This is the center - Onkyo HT-SP904 | Owner Manual - Page 38
First Time Setup-Continued Using Audyssey 2EQ 1 STANDBY/ON STANDBY TUNING PRESET MASTER VOLUME PHONES MULTI CH DVD VCR/DVR CBL/SAT AUX TAPE TUNER C D SETUP ENTER RETURN DISPLAY DIGITAL INPUT TONE STEREO LISTENING MODE DIMMER MEMORY TUNING MODE CLEAR SETUP MIC AUX INPUT VIDEO - Onkyo HT-SP904 | Owner Manual - Page 39
use an appropriate volume level. If the subwoofer has a low-pass filter switch, set it to Off or Direct. Refer to your subwoofer's instruction manual for details. This message appears if saving fails. To Retry the Automatic Speaker Setup Press the [ENTER] button. Make sure speakers that cannot be - Onkyo HT-SP904 | Owner Manual - Page 40
6 TV AUX MULTI CH DVD 7 8 9 VCR TAPE TUNER 10 11 +10 0 C D 12 CABLE CLR SAT D TUN --/--- ENT DIMMER SLEEP TV VOL INPUT GUIDE TOP MENU CH DISC ALBUM VOL PREVIOUS MENU SP A / B PLAYLIST/CAT ENTER MUTING PLAYLIST/CAT SETUP RETURN LISTENING MODE STEREO SURROUND AUDIO SUBTITLE - Onkyo HT-SP904 | Owner Manual - Page 41
COAX1, COAX2, OPT1, OPT2, or "- - - -" (analog). Changing the Input Display If you connect an -capable Onkyo MiniDisc recorder, CD recorder, or RI Dock to the TAPE IN/OUT or CBL/SAT IN jacks, for to work properly, digitally are configured to output digital audio. Refer to the relevant manuals. 41 - Onkyo HT-SP904 | Owner Manual - Page 42
C D 12 CABLE CLR SAT D TUN --/--- ENT DIMMER SLEEP TV VOL INPUT GUIDE TOP MENU CH DISC ALBUM VOL PREVIOUS MENU SP A / B PLAYLIST/CAT ENTER MIN, 1 through 79, or MAX. Since the AV receiver is designed for home theater enjoyment, it has a wide volume range for precise adjustment. To set the - Onkyo HT-SP904 | Owner Manual - Page 43
Playing Your AV Components-Continued MULTI CH STANDBY/ON REMOTE MODE RECEIVER DVD TAPE/AMP INPUT SELECTOR M D/CDR 1 2 3 VCR/DVR CBL/SAT C D DOCK 4 5 6 TV AUX MULTI CH DVD 7 8 9 VCR TAPE TUNER 10 11 +10 0 C D 12 CABLE CLR SAT D TUN --/--- ENT DIMMER SLEEP TV VOL CH - Onkyo HT-SP904 | Owner Manual - Page 44
Down [ ]/[ ] button. Searching stops when a station is found. ■ Manual Tuning Mode 1 TUNING MODE Press the [TUNING MODE] button so that the is weak, it may be impossible to get good reception. In this case, switch to Manual Tuning mode and listen to the station in mono. Note: • You can also use - Onkyo HT-SP904 | Owner Manual - Page 45
TV AUX MULTI CH DVD 7 8 9 VCR TAPE TUNER 10 11 +10 0 C D 12 CABLE CLR SAT D TUN --/--- ENT DIMMER SLEEP TV VOL INPUT GUIDE TOP MENU CH DISC ALBUM VOL PREVIOUS MENU SP A / B PLAYLIST/CAT ENTER MUTING PLAYLIST/CAT SETUP RETURN RECEIVER CH +/- 1 RECEIVER Press the [RECEIVER - Onkyo HT-SP904 | Owner Manual - Page 46
Onkyo control system that allows all -capable Onkyo manual, the DS-A1X Remote Interactive Dock is referred to as the "RI Dock." * iPod is a trademark of Apple Inc., registered in the U.S. and other countries. For the latest information on the RI Dock, see the Onkyo Web site at: www.onkyo supported. - Onkyo HT-SP904 | Owner Manual - Page 47
seconds to star- tup, so you might not hear the first few seconds of the first song. • System On Function: When you turn on the AV receiver, the iPod turns on as well. • System Off Function: When you turn off the AV receiver, the iPod turns off as well. • Auto Power On - Onkyo HT-SP904 | Owner Manual - Page 48
your iPod battery, the AC adapter must be plugged into a suitable wall outlet and connected to the RI Dock's DC IN jack. • See your iPod's instruction manual for more information on battery charging. 48 - Onkyo HT-SP904 | Owner Manual - Page 49
5 6 TV AUX MULTI CH DVD 7 8 9 VCR TAPE TUNER 10 11 +10 0 C D 12 CABLE CLR SAT D TUN --/--- ENT DIMMER SLEEP TV VOL INPUT GUIDE TOP MENU CH DISC ALBUM VOL PREVIOUS MENU SP A / B PLAYLIST/CAT ENTER MUTING PLAYLIST/CAT SETUP RETURN Press [RECEIVER] first SLEEP MUTING CH SEL - Onkyo HT-SP904 | Owner Manual - Page 50
Common Functions-Continued Using the Sleep Timer With the sleep timer, you can set the AV receiver so that it turns off automatically after a specified period. SLEEP Press the remote controller's [SLEEP] button repeatedly to select the required sleep time. You can set the sleep time from 90 to 10 - Onkyo HT-SP904 | Owner Manual - Page 51
can select only the Mono, Direct, or Stereo listening mode. Selecting on the AV Receiver Selecting with the Remote Controller TV VOL INPUT GUIDE TOP MENU CH DISC ALBUM VOL PREVIOUS MENU SP A / B PLAYLIST/CAT ENTER MUTING PLAYLIST/CAT SETUP RETURN SURROUND LISTENING MODE STEREO STEREO - Onkyo HT-SP904 | Owner Manual - Page 52
Dolby D DTS, DTS 96/24 T-D ✔ Mono Movie Orchestra Onkyo Unplugged *4 Original Studio-Mix ✔ DSP TV Logic All Ch Stereo transform your listening room into a movie theater or concert hall, with high fidelity listening mode with 5.1 channel speaker system. Front left Center Front right The - Onkyo HT-SP904 | Owner Manual - Page 53
localization of audio elements. System playback is scalable from 5.1 to 7.1 multichannel surround playback. Onkyo Original DSP Modes Mono is the same regardless of where you are within the listening room. T-D (Theater-Dimensional) or With this mode, you can enjoy virtual 5.1 surround sound - Onkyo HT-SP904 | Owner Manual - Page 54
C D 12 CABLE CLR SAT D TUN --/--- ENT DIMMER SLEEP TV VOL INPUT GUIDE TOP MENU CH DISC ALBUM VOL PREVIOUS MENU SP A / B PLAYLIST/CAT ENTER movie soundtracks, which are typically mixed for reproduction in a movie theater. CinemaFILTER can be used with the following listening modes: Dolby - Onkyo HT-SP904 | Owner Manual - Page 55
mode. On: Panorama function on. Off: Panorama function off (default). ■ Dimension With this setting, you can move the sound field forward or backward when right speakers relative to the listening position. Processing for the Theater-Dimensional listening mode is based on this setting. Ideally, the - Onkyo HT-SP904 | Owner Manual - Page 56
Recording This section explains how to record the selected input source to a component with recording capability, and how to record audio and video from different sources. Recording the Input Source You can only record to a component that's connected to the TAPE OUT or VCR/DVR OUT jacks. See - Onkyo HT-SP904 | Owner Manual - Page 57
Advanced Setup Advanced Speaker Settings This section explains how to check the speaker settings and how to set them manually, which is useful if you change a speaker after performing the automatic speaker setup. Some speaker settings are set automatically by the Automatic Speaker Setup function ( - Onkyo HT-SP904 | Owner Manual - Page 58
guration" on page 57. To get the best bass performance from your speaker system, you need to set the crossover frequency according to the size and frequency a more accurate setting, look up the frequency response in the manuals supplied with your speakers and set accordingly. • Choose a higher - Onkyo HT-SP904 | Owner Manual - Page 59
Advanced Setup-Continued Speaker Distance These settings are set automatically by the Automatic Speaker Setup function (see page 37). With these settings, you can specify the distance from each speaker to the listening position. 1 Measure and make a note of the distance from each speaker to - Onkyo HT-SP904 | Owner Manual - Page 60
Advanced Setup-Continued Speaker Levels These settings are set automatically by the Automatic Speaker Setup function (see page 37). You can set the volume level of each speaker so that all speakers can be heard equally at the listening position. 1 RECEIVER Press the [RECEIVER] REMOTE MODE - Onkyo HT-SP904 | Owner Manual - Page 61
Speaker Setup function. Be sure to select this setting after having performed the Automatic Speaker Setup. Manual: You can adjust the equalizer for each speaker manually. If you selected Manual, continue with this procedure. If you selected Off or Notes: • The front, center, and surround speakers - Onkyo HT-SP904 | Owner Manual - Page 62
TV AUX MULTI CH DVD 7 8 9 VCR TAPE TUNER 10 11 +10 0 C D 12 CABLE CLR SAT D TUN --/--- ENT DIMMER SLEEP TV VOL INPUT GUIDE TOP MENU CH DISC ALBUM VOL PREVIOUS MENU SP A / B PLAYLIST/CAT ENTER MUTING PLAYLIST/CAT SETUP RETURN RECEIVER 1 RECEIVER Press the [RECEIVER] REMOTE - Onkyo HT-SP904 | Owner Manual - Page 63
6 TV AUX MULTI CH DVD 7 8 9 VCR TAPE TUNER 10 11 +10 0 C D 12 CABLE CLR SAT D TUN --/--- ENT DIMMER SLEEP TV VOL INPUT GUIDE TOP MENU CH DISC ALBUM VOL PREVIOUS MENU SP A / B PLAYLIST/CAT ENTER MUTING PLAYLIST/CAT SETUP RETURN REMOTE MODE 1 Look up the appropriate remote - Onkyo HT-SP904 | Owner Manual - Page 64
are out of view, in a rack, for example. 1 Make sure the Onkyo component is connected with an cable and an analog audio cable (RCA). See page MODE buttons are preprogrammed VCR with remote control codes for controlCABLE ling Onkyo DVD players and CD playSAT ers respectively. When these buttons are - Onkyo HT-SP904 | Owner Manual - Page 65
6 TV AUX MULTI CH DVD 7 8 9 VCR TAPE TUNER 10 11 +10 0 C D 12 CABLE CLR SAT D TUN --/--- ENT DIMMER SLEEP TV VOL INPUT GUIDE TOP MENU CH DISC ALBUM VOL PREVIOUS MENU SP A / B PLAYLIST/CAT ENTER MUTING PLAYLIST/CAT SETUP RETURN LISTENING MODE STEREO SURROUND AUDIO SUBTITLE - Onkyo HT-SP904 | Owner Manual - Page 66
Troubleshooting If you have any trouble using the AV receiver, look for a solution in this section. If you can't resolve the issue yourself, try resetting the AV receiver before contacting your Onkyo AV receiver is designed for home theater enjoyment and has a wide that's supported by your TV - Onkyo HT-SP904 | Owner Manual - Page 67
Troubleshooting-Continued The center speaker produces no sound • When the Stereo or Mono with an HDMI-to-DVI adapter is not guaranteed. In addition, video signals from a PC are not supported (page 28). Tuner Reception is noisy, stereo FM reception suffers from hiss, or the FM STEREO indicator doesn - Onkyo HT-SP904 | Owner Manual - Page 68
Troubleshooting expected, and some may not work at all. • To control an Onkyo component that's connected via , point the remote controller at the AV receiver remote controller doesn't control your iPod • 3rd generation iPods are not supported. • Make sure your iPod is properly inserted in the RI Dock. - Onkyo HT-SP904 | Owner Manual - Page 69
Troubleshooting-Continued The wait at least five seconds, and then plug it back in again. Onkyo is not responsible for damages (such as CD rental fees) due to the light may change the product exterior color. • The operating instructions in this manual apply to the iPod as of June 2007, and may change - Onkyo HT-SP904 | Owner Manual - Page 70
Specifications AV Receiver (HT-R557) ■ Amplifier Section Rated Output Power (FTC) All AM Tuning Frequency Range 530 kHz-1710 kHz Radio Presets 40 ■ General Power Supply Power Consumption Standby Power Consumption Dimensions (W × H × D) Weight AC 120 V, 60 Hz 4.5 A 0.1 W 435 × 150 × 377 - Onkyo HT-SP904 | Owner Manual - Page 71
5.1ch Home Theater Speaker Package (HTP-650) ■ Powered Subwoofer (SKW-750) Type: Bass-reflex Input sensitivity/ impedance: 140 mV / 20 kΩ Maximum output power: 230 W (Dynamic Power) Frequency response: 25 Hz-150 Hz Cabinet capacity: 1.3 cubic feet (37 L) Dimensions (W × H × D): 10 - Onkyo HT-SP904 | Owner Manual - Page 72
EUROPE ELECTRONICS GmbH Liegnitzerstrasse 6, 82194 Groebenzell, GERMANY Tel: +49-8142-4401-0 Fax: +49-8142-4401-555 http://www.eu.onkyo.com/ ONKYO EUROPE UK Office Suite 1, Gregories Court, Gregories Road, Beaconsfield, Buckinghamshire, HP9 1HQ UNITED KINGDOM Tel: +44-(0)1494-681515 Fax: +44(0)-1494
-
 1
1 -
 2
2 -
 3
3 -
 4
4 -
 5
5 -
 6
6 -
 7
7 -
8
-
9
-
10
-
11
-
12
-
13
-
14
-
15
-
16
-
17
-
18
-
19
-
20
-
21
-
22
-
23
-
24
-
25
-
26
-
27
-
28
-
29
-
30
-
31
-
32
-
33
-
34
-
35
-
36
-
37
-
38
-
39
-
40
-
41
-
42
-
43
-
44
-
45
-
46
-
47
-
48
-
49
-
50
-
51
-
52
-
53
-
54
-
55
-
56
-
57
-
58
-
59
-
60
-
61
-
62
-
63
-
64
-
65
-
66
-
67
-
68
-
69
-
70
-
71
-
72
 |
 |

E
n
5.1ch Home Theater System
HT-SP904
AV Receiver (HT-R557)
Front Speakers (SKF-750F)
Center Speaker (SKC-750C)
Surround Speakers (SKM-750S)
Powered Subwoofer (SKW-750)
Remote Interactive Dock (DS-A1X)
Instruction Manual
Thank you for purchasing an Onkyo 5.1ch Home
Theater System. Please read this manual thoroughly
before making connections and plugging in the unit.
Following the instructions in this manual will enable
you to obtain optimum performance and listening
enjoyment from your new 5.1ch Home Theater Sys-
tem.
Please retain this manual for future reference.
Contents
Introduction
.....................................
2
Connection
....................................
18
Turning On & First Time Setup
.....
36
Basic Operation
Playing your AV components
.......
42
Listening to the Radio
..................
44
Enjoying the Listening Modes
.....
51
Advanced Operation
.....................
56
Troubleshooting
............................
66