Onkyo TX-NR555 User Manual - Page 49
Subnet Mask, Gateway, and DNS Server, Displays/Sets the IP address.
 |
View all Onkyo TX-NR555 manuals
Add to My Manuals
Save this manual to your list of manuals |
Page 49 highlights
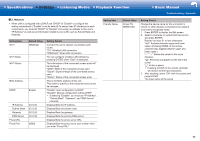
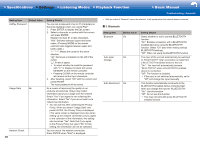
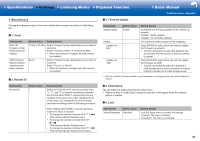
>>Specifications >>Settings >>Listening Modes >>Playback Function >>Basic Manual Troubleshooting | Appendix ˙ 2� Network • When LAN is configured with a DHCP, set "DHCP" to "Enable" to configure the setting automatically. ("Enable" is set by default) To assign fixed IP addresses to each components, you must set "DHCP" to "Disable" and assign an address to this unit in "IP Address" as well as set information related to your LAN, such as Subnet Mask and Gateway. Setting Item Wi-Fi Default Value Off(Wired) Wi-Fi Setup ‐ Wi-Fi Status ‐ MAC Address ‐ DHCP Enable IP Address Subnet Mask Gateway DNS Server Proxy URL Proxy Port (0.0.0.0) (0.0.0.0) (0.0.0.0) (0.0.0.0) ‐ (8080) Setting Details Connect the unit to network via wireless LAN router. "On": Wireless LAN connection "Off(Wired)": Wired LAN connection You can configure wireless LAN settings by pressing ENTER when "Start" is displayed. The information of the connected access point will be displayed. "SSID": SSID of the connected access point. "Signal": Signal strength of the connected access point. "Status": Status of the connected access point. This is the MAC address of this unit. This value is specific to the component and cannot be changed. "Enable": Auto configuration by DHCP "Disable": Manual configuration without DHCP • If selecting "Disable", you must set "IP Address", "Subnet Mask", "Gateway", and "DNS Server" manually. Displays/Sets the IP address. Displays/Sets the subnet mask. Displays/Sets the gateway. Displays/Sets the primary DNS server. Displays/Sets the proxy server URL. Displays/Sets the proxy server port number when you enter "Proxy URL". Setting Item Friendly Name Default Value Onkyo TXNR555 XXX Setting Details Change the device name for this unit which is shown on other devices connected to the network to an easily recognized name. 1. Press ENTER to display the Edit screen. 2. Select a character or symbol with the cursors and press ENTER. Repeat it to input 31 or less characters. "A/a": Switches between upper and lower cases. (Pressing MODE on the remote controller also toggles between upper and lower cases Moves the cursor to the arrow direction. " ": Removes a character on the left of the cursor. " ": Enters a space. • Pressing CLEAR on the remote controller will remove all the input characters. 3. After inputting, select "OK" with the cursors and press ENTER. The input name will be saved. 17
-
 1
1 -
2
-
3
-
4
-
5
-
6
-
7
-
8
-
9
-
10
-
11
-
12
-
13
-
14
-
15
-
16
-
17
-
18
-
19
-
20
-
21
-
22
-
23
-
24
-
25
-
26
-
27
-
28
-
29
-
30
-
31
-
32
-
33
-
34
-
35
-
36
-
37
-
38
-
39
-
40
-
41
-
42
-
43
-
 44
44 -
 45
45 -
 46
46 -
 47
47 -
 48
48 -
 49
49 -
 50
50 -
 51
51 -
 52
52 -
 53
53 -
 54
54 -
55
-
56
-
57
-
58
-
59
-
60
-
61
-
62
-
63
-
64
-
65
-
66
-
67
-
68
-
69
-
70
-
71
-
72
-
73
-
74
-
75
-
76
-
77
-
78
-
79
-
80
-
81
-
82
-
83
-
84
-
85
-
86
-
87
-
88
-
89
-
90
-
91
-
92
 |
 |
