Onkyo TX SR800 Owner Manual - Page 32
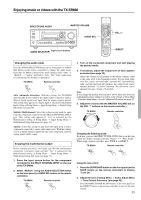
Switching the display, Adjusting the brightness of the front display, Temporarily changing
 |
UPC - 751398004926
View all Onkyo TX SR800 manuals
Add to My Manuals
Save this manual to your list of manuals |
Page 32 highlights
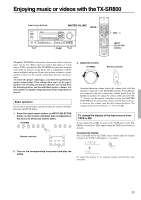
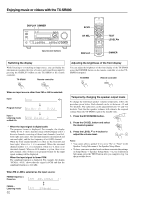
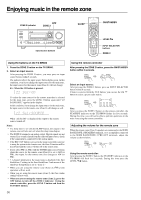
Enjoying music or videos with the TX-SR800 DISPLAY DIMMER STANDBY/ON DISPLAY DIMMER STANDBY POWER ON OFF PURE AUDIO UPSAMPLING DIRECT/PURE AUDIO STEREO SURROUND THX DSP PHONES AUDIO SELECTOR ZONE 2 (GRN ) REC ( RED ) DVD VIDEO 1 VIDEO 2 VIDEO 3 VIDEO 4 VIDEO 5 VCR 1 VCR 2 REC OUT ZONE 2 OFF TUNING SETUP ENTER PRESET RE TURN MEMORY FM MODE A-FORM LISTENING MODE MEMORY CLEAR TAPE TUNER PHONO C D MASTER VOLUME VIDEO 5 INPUT DIGITAL S VIDEO VIDEO L AUDIO R TX-SR800 Input source buttons RCVR CH SEL DISPLAY TEST LEVEL / DIMMER Switching the display While listening to or watching an input source, you can display the information regarding the type of source and signal being input by pressing the DISPLAY button on the TX-SR800 or the remote controller. TX-SR800 DISPL AY Remote controller Adjusting the brightness of the front display You can adjust the brightness of the front display of the TX-SR800 using the DIMMER button on the remote controller or on the TXSR800 front panel. TX-SR800 DIMMER Remote controller When an input source other than FM or AM is selected: Input Program format* Input + Listening mode or Multi Ch * When the input signal is digital audio The program format is displayed. For example, the display "Dolby D: 3/2.1" shows that the format is Dolby Digital with 5.1 discrete channels consisting of three front channels (front left, front right, and center), two surround channels (surround left and surround right), and the low frequency effect (LFE) channel. When the front channel number is 2, they are the front left and front right; when it is 1, it is monaural. When the surround channel number is 1, it is monaural; when it is 0, there is no surround channel. When no LFE number is given, there is no LFE channel. Also, if there is no program format for the input signal, nothing will be displayed. When the input signal is linear PCM The sampling frequency is displayed. For example, the display "PCM fs: 44.1k" shows that the signal is PCM and that the sampling frequency is 44.1 kHz. Temporarily changing the speaker output levels To change the individual speaker volumes temporarily, follow the procedure given below. Each channel can be set between -12 and +12 decibels. The subwoofer can be adjusted between -15 and +12 decibels. Note that the speaker volumes will return to the original settings when the TX-SR800 is put in the standby state. 1. Press the RCVR MODE button. 2. Press the CH SEL button and select the desired speaker. 3. Press the LEVEL or button to adjust the volume level. Notes: • You cannot select a speaker if it is set to "No" or "None" in the Speaker Config Sub-menu of the Speaker Setup Menu. • To have your new speaker levels set here overwrite the settings at Setup Menu → Speaker Setup Menu → Level Calibration Sub-menu, press the TEST button after you complete step 3 in the procedure above. When FM or AM is selected as the input source: FM/AM frequency + Preset no. ch FM/AM + Listening mode 32
-
 1
1 -
2
-
3
-
4
-
5
-
6
-
7
-
8
-
9
-
10
-
11
-
12
-
13
-
14
-
15
-
16
-
17
-
18
-
19
-
20
-
21
-
22
-
23
-
24
-
25
-
26
-
 27
27 -
 28
28 -
 29
29 -
 30
30 -
 31
31 -
 32
32 -
 33
33 -
 34
34 -
 35
35 -
 36
36 -
 37
37 -
38
-
39
-
40
-
41
-
42
-
43
-
44
-
45
-
46
-
47
-
48
-
49
-
50
-
51
-
52
-
53
-
54
-
55
-
56
-
57
-
58
-
59
-
60
-
61
-
62
-
63
-
64
-
65
-
66
-
67
-
68
-
69
-
70
-
71
-
72
-
73
-
74
-
75
-
76
 |
 |
