Oreck AIRPB User Guide - Page 8
Warning - air purifier filters
 |
View all Oreck AIRPB manuals
Add to My Manuals
Save this manual to your list of manuals |
Page 8 highlights
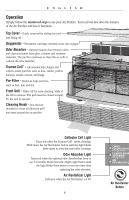
ENGLISH Cleaning. Cleaning Times Proper care and cleaning of the air purifier is critical to performance. The following chart shows the cleaning intervals and methods. Part Cleaning Time Method Cabinet As needed Truman Cell™ 2 to 4 weeks, or as needed Truman Cell™ If arcing occurs* Pre-filter Odor Absorber 2 to 4 weeks, or as needed 12 months, or as needed Air Direction As needed Grill Oxygenator As needed Wipe with damp cloth first. If required, follow with mild non-abrasive cleaner. ® Spray Oreck Assail-a-Cell cleaner or soak in warm water with mild detergent.Rinse and dry thoroughly. Gently wipe cell wires with a dry ® cotton swab, Spray Oreck Assail-a-Cell cleaner or soak in warm water with mild liquid detergent. Rinse and dry thoroughly. Rinse thoroughly in warm water. Replace (optional for odor removal). Do not wash or get wet. Vacuum to clean, if necessary. Use the brush provided with the air purifier to brush away debris in between the slots. Vacuum the front with a soft brush attachment. Do not use any liquids for cleaning. *Arcing is a sharp snapping sound that can occur when dust particles build up in the Truman Cell™. WARNING! Cleaning the unit while it is plugged in may result in electric shock, electric spark and serious injury. Unplug the unit before cleaning or maintenance. Remove the unit from the wall if it is wall mounted. TIP S for clean a Cleaning the Pre-Filter 2 The ir Air Purifier 3 will not run if the top cover and grill are not closed securely. 5 1 1 Unplug the air purifier. 2 Remove the top cover by sliding forward and lifting off. 3 Pull the pre-filter straight up and out of the cabinet. 4 Thoroughly rinse the pre-filter and let it air dry before placing it back in the cabinet. Do not use heated or compressed air as part of the drying process. 5 Place the pre-filter back into the unit by sliding it straight down into the slots. 6 Place the top cover back on the cabinet, sliding back to lock into place. 8
-
 1
1 -
2
-
 3
3 -
 4
4 -
 5
5 -
 6
6 -
 7
7 -
 8
8 -
 9
9 -
 10
10 -
 11
11 -
 12
12 -
 13
13 -
14
-
15
-
16
-
17
-
18
-
19
-
20
-
21
-
22
-
23
-
24
-
25
-
26
-
27
-
28
-
29
-
30
-
31
-
32
-
33
-
34
-
35
-
36
 |
 |
