Oreck Graphite User Guide - Page 4
Operation - vacuum cleaner
 |
View all Oreck Graphite manuals
Add to My Manuals
Save this manual to your list of manuals |
Page 4 highlights
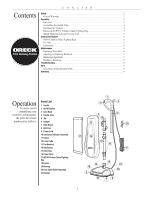
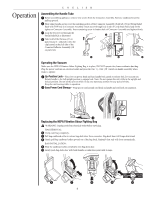
Operation ENGLISH Assembling the Handle Tube 1 Before assembling appliance, remove two screws from the Connector Assembly. Remove cardboard insert by pulling upward. 2 Slide upper handle section over the matching section of the Connector Assembly. Hold tab of Cord Strain Relief flush with TOP hole in Connector Assembly. Insert screw through hole in tab of Cord Strain Relief and firmly tighten to Connector Assembly. Insert remaining screw in bottom hole of Connector Assembly and tighten firmly. 2.1 Loop the Power Cord through the Strain Relief Kit as illustrated 2 TAB 3 Take hold of the Harness (21 on parts list pg 3) - and push it into the clip located on the left side of the Conector Deflector Assembly (10 on parts list). Connector 1 Assembly 2.1 3 Operating the Vacuum Make sure the HEPA Filtration Odour Fighting Bag is in place. DO NOT operate the cleaner without a dust bag. Plug the power cord into an electrical outlet and press the On ( l ) - OFF ( O ) switch on handle assembly when ready to operate. 4 Up-Position Lock - Place foot on power head and lean handle back gently to release lock for vacuum use. Return handle to the full upright position to engage lock. Note: Do not operate the unit while in the upright and locked position. Do not let the unit run while in any one stationary position for any period of time. Keep the unit moving while in operation. 5 Easy Power Cord Storage - Wrap power cord around cord hook on handle and cord hook on connector. 5 4 5 Replacing the HEPA Filtration Odour Fighting Bag WARNING: Unplug cord from electrical outlet before servicing. BAG REMOVAL: 6 Unzip outer bag completely. 7 Pull bag cardboard collar to release bag dock door from connector. Bag dock door will hinge downward. 8 Gently pull bag cardboard collar upward out of the bag dock. Saniseal® dust seal will close automatically. BAG INSTALLATION: 9 Slide the cardboard collar completely onto bag dock door. 10 Firmly push bag dock door with both thumbs on indication point until it snaps. 6 7 8 9 10 4
-
 1
1 -
 2
2 -
 3
3 -
 4
4 -
 5
5 -
 6
6 -
 7
7 -
 8
8 -
 9
9 -
 10
10
 |
 |
