Oregon Scientific SL103 User Manual - Page 1
Oregon Scientific SL103 Manual
 |
View all Oregon Scientific SL103 manuals
Add to My Manuals
Save this manual to your list of manuals |
Page 1 highlights
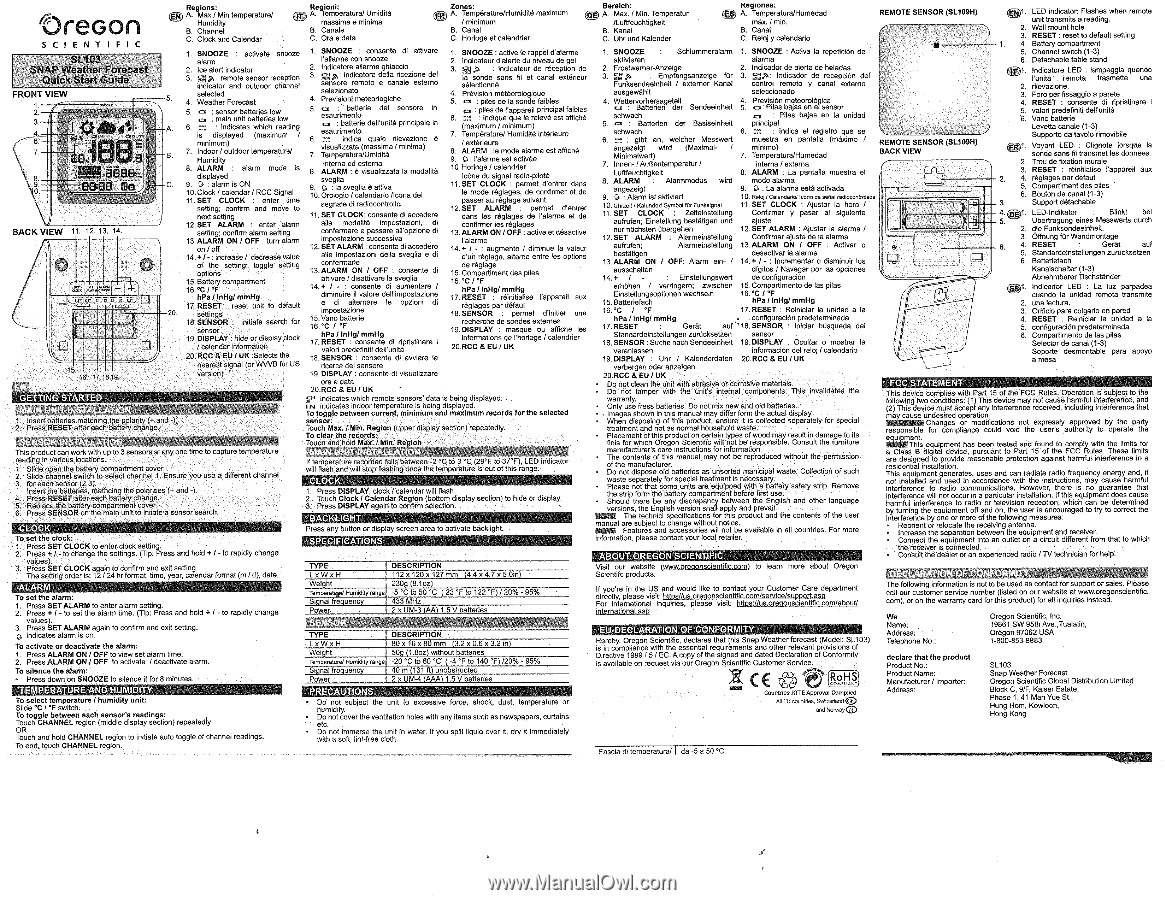
OreGon SC I ENT I F I C Regions: A. Max Min temperature/ Humidity B. Channel C. Clock end Calendar r • PA.eTemperature!Umlffila maselme e minima B. Canals C. Ore e data a Zones: A. Temperature/Humidite maximum minimum B. Canal C. Horloge et calendrier &welch: 41 A. Max. I Min. Temperatur /Luftleuchtigkeit B. Kenai C. Uhr and Kalender Reponse: eg A. Temperatwa/Humedad mix. / min. B. Canal C. Reid y atiendario REMOTE SENSOR (SL109H) )1. LED indicator. Flashes when remote unit transmits a reading. 2. Wall mount bole 3. RESET reset to default setting 1. 4. Battery compartment SL103 SNAP Weather Forecast Quick Start Guide FRONT VIEW 1. 3. A. 6. 7. I B. .9 Edeea 88138 C. B/_A_C_K VIEW ._ 1 OR 20 a 15. 16. 17.18.19. EN GETTING STARTED MAIN UNIT INSTALLATION 1. Insert bakeries matching the polarity (• and -). 2. Press RESET after each battery change. SENSOR INSTA11ATION 1. SNOOZE , activate snooze alarm 2. 3. Ice alert indicator gm: remote sensor reception indicator and outdoor channel selected 4. Weather Forecast 5. ari : sensor batteries low o : main unit batteries low 6. r•- : Indicates which reading is displayed (maximum I minimum) 7. Indoor / outdoor temperature/ Humidity 8. ALARM : alarm mode is displayed 9. 0 , atom is ON 10.Clock / calendar / RCC Signal 11. SET CLOCK : enter time setting; confirm and move to next setting 12.SET ALARM : enter elan setting; confirm alarm setting 1. SNOOZE : consents di attivare rallarme oon snooze 2. Indicators Orme ghiaccio 3. pl A: indicators della rlcezione del sensore remoto e canals estemo selezionato 4. Prevision' meteorlogiche 5. batteds del sensors ki oes1e.umri ento 6. e..sae:ribmeelnietof* ddrunikti . grind sale in iu ihdiea Wale nlevazione e 7. ;T:rl .albotatuteraki tn.ha.„sksliimo a / minima) I"n'tPerensne' d eeteme 8. ALARM : e visuatizzata la modalita simile 9. 4 : la sveglki it attiva 10.0rologio / adendario /lama del segnale di radiocontrollo 11. SET CLOCK: consents di accedere ate Malaita imPostaxiont di containere a passers alropzione dl 1. SNOOZE : active le rappel d'alarrne 2. Indicaleur detente du niveau de gel 3. gig.", . Indicateur de reception de le sonde sans fit et canal exterieur selection,* 4. Prevision meteorologique - : 5. ra : piles de la sonde faibtea piles de rapparell Principal bibles 6. ' : indique que le releve est dacha (maximum/minimum) 7. Temperature/ Humidite interieure / exterieure 8. ALARM : le mode alarme est al-fiche 9. 0 • ralarms est adivee 10 Hortoge / caleridrier Icon. du signal nedio-pilote 11. SET CLOCK : permet crentrer dens le mode reglages, de confirmer et de Passer au reglage suivant. 12.SET ALARM : permet d'entrer dens lea regimes de retains et de confirrner les reglages. 13. ALARM ON /OFF : active et desacthre 13. ALARM ON / OFF : turn alarm on / off U.+1•: increase/ decrease value imPontadoldt successive 12. SET ALARM : consents dl accedere ells impoetazioni della svegtiee di ralarme 14.+ I - : augments / tHminue Is valour dun *lege, 'dame entre les options of the setting; toggle setting options 15.88fferY compartment 16.•C / °F hPa I InHg/ mmHg 17. RESET : reset unit to default settings confentifte 13. ALARM ON / OFF : consents dl attivare / disattivare la svagtia Ie.+ / • : consent. di aumentare / dImInuire II valore deli impostazione a dl alternate le opziord di impostazione de reglage 15.Compartiment des piles 16.'C PT hPa / InHg/ mmHg 17.RESET : ntelitialise I'appareil aux *tapes par doted 18. SENSOR : permet Winitier une 18. SENSOR : initiate search for sensor 19.DISPLAY : hide or display dock / calendar information 20.RCC 8,EU / UK :Selects the nearest signal (or WVVB for US .11::\f.n'tC I 7tterie hPa / InHg/ mmHg 17. RESET consents di ripristinere i valon predeflnId deffunIta 18.SENSOR : consent& di wMare la dative del sensors recherche de sondes cinemas 19. DISPLAY : masque ou affiche les informations de Mork*.I calendrier 20.RCC & EU I UK version) 19.DISPLAY : consente dl visualizzare ora e data 20.RCC EU / UK 5. indicates which remote sensors' data Is being displayed. Ire indicates indoor temperature is being displayed. To toggle between current, minimum and maximum records for this selected sensor: Touch Max. MM. Region (upper display section) repeatedly. • To clear the records: Touch and hold Max./ Min. Re Ion This product can work with up to 3 sensors at any one time to capture temperature reading In various locations. 1. 2. Slide Slide open the battery compartment cover. channel switch to select channel 1. Ensure you use a different channel 3. for each sensor (2,3). Insert the batteries, mathcing the polarities (+ and -). 4. Press RESET after each battery change. 5 Replace the battery compartment cover. 6. REISS SENSOR on the main unit to inliale a sensor search. MAIN UNIT INSTALLATION It temperature recorded falls between -2 •C to 3*C (29'F to 37'F), LED indicator will flash and will stop Cashing once the temperature le out of We range. CLOCK 1. Press DISPLAY, dock /calendar cog flash. 23.. PToreuscsh Clock1Calendar Region (bottom display DISPLAY again to confirm selection. section) to hide ot display. BACKLIGHT CLOCK Press any button or display saeen area to activate baddlght To set the clock: 1. 2. Press Press SET + 1- CLOCK to enter dock setting. to change the settings. (TM: Press and hold • / - to rapidly change values). SPECIFICATIONS 1. SNOOZE : Schkenrneralann I. SNOOZE : Active la repetition de 5. Channel switch (1-3) aktivieren alarms 6. Detachable table stand Im" : 2. Frostwamer-Anzeige 3. Empfangsenzeige for FunksendeWnheit / exlemer Kenai ausgewilhit 4. t ieet.emBaititaer"iaengetgr Sendeeinheft odmeach 5. cti : Batteries der Basiseinheit seiweeh 6 = : gibt an, welcher Messwert angezeigt wind (Maximal- / Minimateert) 7. Innen- /Auftentemperatur / Luftfeuchtigkelt 6. ALARM : Alarrnmodus wkd angezeigt 9. 0 : Alarmist aktiviert 10. unrapit i Kati:40w/ Symbol fOr Funlaigni 11. SET CLOCK : Zekeinstellung aufrufen: Einskillung bestfiligen and nur nachsten Obergehen 12.SET ALARM : Alarmeinstetiung aufrufern Alermeinstellung beskitigen 13-ALARM ON I Off: Alarm eln- I ausschalten 2. Indic.sdor de alerts de heladas 3. Opt: Indicator de reception del control remoto y canal extern° seleccionado 4. 5. Por:evede"s"bPaletes e"lni ssceansor irx : Piles bass en la unidad principal 6. = : Indica el registro que se muestra en paddle (maximo / minimo) 7. Temperatura/Hurnedad ..... REMOTE SENSOR (SL109H) BACK VIEW interne / externs 8. ALARM : La pintail muestra el rnodo alamia 9. 4 : La Namur este &abrade 10.rworceiwoosirons.cow reekcontroleis 11. SET CLOCK : Nuster la has / Confimiar y pester al siguiente ajuste 12. SET ALARM : Ajustar la sienna / Confirmer ajuste de la alarms 13.ALARM ON I OFF : Activar o • desectivar la alarms 14.+/ • : incrementar o disminvir los al (Hallos / Ravager por las opciones gr. Indicator. LEO : lempeggia quendo NNW remote trasmette use 2. rilevazione. 3. Foro per fisseggio a perete 4. RESET : consents di ripristinare i 5. valor' predefiniti dell'unita 6. Vane batlerie Levetta canals (1-3) Support de tavolo rimovibile 01. Voyant LED : Clignote *rapine in sonde sans fit transmet les donnees. 2. Trou de fixation murals 3. RESET : reinitialise rappamil aux 2. 4. reglages par defaut 5. Compartiment des piles 6. Bouton de canal (1-3) 3. Support detachable 4 end. LED-Indikator Blinkt bel Obertragung elites Messwerts durch 2. die Funksendeeinheit 3. Offnung Sir Wandmontage g. 4. RESET : Gatti auf 5. Standartleinstellungen zurOcksetzen 6. Batteriefech Kanalschalter (1-3) 14.* I - : Snetellungswert de configuration erhOhen I vertingem; zwischen 15. CompartImento de las piles Einstellungsoplionen wediseln 15.Batteriefach 16.•hCPaI I•FInHglmmHg 16.'C / 7 hPa / InHg/ mmHg 17. RESET • Reiniciar la unidad a la . corffiguracffin predetermInade 17. RESET : Galt auf '18. SENSOR : Mickr bUsqueda del Standardeinstellungen zurOcksetzen sensor 18. SENSOR : Suche nach Sendeeinheit 19. DISPLAY : Ocular o mostrar la veranlassen information del reld / calendarlo Abnehmberer Thichstender . Indicedor LED : La luz parpadea cuando la unidad remora transmits 2. une lecture. 3. Orificio pare colgarlo en pared 4. RESET : Reiniciar la unidad a la 5. configuration predeterminada 6. Compartimento de les piles Selector de canal (1-3) Sopode desmontable pare apoyo 19.DISPLAY : Uhr / Kalenderdaten 20.RCC 8, EU / UK verbergen o r anzeigen a mesa 20.RCC 8. EU/UK • Do not clean the unit with abrasive or corrosive materials. • Do not tamper with the unWs Internal components. This Invalidates the warranty. • Only use frees batteries. Do not mix new and old batteries. • • images shown in this manual may differ tom) the actual display. • When disposing of this product. ensureIts collected separately for special treatment and notes normal household waste. • Placement of this product on certain types of wood may result in damage to its finis for which Oregon Scientific will not be responsible. Consult the furniture manufacturer's care instructions for information. • The contents of this manual may not be reproduced without the permission of the manufacturer. • Do not dispose old batteries as unsorted manicipal waste. Collection of such • waste separately for special treahnent is necessary. Please not that some units are equipped with a battery safety ship. Remove the strip form the battery compartment before first use. • Should there be any discrepancy between the English and other language versions. the English version shall apply and prevail. NINE The technid spedfications for this product and the contents of the user manual are subject to change without notice. NINE Features and accessories wit not be available in all countries. For more information, please contact your local retailer. ABOUT OREGON SCIENTIFIC FCC STATEMENT This device complies with Part 15 of the FCC Rules. Operation Is subject to the following two conditions: (1) This device may not cause harmful interference, and (2) This device must accept any interference received, including interference that maa muse undesired operation. Changes or modifications not expressly approved by the party resuponable for compliance could void the user's authority to operate the 2116nThis equipment has been tested and found to comply with the limits for a Class B digital device, pursuant to Part 15 of the FCC Rules. These limits are designed to provide reasonable protection against harmful interference In a residential Installation. This equipment generates, uses and can radiate radio frequency energy and, If not installed and used.in accordance with the instructions, may cause harmful interference to radio communications. However, there Is no guarantee that interference will not occur in a particular Installation. HMIs equipment does cause harmful Interference to radio or television reception, which can be determined by turning the equipment off and on, the user Is encouraged to try to correct the interference by one or MO., of the following measures: • Reorient or relocate the receiving antenna. • Increase the separation between the equipment and receiver. • Connect the equipment into an outlet on a circuit different from that to which the receiver is connected. • Consult the dealer or an experienced radio / TV technician for help. 3. Press SET CLOCK again to confirm and exit setting. The selling order is: 12 / 24 hr format, time, year, calendar format (m / d). date. TYPE LxWxH DESCRIPTION 112 x 120x 127 mm (4.4 x4.7 x5.0iffi Visit our website (vArrworsoonscientific.com) to learn more about Oregon Scientift products. DECLARATION OF CONFORMITY ALARM To sat the alarm: 1. Press SET ALARM to enter alarm setting. 2. Press • / - to set the alarm time. (Tip: Press and hold • / • to rapidly change values). 3. IRnOdiWcatSeEs TalaArLmAIRsMona.gain to confirm and salt setting. To activate or deactivate the alarm: 1. Press ALARM ON / OFF to view set alarm time. 2. Press ALARM ON / OFF to activate / deactivate alarm. To silence the alarm: • Press down on SNOOZE to silence it for 8 minutes. Weight 230g (8.1oz) TerriperstspiHumiditymire -5'Cto50°C ( 23 °F to 122 '7)/20% - 95% Signal frequency 433 MHz Power 2 x UM-3 (AA) 1.5 V batteries SENSOR TYPE DESCRIPTION LxWeH 80 x 16 x 80 mm (3.2 x 0.6 x 3.2 in) Weight 50g (1.80z) without batteries Temperalure/ HuntidRy rant. -20 'C to 60*C ( 'F to 140 °F) 20%- 95% Signal frequency 40 m (131 ft) unobstructed Power 2 x UM-4 (AAA) 1.5 V batteries If you're in the US and would gee to contact your Customer Care department directly. please visit For international ingbtM s= n4vtaiCttblirl-i=lcmfigigooug is.(€na1150dl_Bsg EU-DECLARATION OF CONFORMITY Hereby, Oregon Scientific, declares that the Snap Weather forecast (Model: SL103) is in compliance with the essential requirements and other relevant provisions of Directive 1999 / 5 / EC. A copy of the signed and dated Declaration of Conformity is available on request via our Oregon Scientific Customer Service. Est!§) The following information is not ro be used as contact for support or sales.Please call our customer service number (listed on our website at vnwv.oregonsdentilic. corn), or on the warranty card for this product) for all inquiries instead. We Name: Address: Telephone No.: Oregon Scientific, Inc. 19861 SW 95th Ave.,Tualatin, Oregon 97062 USA 1.800-853-8883 declare that the product Product No.: Product Name: Manufacturer / Importer: SL103 Snap Weather Forecast Oregon Scientific Global Distribution Limited TEMPERATURE AND HUMIDITY STolidsee°leCc/t'tFemswpeitcraht.ure / humidity unit: To toggle between each sensor's readings: Touch CHANNEL region (middle display section) repeatedly OR Touch and hold CHANNEL region to initiate auto toggle of channel readings. To end, touch CHANNEL region. PRECAUTIONS • Do not subject the unit to excessive force. shod% dust. temperature or humidity. • Do not cover the ventilation holes with any items such as newspapers, curtdns etc. • Do not immerse the unit in water. If you spill liquid over it, dry ft irnmedalelY with a soft, lint-free cloth. Fascia di temperature/ I da -5 a 50 °C Co.**. RTTE RProova Complied a EU SsOneendn end Noes Address: Block C, 9/F, Kaiser Estate, Phase 1.41 Man Yee St., Hung Hom, Kowloon. Hong Kong
-
 1
1
 |
 |