Panasonic AW-HS50 How-To Store Still Images in HS50 Software Frame Memory - Page 2
Multi View Display Screen
 |
View all Panasonic AW-HS50 manuals
Add to My Manuals
Save this manual to your list of manuals |
Page 2 highlights
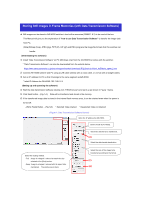
★ If you transfer the image with Alpha Channel included, you can select [RGBA(1&2)] button. - (Fig.1-C) Select the image data file you want to transfer and click [RGBA(1&2)] button. Then select FMEM1 at the [Target] section and click Send button. RGB image will be transferred to FMEM1 and Alpha Channel image will be transferred to FMEM2. ★ Imported still images can be seen on Multi View Display or using the bus selected for FMEM1 / 2. * To use Multi View Display, you need to put the settings for output signal in advance. (Multi View Display Screen) When the setting below is at [On], the image stored in AUX bus is displayed for about 2 seconds after being imported. - [12] USER/FMEM > 6. AUX To FMEM => Rv: [On] Imported Still Image
-
 1
1 -
 2
2
 |
 |

★
If you transfer the image with Alpha Channel included, you can select [RGBA(1&2)] button. – (Fig.1-C)
Select the image data file you want to transfer and click [RGBA(1&2)] button.
Then select FMEM1 at the [Target]
section and click Send button.
RGB image will be transferred to FMEM1 and Alpha Channel image will be
transferred to FMEM2.
★
Imported still images can be seen on Multi View Display or using the bus selected for FMEM1 / 2.
* To use Multi View Display, you need to put the settings for output signal in advance.
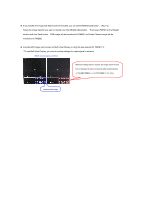
(Multi View Display Screen)
When the setting below is at [On], the image stored in AUX
bus is displayed for about 2 seconds after being imported.
- [12] USER/FMEM > 6. AUX To FMEM => Rv: [On]
Imported Still Image