Panasonic AW-SF100/SF200 AW-SF100 Installation Instructions
Panasonic AW-SF100/SF200 Manual
 |
View all Panasonic AW-SF100/SF200 manuals
Add to My Manuals
Save this manual to your list of manuals |
Panasonic AW-SF100/SF200 manual content summary:
- Panasonic AW-SF100/SF200 | AW-SF100 Installation Instructions - Page 1
AW-SF100 Standalone Version Installation Procedures Revision 4.05 June. 21, 2019 - Panasonic AW-SF100/SF200 | AW-SF100 Installation Instructions - Page 2
1. INTRODUCTION ...3 2. SETTING THE REMOTE CAMERA 4 3. INSTALLATION ...7 4. STARTUP AND EXIT 20 4.1. Starting the Software 20 4.2. Exiting the Software 20 5. ABOUT THE OPERATION MANUAL 20 6. ABOUT ACTIVATION 20 - Panasonic AW-SF100/SF200 | AW-SF100 Installation Instructions - Page 3
1. Introduction This manual describes the installation procedures of the Auto Tracking Software (Standalone version) that runs on a Windows PC. Operating Environment The below-mentioned environment is necessary for - Panasonic AW-SF100/SF200 | AW-SF100 Installation Instructions - Page 4
• Panasonic recommends a wired connection between the PC and remote camera. In the case of a wireless connection, sufficient tracking performance may not be achieved. • When using GPU for human body detection through deep learning, you must install CUDA Toolkit in the server pc. When using a GPU - Panasonic AW-SF100/SF200 | AW-SF100 Installation Instructions - Page 5
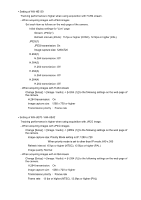
• Setting of AW-HE130 Tracking performance is higher when using acquisition with H.264 stream. - When acquiring images with JPEG images Set each item as follows on the web page of the camera. Initial display settings for "Live" page Stream: JPEG(1) Refrash interval (JPEG) : 15 fps or higher (NTSC), - Panasonic AW-SF100/SF200 | AW-SF100 Installation Instructions - Page 6
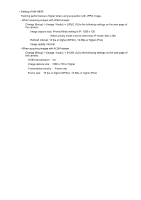
• Setting of AW-HE40 Tracking performance is higher when using acquisition with JPEG image. - When acquiring images with JPEG images Change [Setup] -> [Image / Audio] -> [JPEG (1)] to the following settings on the web page of the camera. Image capture size: Priority Mode setting is IP: 1280 x 720 - Panasonic AW-SF100/SF200 | AW-SF100 Installation Instructions - Page 7
3. Installation Please Install the Software, according to the following procedure. • To install the software, log in as a user having the Administrator authority. • Please continue with the process by clicking the "Yes" when the confirmation of the user account control is displayed during - Panasonic AW-SF100/SF200 | AW-SF100 Installation Instructions - Page 8
3-1. If the installation of Node.js is required, the following screen will be displayed. Click [Next]. 3-2. Select [I accept the terms in the license agreement], and then click [Next]. - Panasonic AW-SF100/SF200 | AW-SF100 Installation Instructions - Page 9
3-3. Click [Next]. 3-4. Click [Next]. - Panasonic AW-SF100/SF200 | AW-SF100 Installation Instructions - Page 10
3-5. Click [Install]. 3-6. Click [Finish] to close the dialog box.. - Panasonic AW-SF100/SF200 | AW-SF100 Installation Instructions - Page 11
4-1. If the installation of "Windows Server 2003 Resource Kit Tools" is required, the following screen will be displayed. Select [Run program]. 4-2. Click [Next]. - Panasonic AW-SF100/SF200 | AW-SF100 Installation Instructions - Page 12
4-3. Select [I Agree] and click [Next]. 4-4. Click [Next]. - Panasonic AW-SF100/SF200 | AW-SF100 Installation Instructions - Page 13
4-5. Click [Install Now]. 4-6. Click [Finish] to close the dialog box. - Panasonic AW-SF100/SF200 | AW-SF100 Installation Instructions - Page 14
4-7. If the confirmation screen of the PC restart appears, click [Yes] to restart PC. 5. If the installation of .NetFramework4.5 is required, the following screen will be displayed, the installation will be performed automatically. - Panasonic AW-SF100/SF200 | AW-SF100 Installation Instructions - Page 15
6-1. If the installation of MjpegProcessor is required, the following screen will be displayed, click [Next]. 6-2. Since the confirmation screen of the installation location appears, click [Next]. - Panasonic AW-SF100/SF200 | AW-SF100 Installation Instructions - Page 16
6-3. The screen for starting installation appears. Click [Next]. 6-4. When installation is complete, click the [Close] button to close the dialog box. - Panasonic AW-SF100/SF200 | AW-SF100 Installation Instructions - Page 17
7. When the installation of the required components is completed, the installation screen appears. Click [Next]. 8. The Software License Agreement appears. Check the content, and if there is no problem, select [I accept the terms in the license agreement], and then click [Next]. - Panasonic AW-SF100/SF200 | AW-SF100 Installation Instructions - Page 18
9. The screen for starting installation appears. Click [Install]. 10. When the following screen appears, set each item and click [Setup]. Web Server Hostname: Set the IP address set for the PC's network adapter Add Windows Firewall Setting for Web Application: Turn the checkbox ON to change the - Panasonic AW-SF100/SF200 | AW-SF100 Installation Instructions - Page 19
12. A confirmation screen appears, Click [Yes]. 13. Close the screen that is displayed in step 10 by clicking the X button in the upper right corner of the screen. 14. When installation is complete, click the [Finish] button to close the dialog box. - Panasonic AW-SF100/SF200 | AW-SF100 Installation Instructions - Page 20
the Software While the application is running, click the × button at the top right of the window to exit the software. 5. About the Operation Manual The operation manual of this software is provided in the help file format displayed on the Web browser. Click ? button on the upper left of the screen
-
 1
1 -
 2
2 -
 3
3 -
 4
4 -
 5
5 -
 6
6 -
 7
7 -
8
-
9
-
10
-
11
-
12
-
13
-
14
-
15
-
16
-
17
-
18
-
19
-
20
 |
 |

AW-SF100
Standalone Version
Installation Procedures
Revision 4.05
June. 21, 2019