Panasonic HDCTM60 Hd Camcorder - Multi Language - Page 88
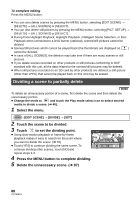
Dividing a scene to partially delete
 |
View all Panasonic HDCTM60 manuals
Add to My Manuals
Save this manual to your list of manuals |
Page 88 highlights
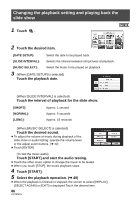
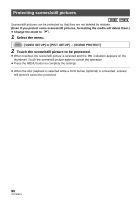
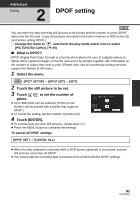
To complete editing Press the MENU button. ≥ You can also delete scenes by pressing the MENU button, selecting [EDIT SCENE] # [DELETE] # [ALL SCENES] or [SELECT]. ≥ You can also delete still pictures by pressing the MENU button, selecting [PICT. SETUP] # [DELETE] # [ALL SCENES] or [SELECT]. ≥ During Face Highlight Playback, Highlight Playback, Intelligent Scene Selection, or Disc Playback when connected to a DVD burner (optional), scenes/still pictures cannot be deleted. ≥ Scenes/still pictures which cannot be played back (the thumbnails are displayed as ) cannot be deleted. ≥ In case of [ALL SCENES], the deletion may take time if there are many scenes or still pictures. ≥ If you delete scenes recorded on other products or still pictures conforming to DCF standard with this unit, all the data related to the scenes/still pictures may be deleted. ≥ When still pictures recorded on an SD card by other products are deleted, a still picture (other than JPEG) that cannot be played back on this unit may be erased. Dividing a scene to partially delete To delete an unnecessary portion of a scene, first divide the scene and then delete the unnecessary portion. ≥ Change the mode to and touch the Play mode select icon to select desired media to divide a scene. (l 40). 1 Select the menu. MENU : [EDIT SCENE] # [DIVIDE] # [SET] 2 Touch the scene to be divided. 3 Touch to set the dividing point. ≥ Using slow-motion playback or frame-by-frame playback makes it easy to search for the point where you want to divide the scene. (l 78) ≥ Touch [YES] to continue dividing the same scene. To continue dividing other scenes, touch [NO] and repeat steps 2-3. 4 Press the MENU button to complete dividing. 5 Delete the unnecessary scene. (l 87) 0h00m00s 88 VQT2M51
-
 1
1 -
2
-
3
-
4
-
5
-
6
-
7
-
8
-
9
-
10
-
11
-
12
-
13
-
14
-
15
-
16
-
17
-
18
-
19
-
20
-
21
-
22
-
23
-
24
-
25
-
26
-
27
-
28
-
29
-
30
-
31
-
32
-
33
-
34
-
35
-
36
-
37
-
38
-
39
-
40
-
41
-
42
-
43
-
44
-
45
-
46
-
47
-
48
-
49
-
50
-
51
-
52
-
53
-
54
-
55
-
56
-
57
-
58
-
59
-
60
-
61
-
62
-
63
-
64
-
65
-
66
-
67
-
68
-
69
-
70
-
71
-
72
-
73
-
74
-
75
-
76
-
77
-
78
-
79
-
80
-
81
-
82
-
 83
83 -
 84
84 -
 85
85 -
 86
86 -
 87
87 -
 88
88 -
 89
89 -
 90
90 -
 91
91 -
 92
92 -
 93
93 -
94
-
95
-
96
-
97
-
98
-
99
-
100
-
101
-
102
-
103
-
104
-
105
-
106
-
107
-
108
-
109
-
110
-
111
-
112
-
113
-
114
-
115
-
116
-
117
-
118
-
119
-
120
-
121
-
122
-
123
-
124
-
125
-
126
-
127
-
128
-
129
-
130
-
131
-
132
-
133
-
134
-
135
-
136
-
137
-
138
-
139
-
140
-
141
-
142
-
143
-
144
-
145
-
146
-
147
-
148
-
149
-
150
-
151
-
152
-
153
-
154
-
155
-
156
-
157
-
158
-
159
-
160
 |
 |