Panasonic KX FL501 Laser Fax - Page 1
Panasonic KX FL501 - B/W Laser - Fax Manual
 |
UPC - 037988809141
View all Panasonic KX FL501 manuals
Add to My Manuals
Save this manual to your list of manuals |
Page 1 highlights
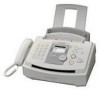
This document is a text description of the control panel layout for the product listed below. "PDF" files of the complete operating instructions are available from the Customer Support section of www.Panasonic.com. If you need the operating instructions in an alternate format, please request it from Customer Support. High Speed Laser Fax with Copier Function Model Number KX-FL501 Finding the Controls The control panel of the unit is divided into three equal parts: left, middle, and right. Left part: This part contains the telephone keypad laid out in the conventional telephone arrangement with a "nib" on the 5 button. Below the keypad are four circular buttons in a horizontal row: from left to right, REDIAL, HANDSET MUTE, FLASH and MONITOR. The REDIAL button is also the PAUSE button. Middle part: At the top middle part of the panel is a smooth surface. This is the display. Immediately below the display is the ONE-TOUCH LABEL CARD, which has three rectangular buttons each, in vertical rows at both ends. Below this card are three circular buttons in a horizontal row: from left to right, HELP, DIRECTORY PROGRAM and MENU. Below these buttons are two more buttons: On the left is the CALLER ID PRINT button and on the right is the CALLER ID SEARCH button. Immediately below the CALLER ID PRINT button is the IQ-FAX button. To the right of these buttons is the JOG DIAL, a large circular dial that clicks as it rotates. Each click indicates one jog step. Right part: Just to the right of the display, the half-moon shaped button is the AUTO ANSWER button. To the right of this button is the COPY ZOOM button, this can be pressed in up and down positions which are PLUS and MINUS keys respectively. These are also the VOLUME control increase and decrease keys. Below this button are three small buttons in a horizontal row: from left to right, COLLATE, RESOLUTION and QUICK SCAN START. Immediately below these buttons is a button marked with an indented page icon.
-
 1
1 -
 2
2
 |
 |
