Panasonic KX-TG2352W 2.4 Ghz Cordles Phon - Page 2
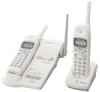
Base unit, Charger Unit
 |
UPC - 037988473175
View all Panasonic KX-TG2352W manuals
Add to My Manuals
Save this manual to your list of manuals |
Page 2 highlights
The Handset Speaker is the rectangular textured area on the back of the handset (behind the display). The triangular pattern of raised texture just below the Handset Speaker indicates the battery compartment. The battery door can be opened by pushing in and down on this area. Along the left and right sides of the handset are two indentations, which are parallel to the display, that secure the belt clip. The belt clip is a T-shaped plastic piece with two curved arms and one long arm. The belt clip snaps into place with the small ridges on the curved arms locking into each of the indentations on the side of the handset. The two metal ridges at the bottom of the handset are the charge contacts. On the left side of the handset, parallel to the TALK button, is the headset jack covered with a little round rubber cap. This cap can be opened by pulling down, and is not removable. Base unit With the base unit facing you, the antenna is on the right side of the base unit and it should be positioned pointing upwards. The handset's charging cradle is on the left side of the base unit. This is about 1 inch deep depression. For charging, the bottom of the handset is placed in the cradle with the handset buttons facing up. The handset also can be placed in the cradle by the inverted position. The unit beeps when the handset is set properly in the cradle for charging. If the unit is wall-mounted, you should push in and turn around the hook on the top of the cradle so that the handset will be held securely. To the lower right of the cradle, further below the top on the front are two indicator lights in a vertical column. The top is the CHARGE indicator and below is the IN USE/HOLD indicator. Immediately below the IN USE/ HOLD indicator are three ovals with a clipped edge in a horizontal row. They are HANDSET LOCATOR buttons 1 to 3 from left to right. They are also INTERCOM buttons 1 to 3 from left to right. Directly below these buttons is a large rectangle with the right edge round. This is the HANDSET LOCATOR ALL button with several "nibs". This is also the INTERCOM ALL button. The base unit microphone is located at the bottom of the base unit below this large button. Charger Unit
-
 1
1 -
 2
2 -
 3
3
 |
 |
