Panasonic PT47WX34 PT47WX34 User Guide - Page 11
DVI Digital Visual Interface input connection, Special Remote Buttons
 |
View all Panasonic PT47WX34 manuals
Add to My Manuals
Save this manual to your list of manuals |
Page 11 highlights
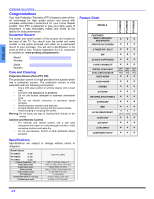
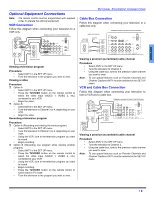
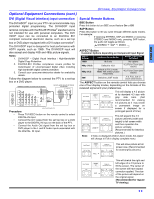
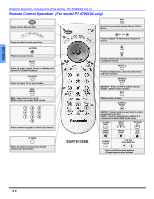
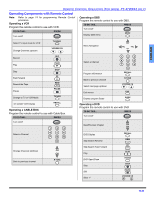
ENGLISH OPTIONAL EQUIPMENT CONNECTIONS Optional Equipment Connections (cont.) DVI (Digital Visual Interface) input connection The DVI/HDCP1 input on your PTV can accommodate copy protected digital programming. The DVI/HDCP input terminal complies with the EIA-861Profiles2 standard and is not intended for use with personal computers. The DVI/ HDCP input can be connected to an EIA/CEA 861 compliant consumer electronic device, such as a set top box or DVD player equipped with a DVI output connection3. The DVI/HDCP input is designed for best performance with HDTV signals, such as 1080i. The DVI/HDCP input will also accept and display 480i and 480p picture signals. Notes: 1. DVI/HDCP = Digital Visual Interface / High-Bandwidth Digital Copy Protection. 2. EIA/CEA-861 Profiles compliance covers profiles for transmission of uncompressed digital video including high bandwidth digital content protection. 3. Consult your consumer electronics dealer for availability details. Follow the diagram below to connect the PTV to a set top box or a DVD player. TERMINALS ON BACK OF PROJECTION TELEVISION ANT 1 VIDEO Y PB S-VIDEO DIGITAL IN DVI OUT JACKS ON BACK OF STB OR DVD PLAYER DVI OUT AUDIO OUT L R SPLIT OUT ANT 2 PR VIDEO L L L AUDIO R R R 1 2 AUDIO COMPONENT INPUT INPUT INPUT PROG VIDEO INPUT 1 2 3 OUT TO AUDIO AMP CABLES NOT SUPPLIED Procedure • Press TV/VIDEO button on the remote control to select DIGITAL-IN input. • Connect the DVI output from the set top box or a DVD player to the DIGITAL IN input on the back of the PTV. • Connect the Audio Out signal from the set top box or DVD player to the L and R Audio inputs associated with the DIGITAL IN input. Special Remote Buttons BBE Button Press this button to turn BBE sound feature On or Off. SAP Button Press this button to let you cycle through different audio modes. For example: • If receiving STEREO, SAP and MONO or receiving STEREO and MONO only, pressing SAP button, the audio will toggle as follows: STEREO SAP MONO ASPECT Button Customer Options depending on Component Input Signal INPUT SIGNAL 1080i 480p (16:9) 480p (4:3) 480i DISPLAY ON SCREEN 16:9 only Default to 16:9 Default to FULL mode. Note: Will stretch picture horizontally. Default to JUST mode ASPECT BUTTON OPTIONS No options 4:3, Full or Zoom (see below) 4:3, Full or Zoom (see below) 4:3, Full, Just or Zoom (see below) The ASPECT button on the remote control lets you choose one of four display modes, depending on the formats of the received signal and your preferences. Input Signal ASPECT 480i or 480p 4:3 Image on 16:9 Screen Size 4 3 This will display a 4:3 picture at its standard 4:3 size with gray side bars. (Not recommended for viewing 4:3 pictures as it may create a permanent image on screen if displayed for a prolonged period of time.) Input Signal ASPECT 480i or 480p ZOOM Image on 16:9 Screen Size 16 9 This will expand the 4:3 picture uniformly (width and height) to full screen width and then reposition the picture vertically. (Recommended for letterbox pictures.) Note: If menu is displayed while in Zoom mode, the aspect will change to Full to display complete menu. Input Signal ASPECT 480i or 480p FULL Image on 16:9 Screen Size 16 This will show picture at full screen size. (Recommended for anamorphic pictures.) 9 Input Signal 480i ASPECT JUST Image on 16:9 Screen Size 16 9 This will stretch the right and left edges of a 4:3 picture to fill the screen, The center of the screen will have aspect correction applied. The size of the picture will depend on the original signal. (Recommended for regular TV viewing.) 9 z
-
 1
1 -
2
-
3
-
4
-
5
-
 6
6 -
 7
7 -
 8
8 -
 9
9 -
 10
10 -
 11
11 -
 12
12 -
 13
13 -
 14
14 -
 15
15 -
 16
16 -
17
-
18
-
19
-
20
-
21
-
22
-
23
-
24
-
25
-
26
-
27
-
28
-
29
-
30
-
31
-
32
-
33
-
34
-
35
-
36
-
37
-
38
-
39
-
40
-
41
-
42
-
43
-
44
-
45
-
46
-
47
-
48
-
49
-
50
-
51
-
52
-
53
-
54
-
55
-
56
-
57
-
58
-
59
-
60
-
61
-
62
-
63
-
64
-
65
-
66
-
67
-
68
-
69
-
70
-
71
-
72
-
73
-
74
-
75
-
76
-
77
-
78
-
79
-
80
-
81
-
82
-
83
-
84
-
85
-
86
-
87
-
88
-
89
-
90
-
91
-
92
-
93
-
94
-
95
-
96
-
97
-
98
-
99
-
100
-
101
-
102
-
103
-
104
-
105
-
106
-
107
-
108
-
109
-
110
-
111
-
112
 |
 |
