Panasonic PT50DL54 PT50DL54 User Guide - Page 12
Vcr, Cable Box, Vcr And Cable Box - remote control
 |
View all Panasonic PT50DL54 manuals
Add to My Manuals
Save this manual to your list of manuals |
Page 12 highlights
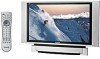
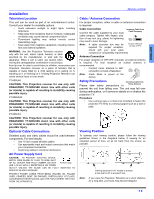
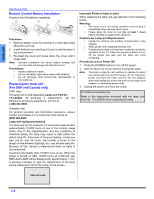
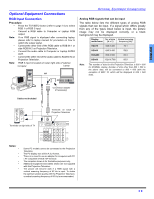
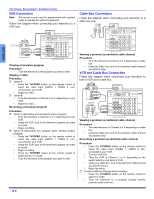
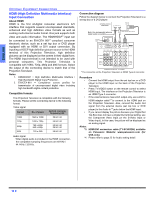
ENGLISH OPTIONAL EQUIPMENT CONNECTIONS VCR Connection Note: The remote control must be programmed with supplied codes to operate the optional equipment. Follow this diagram when connecting your television to a VCR only. Incoming Cable VCR PLAY R E FF W STOP ANT IN ANT OUT VIDEO OUT L AUDIO OUT R ANT TERMINALS ON BACK OF TELEVISION AUDIO IN RGB 1 IN R-AUDIO IN-L HDMI AV IN IN 1 IN 2 OUT IN 1 IN 2 IN 3 Y Y Y S-VIDEO PB PB PB VIDEO VIDEO PR PR PR L AUDIO R L L L L AUDIO R R R R COMPONENT VIDEO INPUT CABLES NOT INCLUDED Viewing a television program Procedure • Tune the television to the program you want to view. Viewing a video Procedure ˆ Option A • Press the TV/VIDEO button on the remote control to select the video input (VIDEO 1, VIDEO 2, etc.) connected to your VCR. • Begin the video. ˆ Option B • Tune the television to Channel 3 or 4, depending on your VCR. • Begin the video. Recording a television program Procedure ˆ Option A (Recording and viewing the same program) • Tune the television to Channel 3 or 4, depending on your VCR. • Using the VCR, tune to the television program you want to record. • Begin recording. ˆ Option B (Recording one program while viewing another program) • Press the TV/VIDEO button on the remote control to select the video input (VIDEO 1, VIDEO 2, etc.) connected to your VCR. • Using the VCR, tune to the television program you want to record. • Begin recording. • Press the TV/VIDEO button on the remote control to switch back to TV mode. • Tune the television to the program you want to view. Cable Box Connection Follow this diagram when connecting your television to a cable box only. CABLE BOX 15 ANT IN ANT OUT ANT TERMINALS ON BACK OF TELEVISION AUDIO IN RGB 1 IN R-AUDIO IN-L HDMI AV IN Incoming Cable IN 1 IN 2 OUT IN 1 Y IN 2 Y IN 3 Y S-VIDEO PB PB PB VIDEO VIDEO PR PR PR L AUDIO R L L L L AUDIO R R R R COMPONENT VIDEO INPUT CABLES NOT INCLUDED Viewing a premium (scrambled) cable channel Procedure • Tune the television to Channel 3 or 4 depending on cable box. • Using the cable box, tune to the premium cable channel you want to view. VCR and Cable Box Connection Follow this diagram when connecting your television to both a VCR and a cable box. VCR PLAY R E FF W STOP ANT IN ANT OUT ANT VIDEO OUT L AUDIO OUT R TERMINALS ON BACK OF TELEVISION AUDIO IN RGB 1 IN R-AUDIO IN-L HDMI AV IN IN 1 IN 2 OUT IN 1 IN 2 IN 3 CABLE BOX 15 ANT OUT ANT IN S-VIDEO VIDEO Y Y Y PB PB PB VIDEO PR PR PR Incoming Cable L AUDIO R L L L L AUDIO R R R R COMPONENT VIDEO INPUT CABLES NOT INCLUDED Viewing a premium (scrambled) cable channel Procedure • Tune the television to Channel 3 or 4 depending on cable box. • Using the cable box, tune to the premium cable channel you want to view. Recording a premium (scrambled) cable channel Procedure • Press the TV/VIDEO button on the remote control to select the video input (VIDEO 1, VIDEO 2, etc.) connected to your VCR. • Turn the VCR ON. • Tune the VCR to Channel 3 or 4, depending on the switch setting on the back of VCR. • Using your cable box, tune to the premium cable channel you want to record. • Begin recording. ˆ To view a different channel while recording: • Press the TV/VIDEO button on the remote control to select TV mode. • Tune the television to a program (except another premium cable channel). 10 z
-
 1
1 -
2
-
3
-
4
-
5
-
6
-
 7
7 -
 8
8 -
 9
9 -
 10
10 -
 11
11 -
 12
12 -
 13
13 -
 14
14 -
 15
15 -
 16
16 -
 17
17 -
18
-
19
-
20
-
21
-
22
-
23
-
24
-
25
-
26
-
27
-
28
-
29
-
30
-
31
-
32
-
33
-
34
-
35
-
36
-
37
-
38
-
39
-
40
-
41
-
42
-
43
-
44
-
45
-
46
-
47
-
48
-
49
-
50
-
51
-
52
-
53
-
54
-
55
-
56
-
57
-
58
-
59
-
60
-
61
-
62
-
63
-
64
-
65
-
66
-
67
-
68
-
69
-
70
-
71
-
72
-
73
-
74
-
75
-
76
-
77
-
78
-
79
-
80
-
81
-
82
-
83
-
84
-
85
-
86
-
87
-
88
-
89
-
90
-
91
-
92
-
93
-
94
-
95
-
96
-
97
-
98
-
99
-
100
-
101
-
102
-
103
-
104
-
105
-
106
-
107
-
108
-
109
-
110
-
111
-
112
 |
 |