Panasonic PV GS320 Digital Video Camcor-english/spanish - Page 65
Menus Related To Taking Pictures, Menus Related To Playback, Other Menus
 |
UPC - 037988980277
View all Panasonic PV GS320 manuals
Add to My Manuals
Save this manual to your list of manuals |
Page 65 highlights
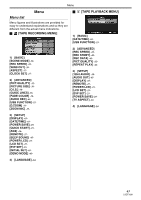
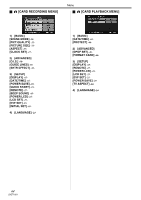
Menu Menus related to taking pictures Menus related to playback ª [DATE/TIME] This switches between date and time indications. ≥The Camcorder automatically records the date and time the picture was taken on the tape/card. ≥You can also show or change the date/time indication by repeatedly pressing the [DATE/ TIME] button on the remote control. ª [AUDIO REC] Switches the audio (PCM audio) recording systems. [12bit]: Records audio in "12 bit 32 kHz 4 tracks". (The original audio signals can be kept after the other audio signals are dubbed.) [16bit]: Records audio in "16 bit 48 kHz 2 tracks". Audio can be recorded in higher quality. (If audio signals are dubbed, then the original audio signals will be erased.) ª [DISPLAY] Set to [ON] and the display mode can be switched to all functions. Set to [OFF] and it can be switched to minimum display. ª [BEEP SOUND] Set to [ON] and confirmation/alarm beeps are issued as follows. 1 Beep ≥When you start recording ≥When you turn on the power ≥When the unit goes from quick start standby mode to recording pause 2 Beeps ≥When you pause recording ≥When you turn off the power ≥When the unit goes into quick start standby mode 2 Beeps for 4 times ≥When a cassette with its erasure prevention tab set to [SAVE] is inserted, condensation occurs (-72-) and at other times. Check the sentence displayed on the screen. (-67-) ª [REC DATA] Set to [ON] and the settings (shutter speed, iris/ gain values and white balance settings (-39-), etc.) used during the recordings are displayed during playback. ≥If the [AUTO/MANUAL/FOCUS] switch was set to [AUTO] when recording, [AUTO] appears on the display. ≥When there is no data, [---] appears on the display. ≥If data recorded on this unit is played back on other equipment (or a tape recorded on other equipment is played back on this unit), the settings information is sometimes not displayed normally. ª [AUDIO OUT] This switches the sound to be played back. [STEREO]: Stereo sound (main sound and sub sound) [L]: Left channel sound (main sound) [R]: Right channel sound (sub sound) Other menus ª [INITIAL SET] When there is a menu that cannot be selected depending on a combination of functions, set to [YES] for changing the menu settings back to the initial shipping condition. (Language setting cannot be back to the initial shipping condition.) ª [DEMO MODE] If you set to [DEMO MODE] >> [ON] without inserting a cassette and a card, the Camcorder is automatically set to the demonstration mode for introducing its functions. If any button is pressed or operated, the demonstration mode is canceled. If no operations take place for approx. 10 minutes, the demonstration mode automatically starts. To terminate the demonstration mode, insert a cassette or a card or set to [DEMO MODE] >> [OFF]. For normal use, set this function to [OFF]. 65 LSQT1091
-
 1
1 -
2
-
3
-
4
-
5
-
6
-
7
-
8
-
9
-
10
-
11
-
12
-
13
-
14
-
15
-
16
-
17
-
18
-
19
-
20
-
21
-
22
-
23
-
24
-
25
-
26
-
27
-
28
-
29
-
30
-
31
-
32
-
33
-
34
-
35
-
36
-
37
-
38
-
39
-
40
-
41
-
42
-
43
-
44
-
45
-
46
-
47
-
48
-
49
-
50
-
51
-
52
-
53
-
54
-
55
-
56
-
57
-
58
-
59
-
 60
60 -
 61
61 -
 62
62 -
 63
63 -
 64
64 -
 65
65 -
 66
66 -
 67
67 -
 68
68 -
 69
69 -
 70
70 -
71
-
72
-
73
-
74
-
75
-
76
-
77
-
78
-
79
-
80
-
81
-
82
-
83
-
84
-
85
-
86
-
87
-
88
 |
 |
