Panasonic SA-BX500 Operating Instructions
Panasonic SA-BX500 Manual
 |
View all Panasonic SA-BX500 manuals
Add to My Manuals
Save this manual to your list of manuals |
Panasonic SA-BX500 manual content summary:
- Panasonic SA-BX500 | Operating Instructions - Page 1
Operating Instructions AV Control Receiver Model No. SA-BX500 Dear customer Thank you for purchasing this product. Before connecting, operating or adjusting this product, please read the instructions completely. Please keep this manual for future reference. If you have any questions, contact In - Panasonic SA-BX500 | Operating Instructions - Page 2
replaced. Replace only with the same or equivalent type recommended by the manufacturer. Dispose of used batteries according to the manufacturer's instructions. HDMI, the HDMI logo and High-Definition Multimedia Interface are trademarks or registered trademarks of HDMI Licensing LLC. HDAVI Control - Panasonic SA-BX500 | Operating Instructions - Page 3
's instructions. replacement of the obsolete outlet. 12) Use only with the cart digital device, pursuant to Part received, including interference that may cause undesired operation. Responsible Party: Panasonic Corporation of North America One Panasonic Way Secaucus, NJ 07094 Support Contact: Panasonic - Panasonic SA-BX500 | Operating Instructions - Page 4
Home Theater has become easy! Connections Until now...Many different cables were necessary. With SA-BX500! Simple connections using 2 HDMI cables and 1 stereo connection cable! ∗ Other connections are also possible. Settings Until now...We must adjust the speaker settings... With SA-BX500! Manual - Panasonic SA-BX500 | Operating Instructions - Page 5
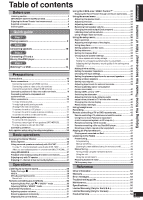
...2 IMPORTANT SAFETY INSTRUCTIONS ...3 Enjoying the Home Theater has become easy! ...4 Supplied accessories ...6 Control guide...6 Using the VIERA Link "HDAVI ControlTM" ...32 Enjoying the Home Theater through one-touch operations ...33 Using the sound menu ...34 Adjusting the speaker level ...34 - Panasonic SA-BX500 | Operating Instructions - Page 6
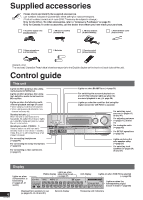
S VIDEO VIDEO L - AUDIO - R Display Lights on when 2-channel mix is functioning (➔ pages 27, 41 and 51) Lights on when Radio display sleep timer is set (➔ page 37) 2CH MIX SPEAKERS BI-WIRE A B Unit display Lights on when PCM FIX is selected (➔ page 39) Lights on when the corresponding digital - Panasonic SA-BX500 | Operating Instructions - Page 7
/SAT) HDMI 3 COMPONENT VIDEO Y A OR B/BI-WIRE : 4-8 Ω / EACH SPEAKER (CHAQUE) A AND B : 6-8 Ω / EACH SPEAKER (CHAQUE) SPEAKERS S VIDEO 6-8 Ω / EACH SPEAKER (CHAQUE) HAUT-PARLEURS Class2 wiring PB IN OUT BD/ TV MONITOR DVD PLAYER OUT IN DVD RECORDER VIDEO IN VCR IN CABLE/SAT IN GAME Digital - Panasonic SA-BX500 | Operating Instructions - Page 8
the Home Theater. • Turn off all equipment before making any connections. • Peripheral equipment sold separately unless otherwise indicated. • To connect equipment, refer to the appropriate operating instructions. Step 1 Placing speakers (➔ page 9) You can enjoy the best sound quality by setting - Panasonic SA-BX500 | Operating Instructions - Page 9
listening-viewing position. Measure the actual distance from each of the connected speakers to the listening-viewing position and perform steps instructed in "Setting distances" (➔ page 37) or perform steps instructed in "Auto speaker setup using the setup microphone" (➔ pages 24 and 25) when you - Panasonic SA-BX500 | Operating Instructions - Page 10
CD SUB 10 RQT9223 • Do not forget to take steps instructed in "Auto speaker setup using the setup microphone" (➔ pages 24 and 25) after connecting a new speaker. • When connecting speakers with the impedance of 4 Ω, make sure to set "4 OHMS " in "Setting the speaker impedance" on page 38. Note - Panasonic SA-BX500 | Operating Instructions - Page 11
ANT AUDIO DC OUT/SORTIE C.C. 5V 500mA MAX ENTER 75 Ω OPTION V.1 LOOP LOOP ANT EXT GND AM ANT BWOOFER SURROUND BACK SURROUND FRONT BD/DVD PLAYER / ANALOG 8CH IN OUT IN DVD RECORDER IN VCR IN CABLE/SAT IN GAME IN TV OUT SUBWOOFER OUT SUBWOOFER 11 RQT9223 Connecting speakers Quick guide - Panasonic SA-BX500 | Operating Instructions - Page 12
Audio cable Optical fiber cable (not included) Connecting equipment with HDMI terminal Connection cable Video and Audio cable HDMI Cable (not included) (It is recommended that you use Panasonic's HDMI cable.) Recommended part OPTICAL 2 OPTICAL 1 DIGITAL IN (CD) COAXIAL FM ANT AUDIO CENTER 75 Ω DC - Panasonic SA-BX500 | Operating Instructions - Page 13
B AUTO SPEAKER SETUP RETURN -SETUP OK TUNE SETUP MIC AUX S VIDEO VIDEO L - AUDIO - R • The "SURROUND" indicator lights on after the setting. • You can enjoy 2-channel sources with surround playback. SURROUND 13 RQT9223 Connecting a TV and a Blu-ray Disc/DVD player TV Quick guide - Panasonic SA-BX500 | Operating Instructions - Page 14
(to "HDMI" and others) " " "SURROUND" VOLUME INPUT SELECTOR WIRELESS READY MULTI CH PROCESSING TrueHD D+ DTS-HD MULTI CH LPCM BI-AMP SURROUND M.ROOM _ + POWER SURROUND SPEAKERS A SPEAKERS B AUTO SPEAKER SETUP RETURN -SETUP OK TUNE SETUP MIC AUX S VIDEO VIDEO L - AUDIO - R SURROUND - Panasonic SA-BX500 | Operating Instructions - Page 15
_ POWER SURROUND SPEAKERS A SPEAKERS B AUTO SPEAKER SETUP RETURN -SETUP OK TUNE SETUP MIC AUX S VIDEO VIDEO L - AUDIO - R 3 is not displayed, press [SPEAKERS A]. • Check the "SURROUND" indicator is lighting up. If not, press [SURROUND] on the unit to set surround playback (➔ pages 13 - Panasonic SA-BX500 | Operating Instructions - Page 16
/SAT IN GAME IN TV OUT SUBWOOFER LOOP ANT EXT GND AM ANT HDMI Video/Audio out HDMI Video/Audio out HDMI Video/Audio out DVD recorder HDMI connection Blu-ray Disc/DVD player Cable box, satellite receiver, etc. The HDMI input terminal on the unit's rear is made to specifications that presume - Panasonic SA-BX500 | Operating Instructions - Page 17
GND AM ANT 1 Digital audio VIDEO out (optical) OUT Digital audio VIDEO out (optical) OUT 2 (R) (L) VIDEO Audio out OUT (R) (L) Audio out VIDEO OUT (R) (L) VIDEO Audio out OUT Blu-ray Disc/ DVD player DVD recorder VCR Cable box or satellite receiver Game To connect a DVD recorder with built - Panasonic SA-BX500 | Operating Instructions - Page 18
Audio out OUT Blu-ray Disc/ DVD player Note DVD recorder VCR Cable box or satellite receiver Game 18 • The input video signal can be sent out through an output terminal of the same type only. RQT9223 • You can change the digital input terminal setting according to the equipment to connect - Panasonic SA-BX500 | Operating Instructions - Page 19
the settings for the digital input terminal and Component Video 3 terminal according to the equipment to connect (➔ page 39). 19 RQT9223 Connections To enjoy TV with surround sound, make connection or instructed on page 16 according to your equipment. Preparations Video cable Audio cable - Panasonic SA-BX500 | Operating Instructions - Page 20
• See page 27 for playback instructions. • When you make HDMI connections (➔ pages 12, 13 and 16), this connection is not necessary. To connect the unit to a CD player Make either digital audio (COAXIAL) output connections () or analog audio output connections () according to your equipment and - Panasonic SA-BX500 | Operating Instructions - Page 21
Press the dent. Hold the protrusion to remove. 21 RQT9223 Connections (DVD RECORDER) HDMI 1 (BD/DVD PLAYER) HDMI 2 (CABLE/SAT) HDMI 3 Preparations You can record audio or pictures to the equipment connected to DVD recorder output terminal (AUDIO, VIDEO, S VIDEO). See page 41 for more details. - Panasonic SA-BX500 | Operating Instructions - Page 22
play on 2 channels sources containing analog audio and 2-channel PCM signals (➔ page 51). • When connecting speakers with the impedance of 4 Ω, make sure to set "4 OHMS " in "Setting the speaker impedance" on page 38. • See "Notes on "To connect bi-wire speakers"" on page 50 for more details. To - Panasonic SA-BX500 | Operating Instructions - Page 23
unless otherwise indicated. • To connect equipment, refer to the appropriate operating instructions. To enjoy wireless audio with SH-FX67 You can connect left and right surround speakers wirelessly by using Panasonic SH-FX67 (a set consisted of a digital transmitter and a wireless system sold - Panasonic SA-BX500 | Operating Instructions - Page 24
displayed on the unit's display. • If " A " is not displayed, press [SPEAKERS A]. Connect the setup microphone (included). POWER SURROUND SPEAKERS A SPEAKERS B AUTO SPEAKER SETUP SETUP MIC AUX S VIDEO VIDEO L - AUDIO - R Setup microphone 4 SUB MENU Place the setup microphone (included). • Place - Panasonic SA-BX500 | Operating Instructions - Page 25
correct them manually. • See "Setting speakers and their sizes", "Setting distances" and "Setting the lowpass filter" (➔ pages 37 and 38). Error messages When one of the following error messages appears, press [-AUTO, TEST] to cancel and perform the auto speaker setup again. Message CONNECT MIC NO - Panasonic SA-BX500 | Operating Instructions - Page 26
nish the Home Theater Be sure to reduce the volume and press [^] to turn the unit to standby. Note • See page 50 for digital signals that can be played on this unit. • Images recorded with x.v.Color or Deep Color (➔ page 52) are also supported. • If " A " is not displayed in step 2, press [SPEAKERS - Panasonic SA-BX500 | Operating Instructions - Page 27
on either of the 2 sets. • Insert the digital transmitter supplied with the one which is OFF to this unit. (➔ page 23) Enjoying only with TV speaker • When image equipment such as TV and recorder is connected to this unit via HDMI (➔ pages 12, 13 and 16), images/audio signals from the recorder go - Panasonic SA-BX500 | Operating Instructions - Page 28
Digital and DTS sources on 7.1 channels (when two surround back speakers are connected to the unit) and on 6.1 channels (when only one surround back speaker is connected SFC (Sound Field Control) You can add presence and spread to surround sound according to your preference. TV/VIDEO MUSIC Use - Panasonic SA-BX500 | Operating Instructions - Page 29
25) or when you set them as absent in "Setting speakers and their sizes" (➔ page 37). _ + POWER SURROUND SPEAKERS A SPEAKERS B AUTO SPEAKER SETUP RETURN -SETUP OK TUNE SETUP MIC AUX S VIDEO VIDEO L - AUDIO - R SURROUND "MUSIC " "EX " (Dolby Digital EX) • The "SURROUND" indicator - Panasonic SA-BX500 | Operating Instructions - Page 30
Remote controlling sound effects See pages 28 and 29 for information about each mode. Adjusting Dolby Pro Logic - Panasonic SA-BX500 | Operating Instructions - Page 31
the current status 1. Press [INPUT SELECTOR]. 2. Press [DISPLAY]. • The sound volume, SFC setting and Digital input (terminal name/format) scroll in turn across the display. • When the unit is receiving a dual audio signal, the reception status is displayed (➔ page 35). • Preset channel number is - Panasonic SA-BX500 | Operating Instructions - Page 32
functions, use this unit's remote control. Connection Connect your home theater equipment (VIERA Link "HDAVI Control" compatible VIERA television and DIGA DVD recorder) with an HDMI cable. • It is recommended that you use Panasonic's HDMI cable. Recommended part number: RP-CDHG10 (1.0 m/3.3 ft - Panasonic SA-BX500 | Operating Instructions - Page 33
VIERA) input to HDMI terminal that this unit is connected to. Ensure that this unit's input is set to "DVD Enjoying the Home Theater through one-touch operations Aim the remote control at the TV goes on and the TV input changes. 3. The speakers produce sounds after the unit is turned on and the input - Panasonic SA-BX500 | Operating Instructions - Page 34
[OK] to confirm. SUB MENU S TV/VIDEO Adjustment range: C, LS, RS, SBL, SBR, SB (If you connect one surround back speaker); -20 dB to +10 dB SUBW; ---, MIN, 1 to 29, MAX Factory setting: C, LS, RS, SBL, SBR, SB (If you connect one surround back speaker); 0 dB SUBW; 20 5. Press [SOUND MENU] to - Panasonic SA-BX500 | Operating Instructions - Page 35
press [OK] to finish the setting. Press [RETURN] to return to the previous display or to cancel the setup in the halfway. Note • The bar shows the current balance of the front speakers. • You cannot use this function when both " A " and " B " are off. Changing the audio output (Dual program) You can - Panasonic SA-BX500 | Operating Instructions - Page 36
AMP SURROUND M.ROOM INPUT SELECTOR _ + POWER SURROUND SPEAKERS A SPEAKERS B AUTO SPEAKER SETUP RETURN -SETUP OK TUNE SETUP MIC AUX S VIDEO VIDEO L - AUDIO - R RETURN -SETUP OK Basic operation g Common operation for setup menu Using the remote control To enter the SETUP Press and - Panasonic SA-BX500 | Operating Instructions - Page 37
10.0 ft (feet) LS, RS ; 5.0 ft (feet) SBL, SBR ; 5.0 ft (feet) Setting speakers and their sizes You can set connected speakers and their sizes manually. Different ranges are played by different speakers. Size setting is necessary for reproducing sources, particularly their bass section, completely - Panasonic SA-BX500 | Operating Instructions - Page 38
to select "YES ", and press [OK] to confirm. YES : When bi-wire speakers are connected NO : When bi-wire speakers are not connected Factory setting: NO 4. To finish the setting (➔ page 36) Setting the speaker impedance 1. To enter the SETUP (➔ page 36) 2. Press [e][r] to select "SPKR IMP ", and - Panasonic SA-BX500 | Operating Instructions - Page 39
desired digital input terminal, and press [OK] to confirm. TV, CBL (Cable box/Satellite receiver), DVR (DVD recorder), BD P (Blu-ray Disc/DVD player), CD, GAME Repeat steps 3 and 4 to change setting. Repeat steps 3 and 4 to change setting. Setting the placement positions for surround speakers Set - Panasonic SA-BX500 | Operating Instructions - Page 40
to a Panasonic TV (VIERA), which does not incorporate HDAVI Control 3, or other company's TV, "AUTO " setting automatically becomes "40 " (msec). Note When you select "OFF ", the followings become applicable. • Standby power consumption becomes 0.4 W. - Standby through with HDMI connections does - Panasonic SA-BX500 | Operating Instructions - Page 41
connected to DVD RECORDER OUT terminal (AUDIO, VIDEO, S VIDEO) (➔ page 21). See the recording unit's operating instructions for details on how to prepare it for recording. POWER SURROUND SPEAKERS A SPEAKERS B AUTO SPEAKER receiver, CD player, Video game or TV ensure the source is connected - Panasonic SA-BX500 | Operating Instructions - Page 42
SPEAKERS A SPEAKERS B AUTO SPEAKER SETUP RETURN -SETUP OK TUNE SETUP MIC AUX S VIDEO VIDEO L - AUDIO - R OK 42 RQT9223 Two or more pieces of Panasonic audio equipment may start functioning when you operate the unit using the supplied remote control. Switch the unit's remote control - Panasonic SA-BX500 | Operating Instructions - Page 43
MENU S When operating a Panasonic DVD TV/VIDEO recorder using the supplied remote control Change the control setting on the supplied remote control to match the DVD recorder's remote control mode. Confirm the DVD recorder's remote control mode in its operating instructions. 1. Press [DVD RECORDER - Panasonic SA-BX500 | Operating Instructions - Page 44
to "BD/DVD P. " To switch the remote control to the Blu-ray Disc/DVD player operation mode To return to the previous screen SUB MENU S TV/VIDEO To select an item • Press to select after [FUNCTIONS] activates display functions on some of the Panasonic Blu-ray Disc/ DVD players. To confirm - Panasonic SA-BX500 | Operating Instructions - Page 45
control can operate Panasonic and Technics audio-visual equipment that has remote control sensors. You may need to change the remote control Works - 0872 - 0751 - - Ampro Anam Anam National AOC Apex Digital Arrgo Aspire Digital Audiovox 0180 0055 0030/0185/1365 0748/0765/0767/0879/0890/ 1217/1943 - Panasonic SA-BX500 | Operating Instructions - Page 46
Remote controlling a TV or DVD Petters Philco Philips Pilot Pioneer Polaroid Polk Audio Portland Presidian Prima Princeton Prism Porscan Techview 0847 Techwood 0051 Teknika 0054/0060/0092/0150/0180/0186 Telefunken 0702 Theta Digital - Thomas 1904 Thomson - TMK 0177/0178 TNCi 0017 Tocom - Torx - 0060 - Panasonic SA-BX500 | Operating Instructions - Page 47
and connect a compatible iPod. • Also read operating instructions for HDMI 1 (BD/DVD PLAYER) HDMI 2 (CABLE/SAT) HDMI 3 R LF L BI-WIRE R HF L R COMPONENT VIDEO Y A OR B/BI-WIRE : 4-8 Ω / EACH SPEAKER (CHAQUE) A AND B : 6-8 Ω / EACH SPEAKER (CHAQUE) SPEAKERS S VIDEO 6-8 Ω / EACH SPEAKER - Panasonic SA-BX500 | Operating Instructions - Page 48
SPEAKERS A SPEAKERS B AUTO SPEAKER SETUP RETURN -SETUP OK TUNE SETUP MIC AUX S VIDEO VIDEO L - AUDIO - R Preset tuning Auto presetting 1. Set can be set in each SET manually. • To cancel during automatic presetting, press [OK]. SUB MENU S Manual presetting TV/VIDEO nish the setting (➔ - Panasonic SA-BX500 | Operating Instructions - Page 49
Manual being received. • setting (➔ page 36) During AM reception When there is a lot of noise interference with an AM broadcast, try switching to this mode. Using the unit 1. Turn [INPUT SELECTOR] to select "FM " or "AM ". 2. Press [TUNE 2 or 1] to tune in a station. Using the remote control - Panasonic SA-BX500 | Operating Instructions - Page 50
OPTICAL DIGITAL IN terminals can play up to 96 kHz. • Frequencies appear on the display when the unit receives input signals transmitted at the frequencies of 88.2 kHz, 96 kHz, 176.4 kHz, and 192 kHz . Multi-channel LPCM (Linear PCM) Blu-ray disc, DVD audio etc. • When you make HDMI connections - Panasonic SA-BX500 | Operating Instructions - Page 51
depends on the software version of your iPod. • Audio/video cannot be recorded or transmitted to iPods or vice versa via this unit. • Panasonic makes no warranty over iPod data management. • For more information, refer to the operating instructions for iPod. • The contents of the operating - Panasonic SA-BX500 | Operating Instructions - Page 52
and the highest level of sound before distortion occurs. HDMI (High Definition Multimedia Interface) HDMI enables you to transmit digital audio and video signals using a single cable. You can also transmit control signals using HDMI connections. Digital DVD recorders, Blu-ray Disc/DVD players, and - Panasonic SA-BX500 | Operating Instructions - Page 53
exceeding 2 units. The unit has received a signal for a picture format that is incompatible with the HDMI connection. Check the settings of the connected equipment. 2 U703 3 U704 4 5 6 REMOTE 1 or REMOTE 2 CANCEL MUTING FUNCTION NO C AND LS/RS SPEAKERS NO LS/RS SPEAKERS NO LS/RS AND SBL/ SBR - Panasonic SA-BX500 | Operating Instructions - Page 54
center speaker, surround speakers, and surround back speakers are connected properly. • Press [SPEAKERS A] on. • Cancel ANALOG 8CH playback. • You cannot use the effect when the input source contains dual audio signals in Dolby Digital or DTS formats. • Set the DTS Digital Audio Output setting on - Panasonic SA-BX500 | Operating Instructions - Page 55
. - Turn the TV (VIERA) on again while all the equipment connected with HDMI cables are on. - Set "VIERA Link (HDMI equipment control)" of TV (VIERA) to "OFF" and then set to "ON" again. (For details, refer to the operating instructions for TV (VIERA).) - Connect this unit to TV (VIERA) using the - Panasonic SA-BX500 | Operating Instructions - Page 56
to change without notice. 2. Total harmonic distortion is measured by the digital spectrum analyzer. HDMI Input (Corresponding Deep Color) Output (Corresponding Deep Color) This unit supports "HDAVI Control 3" function. g FM TUNER SECTION Frequency range Sensitivity Total harmonic distortion MONO - Panasonic SA-BX500 | Operating Instructions - Page 57
repair your product with new or refurbished parts, or (b) replace it with a new or a refurbished product. The decision to repair or replace will be made by the warrantor. Product or Part Name Audio - Friday 9 am to 9 pm, EST.) Panasonic Service and Technology Company 20421 84th Avenue South, Kent, - Panasonic SA-BX500 | Operating Instructions - Page 58
year, parts and labour One (1) year, parts and labour One (1) year, parts and labour One (1) year, parts and labour Ninety (90) days FOR PRODUCT REPAIRS, please locate your nearest Authorized Servicentre at www.panasonic.ca : Link : "ServicentresTM locator" under "Customer support" IF YOU SHIP THE - Panasonic SA-BX500 | Operating Instructions - Page 59
the unit beyond that described in these operating instructions. Refer all other servicing to authorized servicing personnel. 3. Replacement parts - When parts need replacing ensure the servicer uses parts specified by the manufacturer or parts that have the same characteristics as the original - Panasonic SA-BX500 | Operating Instructions - Page 60
Way Secaucus, New Jersey 07094 http://www.panasonic.com Panasonic Puerto Rico, Inc. Ave. 65 de Infantería, Km. 9.5 San Gabriel Industrial Park, Carolina, Puerto Rico 00985 Panasonic Canada Inc. 5770 Ambler Drive Mississauga, Ontario L4W 2T3 www.panasonic.ca 60 RQT9223 © 2008 Matsushita Electric
-
 1
1 -
 2
2 -
 3
3 -
 4
4 -
 5
5 -
 6
6 -
 7
7 -
8
-
9
-
10
-
11
-
12
-
13
-
14
-
15
-
16
-
17
-
18
-
19
-
20
-
21
-
22
-
23
-
24
-
25
-
26
-
27
-
28
-
29
-
30
-
31
-
32
-
33
-
34
-
35
-
36
-
37
-
38
-
39
-
40
-
41
-
42
-
43
-
44
-
45
-
46
-
47
-
48
-
49
-
50
-
51
-
52
-
53
-
54
-
55
-
56
-
57
-
58
-
59
-
60
 |
 |

PP
En
RQT9223-Y
H0608VC0
Cf
Operating Instructions
AV Control Receiver
Model No.
SA-BX500
Dear customer
Thank you for purchasing this product.
Before connecting, operating or adjusting this product, please read
the instructions completely.
Please keep this manual for future reference.
If you have any questions, contact
In the U.S.A.: 1-800-211-PANA (7262)
In Canada: 1-800-561-5505
The warranty can be found on page 57.
For U.S.A. only
For Canada only
The warranty can be found on page 58.
As an ENERGY STAR
Partner*,
Panasonic has determined that this
product meets the ENERGY STAR
guidelines for energy efficiency.
*
For Canada only: The word “Participant” is used in place of
the word “Partner”.