Panasonic SAHT920 SAHT920 User Guide - Page 4
Simple Setup, Step 1 Front Speaker Assembly
 |
View all Panasonic SAHT920 manuals
Add to My Manuals
Save this manual to your list of manuals |
Page 4 highlights
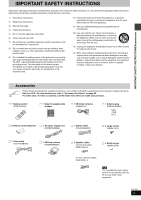
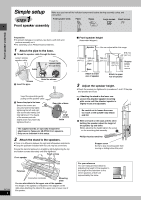
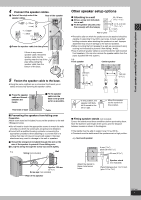
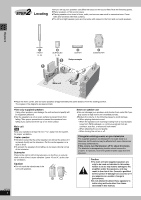
Simple setup 1 STEP Make sure you have all the indicated components before starting assembly, setup, and connection. Front speaker units Pipes Bases Large screws Small screws Front speaker assembly Front speaker assembly Preparation ≥To prevent damage or scratches, lay down a soft cloth and perform assembly on it. ≥For assembly, use a Phillips-head screwdriver. 1 Attach the pipe to the base. 1 Thread the speaker cable through the base. Lessen excess speaker cable. Thread the speaker cable through here. Cable Groove 2 Insert the pipe. Holes for screws Insert the pipe while gently pulling on the speaker cable. 3 Secure the pipe to the base. Ensure the screws are securely fastened by lightly tightening the left and right side screws alternately until fully tightened. (The heads of the screws protrude slightly even if you have fully tightened them.) Rear side of base Large screws Cable The supplied stands are specially designed for attachment to Panasonic SB-PF920 front speakers. Only use as indicated in this setup. 2 Attach the stand to the speakers. ≥There is no difference between the right and left speakers and stands. ≥Using the polyfoam included with this unit may be convenient. Ensure the stand is fastened on straight by lightly tightening the top and bottom screws alternately until fully tightened. Small screws Front speaker Polyfoam RQT7696 4 Connection terminals Mounting plate You can also attach to the upper rear of the speaker. The height of the speaker is indicated in the diagram on the right when attaching the stand to the upper rear or lower rear of the speaker. ∫ Front speaker height (Assembled diagram) Speaker You can adjust within this range. 1,138 mm (4413/16z) 968 mm (381/8z) Pipe Base 796 mm (3111/32z) 625 mm (2419/32z) 678 mm (2611/16z) Stopper screw Do not remove. Attach to lower rear of speaker Attach to upper rear of speaker 3 Adjust the speaker height. ≥Check the screws you tightened in procedures 1 and 2 if the pipe and speaker are loose. e.g. Attaching the stand to the lower rear 1 Loosen the attached speaker mounting plate screw until the attached speaker is slightly loose and adjustable. Be careful not to loosen the screw too much or the speaker may detach and fall. 2 With one hand on the base and the other holding the speaker adjust the height of the speaker up and down. ≥After adjusting the height tighten the screw on the mounting plate securely. Phillips-head screwdriver Stopper screw Screw to stop mounting plate from moving or sliding below this point. For your reference You can enjoy good acoustics by adjusting the height of the speaker to the height of the television so the center positions of both are approximately the same.
-
 1
1 -
 2
2 -
 3
3 -
 4
4 -
 5
5 -
 6
6 -
 7
7 -
 8
8 -
 9
9 -
 10
10 -
11
-
12
-
13
-
14
-
15
-
16
-
17
-
18
-
19
-
20
-
21
-
22
-
23
-
24
-
25
-
26
-
27
-
28
-
29
-
30
-
31
-
32
-
33
-
34
-
35
-
36
 |
 |
