Panasonic SC-BTT190 Setup Guide - Page 2
STEP 5: Connecting the cables, STEP 6: Turning on the system - hdmi
 |
View all Panasonic SC-BTT190 manuals
Add to My Manuals
Save this manual to your list of manuals |
Page 2 highlights
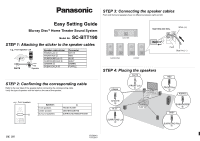
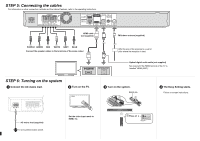
STEP 5: Connecting the cables For information on other connection methods and the internet features, refer to the operating instructions. HDMI cable (not supplied) FM indoor antenna (supplied) PURPLE GREEN RED WHITE GREY BLUE Connect the speaker cables to the terminals of the same colour. Affix this end of the antenna to a wall or pillar where the reception is best. OPTICAL OUT Optical digital audio cable (not supplied) Not required if the HDMI terminal of the TV is labelled "HDMI (ARC)". STEP 6: Turning on the system Connect the AC mains lead. Turn on the TV. HHDDMMI I Turn on the system. R6/LR6, AA The Easy Setting starts. Follow on-screen instructions. AC mains lead (supplied) To a household mains socket Set the video input mode to HDMI, etc. Press [ ].
-
 1
1 -
 2
2
 |
 |
