Panasonic SCHT740 SAHT740 User Guide - Page 5
HT940], Preventing the speakers from falling
 |
View all Panasonic SCHT740 manuals
Add to My Manuals
Save this manual to your list of manuals |
Page 5 highlights
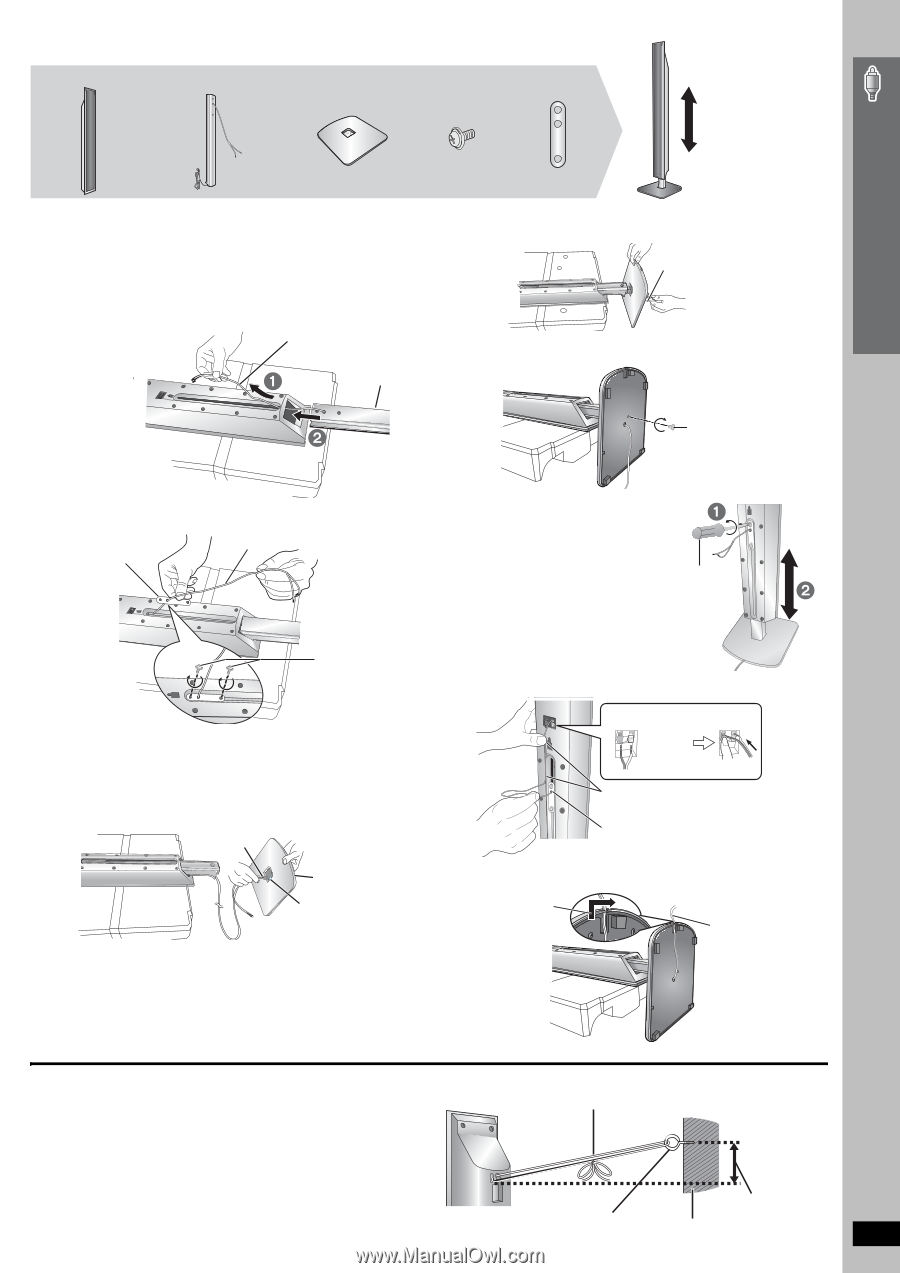
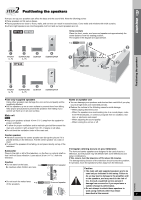
Simple Setup Assembling the front speakers [HT940] 2 Front speakers 2 Stands (with cable) 2 Bases 6 Screws 2 Sliders The speaker height can be adjusted. Min: 110 cm (431/4z) Max: 135 cm (535/32z) 1 Attach the speaker to the stand. Place the polyfoam underneath the speaker for stability while attaching the speaker to the stand. 1 Feed the speaker cable (the shorter part) into the bottom of the speaker and through the slot at the rear. 2 While pulling the speaker cable up through the slot, slide the speaker stand into the bottom of the speaker. Cable Speaker Stand 2 Insert the stand into the base while gently pulling on the end of the cable. Cable 3 Secure the stand to the base. Screw Tighten securely. Polyfoam 3 Thread the cable through the middle hole of the slider and fasten the slider with the two screws. Cable Slider 4 Adjust the speaker height. 1 Loosen the screws until the speaker can slide up and down the stand. 2 Raise the speaker to the Phillips-head desired height, and then screwdriver re-tighten the screws . Screws Tighten securely. 2 Attach the stand to the base. 1 Thread the speaker cable through the base. For quicker threading, loosely fold the cable in half (do not crease), pass the folded portion through the hole, and then pull the rest of the cable through the base. Cable Rounded side Large hole Base 5 Connect the speaker cable. Insert the wire fully. _: White `: Blue Push! Press the speaker cable into the groove. Push excess cable back through the slider holder. 6 Secure the speaker cable to the base. Slide the cable into the groove. Cable ∫ Preventing the speakers from falling e.g. [HT740] [HT743] String (not included) ≥ You will need to obtain the appropriate screw eyes to match the Thread from the wall to the speaker and tie tightly. walls or pillars to which they are going to be fastened. ≥ Consult a qualified housing contractor concerning the appropriate procedure when attaching to a concrete wall or a RQT8582 surface that may not have strong enough support. Improper attachment may result in damage to the wall or speakers. Approx. Rear of the speaker Screw eye Wall (not included) 150 mm (529/32z) 5
-
 1
1 -
 2
2 -
 3
3 -
 4
4 -
 5
5 -
 6
6 -
 7
7 -
 8
8 -
 9
9 -
 10
10 -
 11
11 -
12
-
13
-
14
-
15
-
16
-
17
-
18
-
19
-
20
-
21
-
22
-
23
-
24
-
25
-
26
-
27
-
28
-
29
-
30
-
31
-
32
-
33
-
34
-
35
-
36
-
37
-
38
-
39
-
40
 |
 |