Panasonic SCXH50 SAXH50 User Guide - Page 17
Getting Started, Playing Discs, Other Operations, Reference
 |
View all Panasonic SCXH50 manuals
Add to My Manuals
Save this manual to your list of manuals |
Page 17 highlights
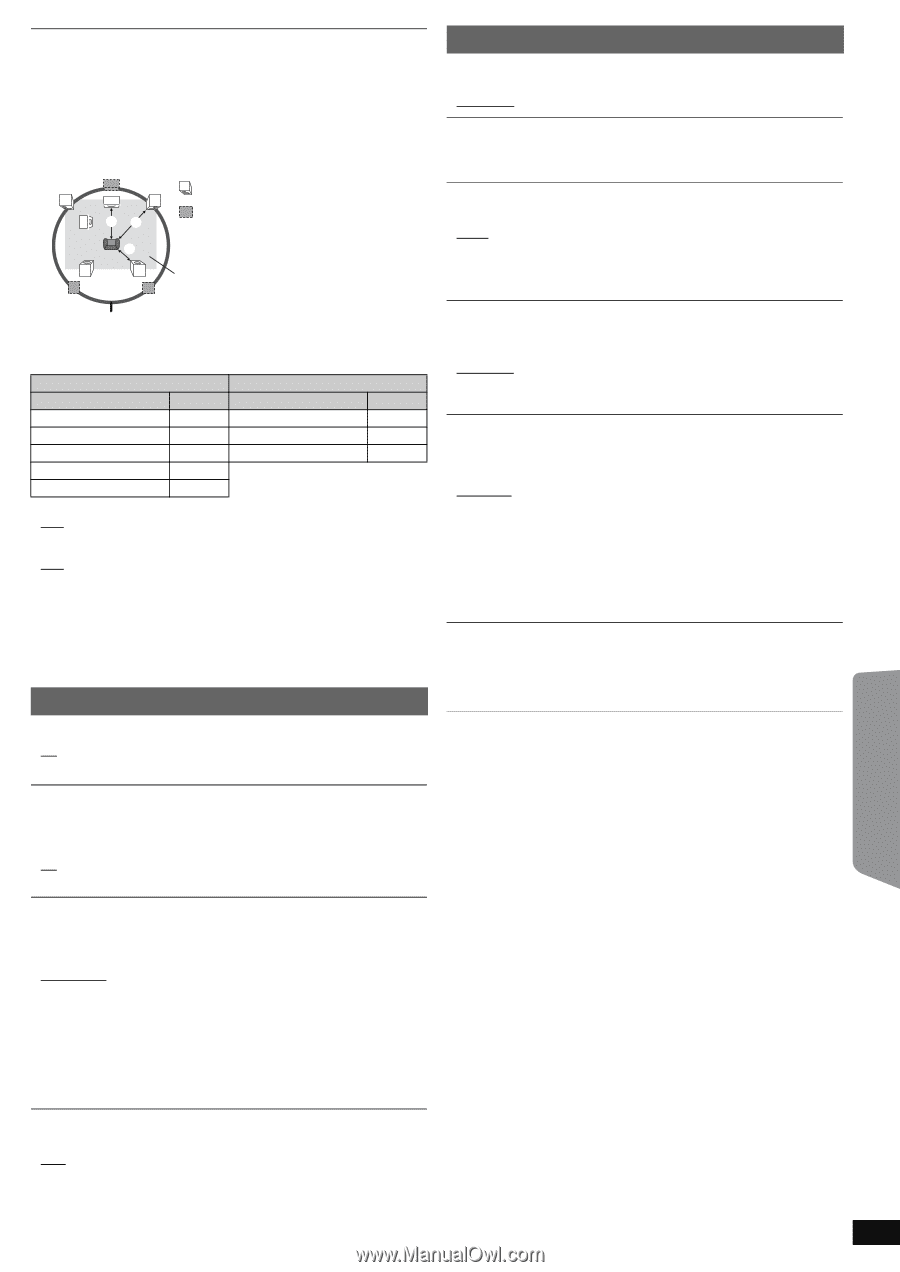
Getting Started Playing Discs Other Operations Speaker Settings Select the delay time of the speakers. (Effective only when "Surround layout (Recommended)" mode is selected in "Speaker layout" (B 8, Easy setup).) (Center and surround speakers only) For optimum listening with 5.1-channel sound, all the speakers, except for the subwoofer, should be the same distance from the seating position. If you have to place the center or surround speakers closer to the seating position, adjust the delay time to make up for the difference. L SW C C R : Actual speaker position : Ideal speaker position Primary listening distance LS RS Approximate room dimensions LS RS Circle of constant primary listening distance If either distance a or b is less than c, find the difference in the table and change to the recommended setting. a Center speaker b Surround speaker Difference (Approx.) Setting Difference (Approx.) Setting 30 cm (1 foot) 1ms 150 cm (5 feet) 5ms 60 cm (2 feet) 2ms 300 cm (10 feet) 10ms 90 cm (3 feet) 3ms 450 cm (15 feet) 15ms 120 cm (4 feet) 4ms 150 cm (5 feet) 5ms ≥ C Delay (Center Delay): 0ms, 1ms, 2ms, 3ms, 4ms, 5ms Select the delay time for your center speaker. ≥ LS/RS Delay (Left Surround/Right Surround Delay): 0ms, 5ms, 10ms, 15ms Select the delay time for your surround speakers. ≥ Test Tone: Use the test tone to listen to the speaker output to confirm speaker connections. Test tone will be output to each channel in the following order. Left, Center, Right, Surround Right, Surround Left, Subwoofer To stop the test tone, press [RETURN]D. HDMI menu VIERA Link ≥ On: The VIERA Link "HDAVI Control" function is available (B 14). ≥ Off Audio Out ≥ On: When audio output is from the HDMI AV OUT terminal. (Depending on the capabilities of the connected equipment, audio output may differ from the audio settings of the main unit.) ≥ Off: When audio output is not from the HDMI AV OUT terminal. (The audio is output using the settings of the main unit.) Others menu Slide Show Time Set the speed of the slideshow. ≥ 3 Seconds ≥ 5 Seconds ≥ 10 Seconds ≥ 15 Seconds Easy setup You can execute basic settings to optimize your home theater system. (B 8) FL Dimmer Change the brightness of the unit's display. ≥ Bright ≥ Dim: The display is dimmed. ≥ Auto: The display is dimmed, but brightens when you perform some operations. Screen Saver This is to prevent burn marks on the TV screen. ≥ Off ≥ Wait 5 min: If there is no operation for 5 minutes, the screen saver will be shown. The TV screen will resume when you perform some operations. (This does not work during playback.) Ratings Set a rating level to limit DVD-Video play. Setting ratings (When level 8 is selected) ≥ 1 to 7 ≥ 8 No Limit When you select your ratings level, a password screen is shown. The default password is "8888". Enter the 4-digit password with the numbered buttons, and press [OK]8. You can change the default password (B below) Do not forget your password. A message screen will be shown if a DVD-Video disc exceeding the rating level is inserted in the unit. Follow the on-screen instructions. Set Password Change the password for "Ratings". When you change the password for the first time: The default password is "8888". Follow the on-screen instructions. Restore Default Settings This returns all values in the Setup menu to the default settings except the password and ratings level. Press [2, 1]8 to select "Yes" and press [OK]8. Turn the unit off and on again. Power Off Link Select the desired power off link setting of this unit for VIERA Link operation (B 15). (This works depending on the settings of the connected VIERA Link "HDAVI Control" compatible equipment.) ≥ Video/Audio: When the TV is turned off, this unit will turn off automatically. ≥ Video: When the TV is turned off, this unit will turn off except during the following conditions: - audio playback ([CD] [MP3]) - radio mode - "AUX", "ARC" or "D-IN" mode (non-selected TV audio setting for VIERA Link) - "MUSIC P." mode TV Audio Select the TV audio input to work with the VIERA Link operations (B 14). ≥ AUX ≥ ARC ≥ DIGITAL IN Reference RQTX1326 17
-
 1
1 -
2
-
3
-
4
-
5
-
6
-
7
-
8
-
9
-
10
-
11
-
 12
12 -
 13
13 -
 14
14 -
 15
15 -
 16
16 -
 17
17 -
 18
18 -
 19
19 -
 20
20 -
 21
21 -
 22
22 -
23
-
24
-
25
-
26
 |
 |