Panasonic WVCU550B WVCU550B User Guide - Page 8
INSTALLATION, Replacing the Side Panels with the optional WV-Q62 Rack Mounting, Brackets
 |
View all Panasonic WVCU550B manuals
Add to My Manuals
Save this manual to your list of manuals |
Page 8 highlights
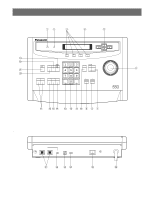
INSTALLATION The installation described below should be made by qualified service personnel or system installers and should conform to all local codes. s Replacing the Side Panels with the optional WV-Q62 Rack Mounting Brackets 1. Remove both the left and right side panels of the System Controller by removing four screws. 2. Remove the Palm-rest located on the front of the System Controller by removing two screws. 3. Place the Rack Mounting Brackets on both sides of the System Controller and tighten with the four supplied screws. 4. Install the System Controller with Rack Mounting Brackets in the rack by using four screws (procured locally). Palm-rest Side Panel Remove screws. Rack Mount Screws Rack Mount Screws Rack Mounting Bracket Tighten screws. 8
-
 1
1 -
2
-
 3
3 -
 4
4 -
 5
5 -
 6
6 -
 7
7 -
 8
8 -
 9
9 -
 10
10 -
 11
11
 |
 |
