Pentax 16701 K-x Black K-x Manual - Page 181
Setting the Green Button Function
 |
UPC - 027075159433
View all Pentax 16701 manuals
Add to My Manuals
Save this manual to your list of manuals |
Page 181 highlights
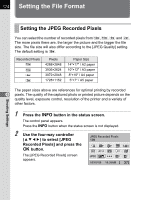
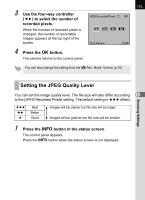
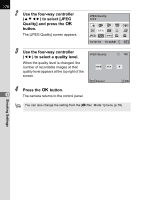
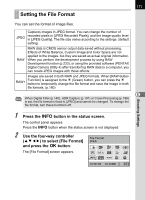
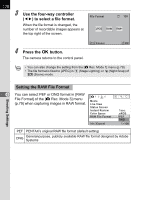
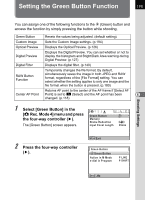
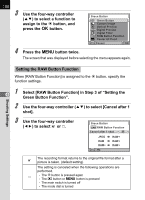
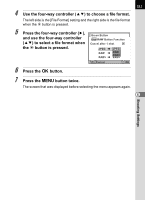
Setting the Green Button Function 179 Shooting Settings You can assign one of the following functions to the | (Green) button and access the function by simply pressing the button while shooting. Green Button Resets the values being adjusted. (default setting) Custom Image Sets the Custom Image settings. (p.194) Optical Preview Displays the Optical Preview. (p.126) Digital Preview Displays the Digital Preview. You can set whether or not to display the histogram and Bright/Dark Area warning during Digital Preview. (p.127) Digital Filter Displays the digital filter. (p.140) RAW Button Function Temporarily changes the file format. By default, simultaneously saves the image in both JPEG and RAW format, regardless of the [File Format] setting. You can select whether the setting applies to only one image and the file format when the button is pressed. (p.180) Returns AF point to the center of the AF frame if [Select AF Center AF Point Point] is set to S (Select) and the AF point has been 6 changed. (p.118) 1 Select [Green Button] in the [A Rec. Mode 4] menu and press 1234 Green Button the four-way controller (5). Memory Shake Reduction The [Green Button] screen appears. Input Focal Length 35mm 2 Press the four-way controller (5). MENU Exit Green Button Green Button Action in M Mode e-dial in Program P LINE P SHIFT MENU
-
 1
1 -
2
-
3
-
4
-
5
-
6
-
7
-
8
-
9
-
10
-
11
-
12
-
13
-
14
-
15
-
16
-
17
-
18
-
19
-
20
-
21
-
22
-
23
-
24
-
25
-
26
-
27
-
28
-
29
-
30
-
31
-
32
-
33
-
34
-
35
-
36
-
37
-
38
-
39
-
40
-
41
-
42
-
43
-
44
-
45
-
46
-
47
-
48
-
49
-
50
-
51
-
52
-
53
-
54
-
55
-
56
-
57
-
58
-
59
-
60
-
61
-
62
-
63
-
64
-
65
-
66
-
67
-
68
-
69
-
70
-
71
-
72
-
73
-
74
-
75
-
76
-
77
-
78
-
79
-
80
-
81
-
82
-
83
-
84
-
85
-
86
-
87
-
88
-
89
-
90
-
91
-
92
-
93
-
94
-
95
-
96
-
97
-
98
-
99
-
100
-
101
-
102
-
103
-
104
-
105
-
106
-
107
-
108
-
109
-
110
-
111
-
112
-
113
-
114
-
115
-
116
-
117
-
118
-
119
-
120
-
121
-
122
-
123
-
124
-
125
-
126
-
127
-
128
-
129
-
130
-
131
-
132
-
133
-
134
-
135
-
136
-
137
-
138
-
139
-
140
-
141
-
142
-
143
-
144
-
145
-
146
-
147
-
148
-
149
-
150
-
151
-
152
-
153
-
154
-
155
-
156
-
157
-
158
-
159
-
160
-
161
-
162
-
163
-
164
-
165
-
166
-
167
-
168
-
169
-
170
-
171
-
172
-
173
-
174
-
175
-
 176
176 -
 177
177 -
 178
178 -
 179
179 -
 180
180 -
 181
181 -
 182
182 -
 183
183 -
 184
184 -
 185
185 -
 186
186 -
187
-
188
-
189
-
190
-
191
-
192
-
193
-
194
-
195
-
196
-
197
-
198
-
199
-
200
-
201
-
202
-
203
-
204
-
205
-
206
-
207
-
208
-
209
-
210
-
211
-
212
-
213
-
214
-
215
-
216
-
217
-
218
-
219
-
220
-
221
-
222
-
223
-
224
-
225
-
226
-
227
-
228
-
229
-
230
-
231
-
232
-
233
-
234
-
235
-
236
-
237
-
238
-
239
-
240
-
241
-
242
-
243
-
244
-
245
-
246
-
247
-
248
-
249
-
250
-
251
-
252
-
253
-
254
-
255
-
256
-
257
-
258
-
259
-
260
-
261
-
262
-
263
-
264
-
265
-
266
-
267
-
268
-
269
-
270
-
271
-
272
-
273
-
274
-
275
-
276
-
277
-
278
-
279
-
280
-
281
-
282
-
283
-
284
-
285
-
286
-
287
-
288
-
289
-
290
-
291
-
292
-
293
-
294
-
295
-
296
-
297
-
298
-
299
-
300
-
301
-
302
-
303
-
304
-
305
-
306
-
307
-
308
-
309
-
310
-
311
-
312
-
313
-
314
-
315
-
316
-
317
-
318
-
319
-
320
-
321
-
322
-
323
-
324
 |
 |
