Pentax ME Super ME Super Manual - Page 17
preliminaries
 |
View all Pentax ME Super manuals
Add to My Manuals
Save this manual to your list of manuals |
Page 17 highlights
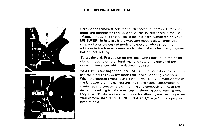
SHOOTING ON AUTO When operating in the "AUTO" mode, the shutter speed is automatically varied by the camera in relation to the preset lens aperture. In most cases, sharply focused, well-exposed photos are easily obtained and the only adjustments required are the preliminaries outlined below. When it is extremely bright, however, or when lighting is limited (such as at dusk, dawn, night, shooting indoors, etc.) additional adjustments are sometimes required. Usually, simply changing the lens aperture is enough, but there are also instances when use of a tripod, electronic flash, or the exposure compensation dial will bring improved results. Preliminaries: Before checking the exposure for auto operation, be sure you have performed the following: (1) Check that the ASA film speed is set properly (page 9). (2) Preset the lens aperture as described on page 13. (3) Set the exposure mode dial to "AUTO." (4) Set the exposure compensation dial to lx. Exposure Check: Put your eye to the viewfinder and lightly press the shutter button until one of the Light Emitting Diode (LED) indicators glows. There is no need to maintain finger pressure on the shutter button to keep the display lit. Once it is turned on, it remains lit for approximately 20 - 35 seconds. If it goes out before you complete your exposure, simply press lightly on the shutter button once again. • 15
-
 1
1 -
2
-
3
-
4
-
5
-
6
-
7
-
8
-
9
-
10
-
11
-
 12
12 -
 13
13 -
 14
14 -
 15
15 -
 16
16 -
 17
17 -
 18
18 -
 19
19 -
 20
20 -
 21
21 -
 22
22 -
23
-
24
-
25
-
26
-
27
-
28
-
29
-
30
-
31
-
32
-
33
-
34
-
35
-
36
-
37
-
38
-
39
-
40
-
41
-
42
-
43
-
44
-
45
-
46
-
47
-
48
-
49
-
50
-
51
-
52
 |
 |
