Pentax Optio SV Operation Manual - Page 96
Changing the Focusing Area, press the four-way controller
 |
UPC - 027075086562
View all Pentax Optio SV manuals
Add to My Manuals
Save this manual to your list of manuals |
Page 96 highlights
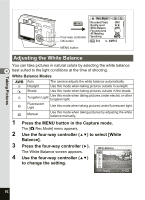
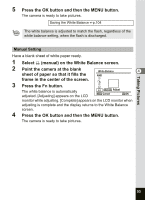
Taking Pictures MENU Four-way controller OK button Rec. Mode Recorded Pixels Quality Level White Balance Focusing Area AE Metering Sensitivity 2560 AWB AUTO MENU Exit SIMPLE MENU button Changing the Focusing Area You can change the autofocus area (Focusing Area). 4 Focusing Area Multiple Normal range Spot The autofocus range becomes smaller. 1 Press the MENU button in the Capture mode. The [A Rec.Mode] menu appears. 2 Use the four-way controller (23) Rec. Mode to select [Focusing Area] and Recorded Pixels press the four-way controller (5). Quality Level White Balance 3 Use the four-way controller (23) Focusing Area AE Metering to change the setting. Sensitivity MENU Cancel 4 Press the OK button and then the MENU button. The camera is ready to take pictures. 2560 AWB AUTO OK OK The autofocus area does not appear in the viewfinder. Always check the focusing area on the LCD monitor. Saving the Focusing Area Setting 1p.104 94
-
 1
1 -
2
-
3
-
4
-
5
-
6
-
7
-
8
-
9
-
10
-
11
-
12
-
13
-
14
-
15
-
16
-
17
-
18
-
19
-
20
-
21
-
22
-
23
-
24
-
25
-
26
-
27
-
28
-
29
-
30
-
31
-
32
-
33
-
34
-
35
-
36
-
37
-
38
-
39
-
40
-
41
-
42
-
43
-
44
-
45
-
46
-
47
-
48
-
49
-
50
-
51
-
52
-
53
-
54
-
55
-
56
-
57
-
58
-
59
-
60
-
61
-
62
-
63
-
64
-
65
-
66
-
67
-
68
-
69
-
70
-
71
-
72
-
73
-
74
-
75
-
76
-
77
-
78
-
79
-
80
-
81
-
82
-
83
-
84
-
85
-
86
-
87
-
88
-
89
-
90
-
 91
91 -
 92
92 -
 93
93 -
 94
94 -
 95
95 -
 96
96 -
 97
97 -
 98
98 -
 99
99 -
 100
100 -
 101
101 -
102
-
103
-
104
-
105
-
106
-
107
-
108
-
109
-
110
-
111
-
112
-
113
-
114
-
115
-
116
-
117
-
118
-
119
-
120
-
121
-
122
-
123
-
124
-
125
-
126
-
127
-
128
-
129
-
130
-
131
-
132
-
133
-
134
-
135
-
136
-
137
-
138
-
139
-
140
-
141
-
142
-
143
-
144
-
145
-
146
-
147
-
148
-
149
-
150
-
151
-
152
-
153
-
154
-
155
-
156
-
157
-
158
-
159
-
160
-
161
-
162
-
163
-
164
-
165
-
166
-
167
-
168
-
169
-
170
-
171
-
172
-
173
-
174
-
175
-
176
-
177
-
178
-
179
-
180
 |
 |
