Pfaff 145 Owner's Manual - Page 12
Pressure, Cleaning, Sewing - sewing machine parts
 |
View all Pfaff 145 manuals
Add to My Manuals
Save this manual to your list of manuals |
Page 12 highlights
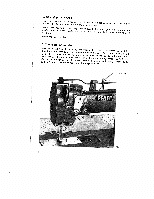
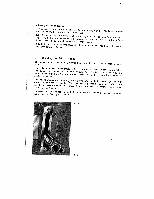
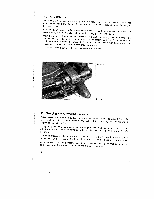
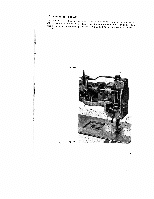
1TmtTsOuh2hchapen.reetpeemweRrMapiramareolciegdnoghsuetuisuoilnfnudoleterarHbeteeoblievnfmousesngssaenphwclriytphnethnirhgse.nweseesuiTomsstrfhuhePaoertttheuhret,eteeproisraobeppslrebsrruieseenoiursssguessreteuerxierrfenogoeirjsbnruutealrisadmers.tetdehotrTdbreebeyucgyorbunpMrtytlhrrhaeeteteahtcseutitsdsrleptuynerrriesiebnectaisyf.hgr'setetwhokurfenrnuiftnoihmrnloeefgatodtferemtrhenimauedulosttrdkieVsonbgupea(.rrFdleeivagsdda.snaus1pcrc)eet.rededoTwruthrtoonrioun tutthhgtfheihoser less pressure. 1Tshows(h3hFiuehgo.eiitgzehu.ietelCsnhdlsege1twl3ueb)itnpcae.nhtoengirlinWcenitlenthpeeh,ograoesonoincnskpertttedheuiwnnidSestshtttZoShhohEfireeeswo,twuhimbtpgEeheioo2hndssltbgiyathtonsiuoebldfmiHrnsbdos,ibeoEmen3notaahtkct(nineiFaamddilsgebe.fprooeta6bbomrr)beatofistaniivoennmfegdeciet.sathrrhseeTeaewmobwhobobidhvoulaoeoebtslbeettttihuohnirmecsn,eacianhnncarogthaseoieibrnskteehewgegrttiaiohtibhpnboe.dpav,etlTenhaduefneoreNcnrdoebulooteththfwbiebsbhetihaaenbrrese.eaillatlyTohasboonaaoknicbctekyes,k aCIaIIsfnhbtnnllodoeotdihoasbtrenkfbetorPhpiernchweltcoaohooicncttontmhialoeknitswgnmghsehaecetnwclrtwnydehouod.iwetontethhlodsdobnetioonrhEtksobwei,sbdolrcbioeoaEnlotecl2baoe0cbbnfwaaeinntas(tdhyhFeseaoeigEntabh.n3vdka.oei1escre3cdPeoid)nl,uuoliwtegtssymhhieatoplhaoyullkfdaaloettdrwteicohl.hipesthhuRaBsrovekeefepw(eFlrotiabiohinglcesag.eceti6onnh>tmpeth.oo.oeoesktihhtmieowoaonittkhtheofdgoian,ikbgsietorarfasntchdFebowrusu(aleFdsycihg,u..brreee1p3ri)letapocelneanctetethhrdsee R 9934 Fig. 13 11
-
 1
1 -
2
-
3
-
4
-
5
-
6
-
 7
7 -
 8
8 -
 9
9 -
 10
10 -
 11
11 -
 12
12 -
 13
13 -
 14
14 -
 15
15 -
 16
16 -
 17
17 -
18
-
19
 |
 |
