Pfaff 6250 Owner's Manual
Pfaff 6250 Manual
 |
View all Pfaff 6250 manuals
Add to My Manuals
Save this manual to your list of manuals |
Pfaff 6250 manual content summary:
- Pfaff 6250 | Owner's Manual - Page 1
rrrr - electronic 6250 .' PFAFF e2 iec0 tro Instruction book - Pfaff 6250 | Owner's Manual - Page 2
I For easier understanding of this instruction book I - please fold this page open colour code. I The plug must never be used without fuse cover. Spare fuse covers are available I froiii electrical suppliers or the PFAFF agencies. i Please also observe the general safety notes on page - Pfaff 6250 | Owner's Manual - Page 3
presser foot, the etc. needle break area, such Always making unplug sewing any othei user machine servicing from the electric outlet when removing covers, lubricating, adjustments mentioned in the instruction manual. as threading or when 1 7. Hold plug when rewinding into cord reel - Pfaff 6250 | Owner's Manual - Page 4
22 1 2345 678 9 J !i 'i -10 p;16 , IF 16 23 12 24 PFAFF ertronic 6250 14 -15 25 26 27 26 29 37 V 4 I • 30 1W 38 PFAFF electro cc 6250 -_ - Pfaff 6250 | Owner's Manual - Page 5
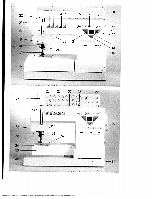
Parts of the sewing machine (1) Key for "slow sewing" (2) Key for "needle up/down position" (3) Key for "tacking/buttonhole/single pattern" (4) Key for "reverse sewing" (5) Twin needle indicator (6) Stitch width slide key/needle positions (7) Stitch length slide key/buttonhole length (8) Balance - Pfaff 6250 | Owner's Manual - Page 6
can repair, This is solely the responsibility of our qulified service staff. 11. Be sure to use only original PFAFF parts. Environment The recommended environn ient is. Ambient temperature 1 0 C to 40 C Humidity 20% to 80% This sewing machine is a high-quality electronicmechanical appliance; it is - Pfaff 6250 | Owner's Manual - Page 7
as your PFAFF sewing machine. If you now take time enough to study the instruction book, nothing can go wrong. After all, this is the only way to learn all the things the machine can do, and to make full use of them. If you have any further questions, that is no problem! Your PFAFF dealer will - Pfaff 6250 | Owner's Manual - Page 8
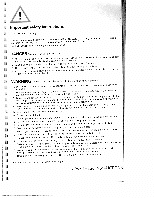
Changing a sewing foot Changing the Covering stitches . . . . Cross stitch Darning Darning tears Darning with elastic stitch Darning with straight stitch Decorative stitches Detachable work support Dual fabric feed Elastic stitch Elastic stitches Electrical connection Electronics - Pfaff 6250 | Owner's Manual - Page 9
Tacking Technical section a Thread reel Fhread tension Thread trimmer a Threading Threading the needle threarh . a Threading the sewing machine Top feed Topstitching a Trouble shooting Twin needle Twin needle indicator I Utility anrl fancy stitches Utility stitch table a Winding from a second - Pfaff 6250 | Owner's Manual - Page 10
other needle positions, e. g. zipper insertion, and especially top-stitching. Both top-stitching and fancy stitching. Durable elastic seam, e. g. for sewing leggins, and for embroidery work. Ornamental utility stitch. For highly durable seams, a g. for inseams, sportswear and workwear, and for fancy - Pfaff 6250 | Owner's Manual - Page 11
Pullovei stitch Elastic closing and serging seam for open knit materials. 24 Honeycomb stitch ft - - 25 Closed overlock stitch For sewing on elastic threads, covering terry-cloth seams and for fancy hems - - For closing and serging seams for materials that fray easily. 26 Fagoting stitch - Pfaff 6250 | Owner's Manual - Page 12
0 hII'i ''I''Jhulk -iIIIIIilI-ihiIIIIitI- a, IIIfIIIHIIIjIIIF a, '''tIilIil'li'h1i V'''' a 0, )*))) g ---- a, P%J a, Ill Ill(1 101 IIi IIIHmp 1I III il 01 lIiJ %%J 'iIIIIIui''iiIIIIIii ''liiijJIil''hiiIIIih 'qi qr-'ip qr a, II .•.• z g 5 -€4_ 'II I liii!I 111111! 01 11111 - Pfaff 6250 | Owner's Manual - Page 13
S S S S S S S S S S S S I. . . 5 S S I..' I. '.' •iI. . 5: a' S.. I.' 5: U..' S II S S - Pfaff 6250 | Owner's Manual - Page 14
/ ..- - Pfaff 6250 | Owner's Manual - Page 15
Operating the sewing machine Tedmb& secdon Pages 11 to29 - Pfaff 6250 | Owner's Manual - Page 16
I I I I I I I I I I I I I I I I I I I I I I I I I I I I I I - Pfaff 6250 | Owner's Manual - Page 17
Technical section Electrical connection Detachable work support Winding the bobbin Bobbin case Bobbin thread tension Threading the needle thread Needle threader Drawing up the bobbin thread Presser foot lifter Thread trimmer Changing the sewing foot Dual feed Top feed Changing the needle Needle - Pfaff 6250 | Owner's Manual - Page 18
Place the enclosed mains cord, foot control and instruction book in the compartment of the covercase. Top cover Open the folding cover (37) upwards. I Programs rhe programs of the sewing machine are illustrated n the inside of the top cover. Electrical connection Connect the mains cord between - Pfaff 6250 | Owner's Manual - Page 19
Connecting the foot control Connect the plug of the foot control with the connec tion socket (31)of the sewing machine. The sewing speed is regulated by pressing the pedal. Main switch When the main switch (1 5) is switched on, the sewing lamp lights up The sewing machine i now ready to use. - Pfaff 6250 | Owner's Manual - Page 20
. Removing the detachable work support (free-arm) In order to sew using the free-arm, swing the clutch able work support to the left and lift it upwards out of the hole. When you replace and swing it in again make u1: the detachable work support is flush with the tree arm of the sewing machine - Pfaff 6250 | Owner's Manual - Page 21
I I a a I a a a I I Preparing the machine for bobbin winding Hold the hand wheel (1 0) firmly and turn the release a disk (11) fully in the direction of the arrow. During bobbin winding the - Pfaff 6250 | Owner's Manual - Page 22
bobbin from the reel holder Place the sewing thread on the reel holder (27). To obtain free movement of the thread and hold the thread reel firmly, fit an unwinding disk of the right size for the thread reel. Threading Place the thread into guide A from behind and pull it through opening - Pfaff 6250 | Owner's Manual - Page 23
for it and place a reel of thread on it. S S Threading Place the thread into guide C opening B to the right Wind and pull it the thread through clockwise a few times until it snaps in. TIP: If the machine is already threaded, you can wind S thread from the second thread reel without having - Pfaff 6250 | Owner's Manual - Page 24
Hook cover Switch off the main switch -loki the he front. hook cover (33) at the side and open it to Taking out the bobbin case Lift the latch of the bobbin case case out Release the latch - Pfaff 6250 | Owner's Manual - Page 25
the bobbin thread tension. Turn screw C just a little to the right to increase thu tension. Inserting the bobbin case Lift cover F and push the bobbin cac fully oiili pu of the sewing hook Opening E of the bobbin Ce must face upwards. Check: Pull the bobbin threud sharply, the bobbin can not fall - Pfaff 6250 | Owner's Manual - Page 26
ill it I reel holder (27) and fit an unwinding disk of tin a jI it size. Now, using both hands, pull the thread into guide A and under thread guide hook D. Pass the thread through the threading slot (20) and downwards. Poll the thread around stop E into the right hand threa ding slot and - Pfaff 6250 | Owner's Manual - Page 27
Needle threader In order to make threading of the needle easier and quicker the PFAFF needle threader is provided. Lower the sewing foot (see next page). Take one stitch to bring needle to its highest position. Turn the hand wheel until the needle is at its highest - Pfaff 6250 | Owner's Manual - Page 28
thread has formed a loop. I Pull the needle thread to draw up the bobbin thread. I I I I I I I I I I I obbin thread lose the hook cover (33) and pull the thread under e sewing foot to the left Thread trimmer Pull the threads from the back to the front over the thread trimmer (36 - Pfaff 6250 | Owner's Manual - Page 29
Set the needle at its highest point Press the sewing foot upwards at the front and downwards at the back at the same time so that it disengages from the sewing foot holder (1 7). Engaging the sewing foot Place the sewing foot under the sewing foot holder (1 7) so that when the presser bar lifter - Pfaff 6250 | Owner's Manual - Page 30
I I I I I I I I i I he built-in dual fabric feed oeynwrenlsiinegfgwheteimndogirancdgdhiififafnficicectuisuolltntitmmfaealaestteodersriieaatnlhlssseusPrumEecsAahtFepFareisraoFlfsefifclerktroammthnaedtthciredhaeiytnaooglpnsooaflalnubcdtrhiioebcncso:ktttebhoduemiladtna- - Pfaff 6250 | Owner's Manual - Page 31
in place. DHptoloiastlchdeeenstgh.reaePagtruio,nspahgnttetdhheeedletttwooiptiptmhffeoetewvededo(s3fli8on)wgeldyroswuapntwtahaerlidtmtslea(srakeneeddaolsuot the illustration on page 26>. important! For all sewing jobs with the top feed, only use sewing feet with cutout at the back 2/ - Pfaff 6250 | Owner's Manual - Page 32
fixing / screw (24) and pull the needle out downards. / / To insert: The flat side A of II te tiedIe must face tu the rear. Lower the sewing foot and insert the needk:, pushing it rip as tar as it will gu. Hold thu needle and tightet tire fixing screw (24) fit n ily. - Pfaff 6250 | Owner's Manual - Page 33
is 4 to 5. For embro I idering and buttonhole sewing between 2 and 3. I U I I U I I U U I U U Lowering the feed dog For ccrtain sewing work, e.g darninq, the teed dog U ii,s to be dropped. To do this, open the hook cover arid press slide B fully to the right Now the feed I dog is lowered I B B - Pfaff 6250 | Owner's Manual - Page 34
- Pfaff 6250 | Owner's Manual - Page 35
Operating the sewing machine Program keys Function keys Control slide keys Pages 31 to 40 - Pfaff 6250 | Owner's Manual - Page 36
- Pfaff 6250 | Owner's Manual - Page 37
U 5 S S S S 1 : :- :-- PFAFF electronic 6250 Elektronic section Program keys Clear key Needle positions Stitch width slide key Stitch length slide key Balance slide key Slow sewing Needle position up/down Buttonhole/tacking! single patterns Reverse sewing Twin needle Page 34 Page 34 Page 35 Page - Pfaff 6250 | Owner's Manual - Page 38
_______ • •Ob 6 • Li 1 --- --- LL • l ---- • L- - LL • Li L2 LS J I PFAFF electronic 6250 Made in Geemany rogram keys rhe PFAFF electronic 6250 has two program keys. When the machine is switched on, program 00 will appear automatically in the liquid crystal display (1 3). J9rees. - Pfaff 6250 | Owner's Manual - Page 39
. e lights up and you can set up to 1 3 needle positions. Note concerning slide Whenever the machine key (6): is switched on or a program is selected, the electronic system will make a basic I program setting. The green diode does not light up until the slide key - Pfaff 6250 | Owner's Manual - Page 40
__ I uin6n 613111BS DISPq 0111 I I p ttu I Olfl SC UbOS SC u!C6C pio soo6 ii paAbLu si Ao( opis oq iun dii iq6ij TOU SO()() 0[II 1(1 II) oft iII(I I oiouo O)(eUi ji uioisAs D!uOJjDcI(a 'p0130(05 si iuei6njd e Jo UO pOqOl!Ms ! O1ftJ3' 1 IA :(L) Aoj opqs fiuiIiJ 3110') 0ON I I B )J Aieuip - Pfaff 6250 | Owner's Manual - Page 41
C • 0.2 -1 • H Li 0-7 0-9 Setting the bldnce The buleuce slide key (8) hos two functions 1 When you move II s ol!(i key the upper diode lights up rind you con detso ii: stitcl res. liflC311 of The farther you move [I in key right, the longer the reverse stitches will ho soWn. II htclIoS - Pfaff 6250 | Owner's Manual - Page 42
keys lh PFAFF electronic 6250 has four function keys and an additional twin-needle indicator. I 1 Slow sewing WIeu you pius key (1) h ky dgdlu; tIm green the green diode will diode goes out and light up. The machine now sews at half the machine sews at full speed again. sewing speed - Pfaff 6250 | Owner's Manual - Page 43
With this key you can determine and save your own buttonhole lengths in programs 71 / /2. 2. Tacking If this key is the pattern, pressed before sewing is tacked automatically, is begun, the green diode will light then the diode goes out again. up. The seam, or beginning l 3, Single - Pfaff 6250 | Owner's Manual - Page 44
. As soon as you press the key again, the green diode will go out and the machine sews forwards again. If you press the key during sewing, the PFAFF electronic 6250 will sew backwards as long as you hold the key. Then the green diode does not light up. I I I I I I t. * v •/' I Twin - Pfaff 6250 | Owner's Manual - Page 45
Sewing and embroidering Utility and fancy stitches Pages 41 to 71 41 - Pfaff 6250 | Owner's Manual - Page 46
S I I I I I I I I I I I I I I I I I I I I I I I I I I - Pfaff 6250 | Owner's Manual - Page 47
Utility and fancy stitches Non-elastic stitches Elastic stitches Overlock stitches Covering stitches Buttonholes Fancy stitches Pages 45 to 50 Pages 51 to 53 Pages 54 to 55 Pages 56 to 58 Pages 59 to 62 Pages 63 to 71 Sewing table Page 44 - Pfaff 6250 | Owner's Manual - Page 48
I I I I I S Explanation of tables for sewing recommendations Whenever a program is selected, the machine sets a I basic stitch length, stitch width and balance automatically. I You can change these settings according to material and sewing purpose using slide keys 6, 7 and 8, In I the - Pfaff 6250 | Owner's Manual - Page 49
garment before trying it on. When you press the toot control the machine will only make one stitch. For each further stitch you have to the bottom feed and disengage the top - feed. - Place the fabric under the sewing loot Sew one stitch, then pull the fabric to the rear by - the required amount - - Pfaff 6250 | Owner's Manual - Page 50
3 h Ii 1 L_L_. L Zigzag stitch Zigzag stitch 10 cart ht tisl fur trouble free sergirig of all edges Whilo set qu ig ar dge, always nkike Sure the tim a i iii sm 'w hea in I smooth seams. [Is' raw edge has to he guided along edge grade B. You can adjust this etlrjm ' u It' will I is ljnstrr rg screw - Pfaff 6250 | Owner's Manual - Page 51
15 Z5j4J i Bllnd stitch Blind stitch 1 4 is best suited for invisible hems; sewing by hand is unnecessary. Serge the edge of the hem. - - Fold the . - Now place the that the crease fabric under the sewing foot so line runs along edge guide B. When the needle enters the crease line it must - - Pfaff 6250 | Owner's Manual - Page 52
intended for strengthening I damaged areas of fabric. Stitch over the damaged area at the required - I length. I - Press the reverse key; the machine finishes sewing the darning program and the darning length is thus saved. The saved darning length can now he repeated as I often as you need - Pfaff 6250 | Owner's Manual - Page 53
sew it on as described at left Sewing on buttons With program 74 you can sew on two and four-hole buttons with no problem at all. Remove the sewing the right hole in the button. - The machine sews a tack and the program is completed. TIP: You can sew on buttons easier still if you lower the teed - Pfaff 6250 | Owner's Manual - Page 54
p>g iiJ • 3 2 )ruJimI 73 ul ii I(fJu1C b2iO (jtIRIy iii IC Ill thC IIlt Ii 11(1 III th IIiIIC )lII k iI1I/ (CI i(ICI I;i( tt pCC. IC(, (itkCCIIt /(Ct -;i/CC I) - Pfaff 6250 | Owner's Manual - Page 55
prog -. I 3 > > -'-I Lj . 3-5 0/1 - L -t Stretch triple straight stitch Tganhreidsatsplsretoergevrneagmstehaimsis usn.seeTedhdeefodhr,eseae.vgwi.eiinrngtshirda'Hefastrbeoraiumcs,estrhwesehlaeomrnegser the stitch length you need. - Pfaff 6250 | Owner's Manual - Page 56
I I I I I I I I I prog iL prog - I 3-b 0/1 I 19 2-3 4-6 • 3-5 0 I I .1 L I Phnii stein stitch i 5 ii /iJ/ap like stitch, this plograin is very ii I I i ' wing seams on elastic materials, u 9 ft '-ji rtswear. II' 1 i( h i IsO SLiitable foi sewiilcj seams Stretch triple zigzag - Pfaff 6250 | Owner's Manual - Page 57
iL 1 6 • 3-5Ui LI Elastic stitch Owing to its high elasticity this stitch is used for sewing elastic, eg. on underwear - Cut off the old elastic close to the edge. - Gather the part prepared in this way between the elastic tape, or place it underneath, and pin it firmly in place. - Sew it on - Pfaff 6250 | Owner's Manual - Page 58
the PFAFF electronic 6250 offers When you sew overfock scorns, we recommend you use blind stitch foot No 3. It guides th fabric better and prevents tunneling of the scant at wider stitch widths. prog 20 3 ,6 • :3-b 0,1 '3 Open overlock stitch ttvirl ilti:, ',ttch ri is no problem - Pfaff 6250 | Owner's Manual - Page 59
the fabric edge against fraying. Pullover stitch Used togethei with the knitted-edge foot (special accessory, this stitch can even he used for sewing open-knit fabrics. Fashion-knit garment sections cdii he joined with this stitch without any effort. TIP: To prevent the seam from stretching - Pfaff 6250 | Owner's Manual - Page 60
I What s i covering stitch? a i s ii uce the following programs for sewing a i ii ig viliicl seam. lends This produces the typcial "flatlock a professional look to collai t', oi raglan seams. ii 'prog IA I33 [26 j25 - 6 I 3-5 - Fagoting stitch - Pfaff 6250 | Owner's Manual - Page 61
I - 4 A HJL - rI,1 - -fl-- 16 • 3_bj 1 ..L Fancy elastic stitch Fancy elastic stitch is very useful for materials that need a flat seam, e g. terry cloth. - Place the two fabric edges so that they overlap by about 3/4 of an nch and over-stitch each edge with fancy elastic stitch. Cross - Pfaff 6250 | Owner's Manual - Page 62
S I I S I I I I I I I I I H1 i CI) I IH II ) ) H H lilt' 'I )l 'H II' I 'J(Ic I(' iIL' i) I IH SJfl) 1UiLil1S HA( )I(Il' 1LH)LI II I I I 1)01(1 I I I I I I I I I I - Pfaff 6250 | Owner's Manual - Page 63
Httonhoes lh PFAFF eletronic 6250 offers you diftuient buttonhole sewing programs to choose from. [)t'pending on the with a magic pen or di Uss pin, and always sew a sai nple buttonhole first Note: Before starhng any buttonhole, always push the guide of the buttonhole foot fully to the front, in. so - Pfaff 6250 | Owner's Manual - Page 64
length of the second hartack yourself, press key 3 I "buttonhole". A point then appe irs at the right side of the "7" in the display Tb.' machine will now sew slowly Inst botor>' the siid >1 tI 13' ,1COiiCl l>uttoi ihlOht' st',iiir As mmii ,>s Iii, 1w>> 5>, iriS, sic uf u>tudl length I puss tb - Pfaff 6250 | Owner's Manual - Page 65
The farther you move the slide key right. the more reverse stitches the machine sews, i.e. the left seam will automatically be made longer. If the left you move the slide key left the fewer reverse stitches the machine sews, i.e. the left seam will automdtically be made shorter. Programmable linen - Pfaff 6250 | Owner's Manual - Page 66
Ii )littUillt()lf(S ecj for Stretch buttonhole Program 72 is very useful for sewing huttoni oks ii I 111(1(1 using a qiiuip thruad l'. too, a giinp 01(101 tim $f'win(J foot to the - Push tin buttonhole shite fnIi , lilt I Sew the first hnttu 11011' 1,111 i ti I' 'qi ill ii ilo left iii n' - Pfaff 6250 | Owner's Manual - Page 67
I Vecorative stitches I I I PlcseFIneiamFolnrAiecbcceyFnprtm-oFhrinioadbdegndnrelduoecrdyicceiddeftetfryeheorecoyrrvnoueeerirnwacantdotois6cwgrvok2renwme5wahshb0ttieeiocitnrhmocrahefeetfacemieroosrtebesnmtxrsoayotm,vioiclacdueehioesnloalardooybowurlsuevrehgssafoairfrnoirrloaeogmrmtmishesoi. - Pfaff 6250 | Owner's Manual - Page 68
.th n m lhIttern length Changing the pattern length at the same stitch I ii I SR liu to is switched on and when a new density hued, the PFAFF electronic 6250 sets ii th specific to the program. In some programs you can change the pdttern length with the pattern length slide key (8) dn(J retein - Pfaff 6250 | Owner's Manual - Page 69
4 4 Changing the pattern width When the machine is switched on and when a new program is selected, the PFAFF electronic 6250 automatically sets a basic pattern width. This basic setting can be infinitely varied with the stitch width slide key (6). Then the upper diode lights up. Exceptions - Pfaff 6250 | Owner's Manual - Page 70
. •i I L 1 .I L4 4'>: A :1 (1J r 'd I cj / I S a S r I a K. I ki i,iii (.oourt(i t1r(e1s • ki tI i U i 1 U ti UJU [V stl[TUUIC. h( [ 7 Oflit ,HJt[ (l[ff(U([[1 SI/VU 'US 711' I.V 1.1 VIIV Il 1 1)1 'I I [I [II VII U tIVI vJ LIft. 1 lint Ill UI 5 II 1I L VI II., I'/ StI) - Pfaff 6250 | Owner's Manual - Page 71
_________ I I ' c .; - a 4, 4. . A (1 ': c', I I tIll ifii _f 4, ' 14 4, 4 U c.j j j 4! h 0 t ii ,J I 4, I ;1,-,,! 4, Twin needle You edO uclireve titini irtah tilt) tVVin iiOedle, 1 to' ii ulior a' borders can he much' with a lilt) / th 1' l ii l w wl,rl ls',ititn - Pfaff 6250 | Owner's Manual - Page 72
t, : H C' H -I ii ii Li 1', I•1'tVIt(I lU II -t rj)I 64 1 l(j,t ULII1L I 'I (IV JU lit U t iL 1 lit Cross stitch Ni It I i VI Ii I. Vt VV(i .11 VjiI IV I)(i(IVI I i1i V I 1)1 I t,1 .1(1 II (V .( ) UllicIl [([I VIVII1I PFAFI 62b0 II e;trOnlc VU1II VI ViV IV VV V VI VV - Pfaff 6250 | Owner's Manual - Page 73
Embroidering leather With the PFAFF electronic 6250 you can embroider leather with no problem at all. Since leather easily, too. Embroidering leather can he made even easier by using a teflon sewing foot The teflon covering allows the foot to slide easily over the leather. Depending on the thickness - Pfaff 6250 | Owner's Manual - Page 74
I I I I I I I I I I I I wLh d thfference p ir of Suspeiidrs and I - Pfaff 6250 | Owner's Manual - Page 75
you can Freehand guiding, however, needs a little prdctice in the beginning. Transfer the initials with the magic pen to the part - to be stabilizer. (Any - waste is dissolved in water). TIP: If ou sew fast but move the material slowly, the stitches will be made dense. properly covered. - Pfaff 6250 | Owner's Manual - Page 76
- Pfaff 6250 | Owner's Manual - Page 77
Application examples Practical sewing Traditional embroidering techniques Pages 73 to 93 C U - Pfaff 6250 | Owner's Manual - Page 78
- Pfaff 6250 | Owner's Manual - Page 79
Hems with twin needle Gathering Shirring Darning Inserting zippers Roll-hemming Sewing lace Shell edging Rcliolwu Luut i erubroLdery QuItiric; [yelut enilriideiy Henistitching Pages 76, 77 Page 77 Pages 78, 79 Page 80 Pages 81, 82, 83 Pages - Pfaff 6250 | Owner's Manual - Page 80
id P nsion pksea clii to I I I I I I S I I I Top-stitchmg With program 02 you ui chango the ic edhe I positinil in such a way that yen can ahway guide the sewing toot along the fabric iii In i p ,tim I S work If yen wish ii lop It Ii ii riiIi wehti thin I this siniply gueh the huh - Pfaff 6250 | Owner's Manual - Page 81
feeding at the beginning of the seam we recommend placing a piece of fabric of the same thickness as the work under the sewing foot to support it. Proij LJL • jJO/1 Sewing hems with the twin needle With the twin needle you can not only embroider, but also make top-stitch seams. Using the - Pfaff 6250 | Owner's Manual - Page 82
HHH ,leeves, skirts or valances. To obtain neat and a n gathers you should sew two or three gathering a Mark the tirst line on the tace side of the carl now stitch the utfier sear i is al sewing- toot width using the first one as a guide. Now gather the part by pulling the bottom ihii ,nls. You - Pfaff 6250 | Owner's Manual - Page 83
jg t t 241 2 •1 1 6 •3-510/1 TIP: The cording toot (special for gathering. The grooves in accessory) is h,u this foot guide thi idtl elastic evenly during the sewing action. Gathering with elastic threads Gathering sleeves or with elastic threads. waist seams is no The elastic thread - Pfaff 6250 | Owner's Manual - Page 84
the fabric Ii along it. iii mw stitch thi other Si. illiS it sewnicj ith using the first one as ii guide. wa vera! sean is one bes rio the otto .1 III stitch the iiiitCnil to its origiiiil Its iicj sewing, otherwise tlit slnrniig will L at heginrung iiiil cod of the' side. :: I I I". - Pfaff 6250 | Owner's Manual - Page 85
I cc pin of the darning foot fully into hole C. WIsii ycic do this, guide fork G places itself around the pu "sri bar. Wire E must be behind fixing over the damaged area by moving the part - evenly in the inquired direction. When doing so, move the part iii shallow curves. This prevents tearing of - Pfaff 6250 | Owner's Manual - Page 86
H 'orse key: the mactune finishes svwinq Darning with elastic stitch Darning with elastic stitch is also a very suitable means Of iel)aiIIil(J (knnaqv( I Sew until over 1h it is well C a c ige oveied. I re witl i mows of stitches \Nliei (10110) 50, make sure the stitch mows ovei lap - Pfaff 6250 | Owner's Manual - Page 87
- If 13 0,2-1 6 zI 3-5 0/1 I _J TJ*JIJZ 13 0,2-1 6 • 3-5 0/1 L_ I Sewing on patches The best way to darn damaged area with a Baste the piece of - ged area from the larger holes is piece of new new material face side. to cover material. onto the the darna I Over-stitch its edges with - Pfaff 6250 | Owner's Manual - Page 88
for I all other materials. For all types of zippers it is important to sew right up I close to the teeth of the zipper. This is why the needle so that it enters close to the edge of lit' zipper teeth. If the sewing foot is engaged on the mjla side, the needle position must only be changed I - Pfaff 6250 | Owner's Manual - Page 89
at the - same distance. Stop shortly before the end of the seam and leave - the needle in the material. Raise the sewing foot and open the zipper. You can now sew to the end of the seam. - V I Close the zipper and I;ati th the other zipper half. Afterwards atitch alor a; tie l TIP - Pfaff 6250 | Owner's Manual - Page 90
material. foot and push the fahric into the Raise the sewing scroll of the hemmer. - Lower the sewing foot evenly in the hemmer. the fabric does not run and guide the fabric edge When doing so, make sure under the right side of the sewing foot TIP: For silk, rayon or chiffon mit 'ii - Pfaff 6250 | Owner's Manual - Page 91
prog 00 2,5 ; 01 Lace inserts Yw-oeuaFSrcitrioastcnrt hbopatbrhsooettedrhuctcheheedilgdalearebcsneeo'astfuottcihtflheouelthlaefecafsteceewcatitstiohadnenlaao.rlf'riotinhkwern1nfndinsbanijjcui - - - Cut and open iron the fabric under the it over to the side. Stitch over both edges of the - Pfaff 6250 | Owner's Manual - Page 92
1 puq 45 , 1 a I I I I I I I 0/1 I TIP: If you add a coloured wool thioud it the shje you can stroiiqthioii (lie shell shjiilq aiol ohtin u pretty contrast at th ic sun io ti no Ii istoad of a woolo ii thread you can also place a different coloured light I fabric underneath. very - Pfaff 6250 | Owner's Manual - Page 93
bar- and eyelet embroidery is I easy to make with your sewing machine. Transfer your pattern onto the face side of the - I . I Embroider the contours with a dense zigzag stitch. The backing material provides this part of the I work with much more shape and stability. Finally, all you have to - Pfaff 6250 | Owner's Manual - Page 94
are sewn together by hand with small stitches I but it is quicker and more practical with the sewing machine e.g. with the program 03. There I is always stitching about 3 rum beside the seam. can make it into I ci si i ioi s, wall Ii a g i ups or I icc I covers. I I I I a I I I I I I - Pfaff 6250 | Owner's Manual - Page 95
Set the stitch width, and embroidery, needle at its the machine program 1 2 is very left position, select the stitches evenly Set the presser bar lifter at the darning position. - Lower teed dog. Remove the sewing foot Place the eyeletting plate making sure pin A fits in nuedle plate. Then push - Pfaff 6250 | Owner's Manual - Page 96
. - a a a - - - - - - I : 4% -4 •l I ••. •" -4 4 ".:7.•r. k.• . I 4' .4 1 '.f .:r. Wu.17_a fiø? ¼ ,: :'. I j C ii q g ii 4n •.. :. :i. ',.q - •':.Ta ::•- f.....:': t 4!! ;i : ;::2 . LIi1t a • -: •:'-". •• . ex' 4 • I4J fji 4 • •• 1. ' idi •. • - Pfaff 6250 | Owner's Manual - Page 97
materials. finish is used for very light and thin It is very suitable for frills or ruffles. Tliiii is no need to pull any threads. - Sew using program 67 or 68 at foot width aloij the edge of the fabric. Cut off the protruding fabric at the hemstitcfud - edge with a small - Pfaff 6250 | Owner's Manual - Page 98
'4 r ,Th N 4 I 4, / I 4 ' a- 4, '41 S - Pfaff 6250 | Owner's Manual - Page 99
-w__w r - yr ---- CD Ci) CD - CD Ct, Ct, Ct, 0 - Pfaff 6250 | Owner's Manual - Page 100
I S S S I I I I I I I I I I I a I I a I I I I a I S S I 4 1a - Pfaff 6250 | Owner's Manual - Page 101
I 4 Accessories and needles Sewing feet (standard accessories> Special accessory table Aplique foot Cording foot Gathering/knit-edge foot Bias tape binder Multi-stitch gathering toot Cording/fringe toot Needle - Pfaff 6250 | Owner's Manual - Page 102
wnq (a () .4 t1 4 1 I Fancy-stitch foot for top feed Rr1 No. 98694 814-00 2 Fancy-stitch foot (not suitable for top feed> Part No.: 98 694 89 7-00 3 Blind stitch and overlock foot Part No. 98-694 89000 4 Zipper- and edge-stitching foot Part No: 98-694 884 00 I I I I I I I a I a a I a I a I a - Pfaff 6250 | Owner's Manual - Page 103
t) UuuuiltuIe F' 6 Darning foot Part No.. 93-035 960-91 7 Hemmer Part No.: 98694 818-00 8 Edge guide Part No. 98-802 42200 Second reel holder II Seam nipper j Iô Soft brush Oit tube p4I Ii4 - Pfaff 6250 | Owner's Manual - Page 104
dealer. tiiOoi; i,i1 B; cu5 B id ii ii ii iiuj ii, 5 giooves tB dli: vvith needle spacing 1 6-2,0) I dO/lOb H-ZWI Part number 93-042 941 -91 98-053 484-91 93-042 950-91 Sewing work For appliqué work For binding edges with bias tape Cording foot, 7 grooves (twin needle with needle spacing - Pfaff 6250 | Owner's Manual - Page 105
the appliqué foot in the sewing machine. - Transfer your drafted pattern onto the appliqué the motif out and pull the paper off. t' so and o.ir.oriil. iron on the appliqué parts on the base wanls over stitch all contours with narrow i it' iigzag stitches. When you reach a is tire "needle - Pfaff 6250 | Owner's Manual - Page 106
mphusize the coidtng oiled, you angie" on the trout edge 1)1 the 1 'Ii,ipcs tili' fuihrin, (lilt rig sewing itt J I, ft 00 Vi liii itt' You can ci dam a sinuular 'liii I titreaul; this oaken tI it sewing While sewing the Cordii ig I cill tIn tate' i,tI I 1 gtitI YoLu cart LiSt' the grooves guide - Pfaff 6250 | Owner's Manual - Page 107
gathered under the sewing foot, and the gather-free through the foot cutout fabric from the top The tabric parts lie face guide the fabric edges evenly through the toot Disengage at the front, the gathering foot and take it out to by the pushing it back over down the rove of the sewing - Pfaff 6250 | Owner's Manual - Page 108
ig toot can I ins used iii th rens I (liffmrent was: loIn In r with sewing fool and 1 Fol di ig the Ia h nc in pkc its. I Ii hios (Ioii 1 5 nIl of the biiiki and pull 2. l-oklinq ihi fabric in ph its i id sewing tliuni lii nit one woik,tnp. 3. F olding tIn labs iii pliat., ,nwuiq tIn in on - Pfaff 6250 | Owner's Manual - Page 109
the outside inward. - For thicker threads you may have to choose a longer stitch length; it is best to sew a test an first When you have finished, pull the work out ot il - machine carefully, because if you pull too ti',l will pull the last loops tight - Knot the threads on the reverse - Pfaff 6250 | Owner's Manual - Page 110
130/705 H-PS 15, 90 130/705 H-SKF 70, 110 .€-EEZ Medium ball point : Heavy bail point Stretch-fabric needle developed especially for Pfaff, Particularly suitable for delicate stretch and knitted fabrics. Wide-meshed corsetry Lycra, Simplex I and Lastex 130/705 H-J 90-110 Acute round point - Pfaff 6250 | Owner's Manual - Page 111
Needle chart System & No Stitch length Stitch width Needle spacing Suitable for 130/705 H-ZWI 80 2.5 mm 2.5mm F r 130/705 H-ZWI 80 90 2.5 mm 2.5 mm 3.0 mm 100 1.6mm 2.0mm - -- 2.5mm 3.0mm 4.0mm - T1edium wide cording Wide cording Extra wide CUftfng Extra-wide cording - - Pfaff 6250 | Owner's Manual - Page 112
I I I I I L I I I I I I I I I I I I I I I I I I I I J I I a a I I - Pfaff 6250 | Owner's Manual - Page 113
Care Maintenance and trouble shooting PageslO9 to 115 - Pfaff 6250 | Owner's Manual - Page 114
- Pfaff 6250 | Owner's Manual - Page 115
1JL P Maintenance and trouble shooting Changing the needle plate Cleaning and oihng Sewing lamp Page 112 Page 112 Page 113 Sewing faults and their removal Pages 114, 115 111 - Pfaff 6250 | Owner's Manual - Page 116
r I I I 'I 7' I I I I Chingiiig the needle plate it 'iy iii portant to coin and oil the sewing iii ic, because it will reward you with a longer ,tuvice life. The more often you use the machine, the care it needs. Removal: Switch off the main switch I at tI' a 'wit q ft tnt md remove the - Pfaff 6250 | Owner's Manual - Page 117
Switch off the main switch Disconnect the mains plug and the foot control - I plug from the machine. Take off the detachable work support. - I The sewing lamp (bulb) is located inside the needle head of the sewing machine. Removal To make it easier to change the bulb we recommend placing the - Pfaff 6250 | Owner's Manual - Page 118
. S See i eecl le chart (pi gi 1 06). Let the machine feet the fabric. Only guide the fabric I I lightly. VV[ieii you insert the bobbin case, push needle- and bobbin I thread tensions. S 5. Machine does not feed or feeds irregularly Sewing lii it ls collected between the feed dog teeth rows - Pfaff 6250 | Owner's Manual - Page 119
niichine and back on again after about 10 seconds. Important notes: Before you change sewing feet or needles, you must switch off main switch 1 07. Do not start the If you leave the threaded machine, machine without fabric in it. even for a short time, do not forget to switch off
-
 1
1 -
 2
2 -
 3
3 -
 4
4 -
 5
5 -
 6
6 -
 7
7 -
8
-
9
-
10
-
11
-
12
-
13
-
14
-
15
-
16
-
17
-
18
-
19
-
20
-
21
-
22
-
23
-
24
-
25
-
26
-
27
-
28
-
29
-
30
-
31
-
32
-
33
-
34
-
35
-
36
-
37
-
38
-
39
-
40
-
41
-
42
-
43
-
44
-
45
-
46
-
47
-
48
-
49
-
50
-
51
-
52
-
53
-
54
-
55
-
56
-
57
-
58
-
59
-
60
-
61
-
62
-
63
-
64
-
65
-
66
-
67
-
68
-
69
-
70
-
71
-
72
-
73
-
74
-
75
-
76
-
77
-
78
-
79
-
80
-
81
-
82
-
83
-
84
-
85
-
86
-
87
-
88
-
89
-
90
-
91
-
92
-
93
-
94
-
95
-
96
-
97
-
98
-
99
-
100
-
101
-
102
-
103
-
104
-
105
-
106
-
107
-
108
-
109
-
110
-
111
-
112
-
113
-
114
-
115
-
116
-
117
-
118
-
119
 |
 |
rrrr
-
electronic
6250
.‘
PFAFF
eiectro
20
Instruction
book