Pfaff 84 Owner's Manual - Page 18
No.93-106103-91
 |
View all Pfaff 84 manuals
Add to My Manuals
Save this manual to your list of manuals |
Page 18 highlights
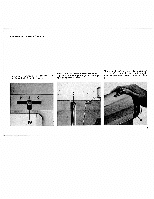
Attaching the Embroidery and Darning Plate Embroidery and darning plate No. 93-030 125-45 fFcpelooeursddee,cmdearuntiasntienmbthebseerrwoeainidcndecgereyrseosdaponeridirneaastdciaotoirnvnfsei,n.ygotFhuoeprrlatPmhtfeiaasfcifshpi8uni4ner. Apply this plate as follows: Bring the needle to its highest point. Remove the sewing foot. Raise the bed cover and pull ing forward. Place plate over the the embroidery and darn machine feed so that its lug enters the center feed slot (see ill.). Re place the bed cover. Darning To prepare your machine for darning, pro ceed as follows: Darning foot No.93-106103-91 Piaff 85 In this case it is not necessary to remove the cover plate. Simply press the darning plate into the corresponding cutouts in front of the needle plate. tisRsnhcegeertpewlrfsaeoccaore(ret1w6sNto)h.oe(.tL2h29oao)3wtr.-d1esiTpr0n6riatgirhnh1yegt0e3snpc-e9lriw1eps,seinsawaegtirrtnaefgcbsohtaosirftnoogolbnitfytienttrhed.fueraomdrmlnbe ---.-' / 18
-
 1
1 -
2
-
3
-
4
-
5
-
6
-
7
-
8
-
9
-
10
-
11
-
12
-
 13
13 -
 14
14 -
 15
15 -
 16
16 -
 17
17 -
 18
18 -
 19
19 -
 20
20 -
 21
21 -
 22
22 -
 23
23 -
24
-
25
-
26
-
27
-
28
-
29
-
30
-
31
-
32
-
33
-
34
-
35
-
36
-
37
-
38
-
39
-
40
 |
 |
