Pfaff GrandQuilter 18.8 Owner's Manual
Pfaff GrandQuilter 18.8 Manual
 |
View all Pfaff GrandQuilter 18.8 manuals
Add to My Manuals
Save this manual to your list of manuals |
Pfaff GrandQuilter 18.8 manual content summary:
- Pfaff GrandQuilter 18.8 | Owner's Manual - Page 1
Owner's Manual - Pfaff GrandQuilter 18.8 | Owner's Manual - Page 2
Bobbin Winder and Bobbins 12 Machine Part Names 15 The Control Unit 16 Threading Overview 17 How Do I Thread the Machine 17 How Do I Change the Needle 20 How Do I Make Adjustments to Make the Perfect Stitch 21 Tension, Tension, Tension 22 Trouble Shooting Checklist Check spring replacement - Pfaff GrandQuilter 18.8 | Owner's Manual - Page 3
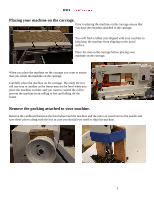
the roll to prevent the machine from rolling to fast and falling off the frame. Remove the packing attached to your machine. Remove the cardboard between the hand wheel and the machine and the piece of wood next to the needle and save these pieces along with the box in case you should ever need - Pfaff GrandQuilter 18.8 | Owner's Manual - Page 4
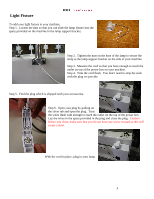
you can slide the lamp fixture into the space provided on the machine in the lamp support bracket. Step 2. Tighten the nuts on the base of the lamp to secure the lamp to the lamp support bracket on the side of your machine. Step 3. Measure the cord so that you have enough to reach - Pfaff GrandQuilter 18.8 | Owner's Manual - Page 5
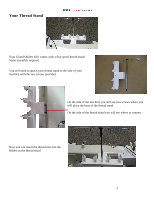
Your Thread Stand Your Grand Quilter 18.8 comes with a four spool thread stand. Some assembly required. You will need to attach your thread stand to the side of your machine with the two screws provided. On the side of the machine you will see two screws where you will place the base of the thread - Pfaff GrandQuilter 18.8 | Owner's Manual - Page 6
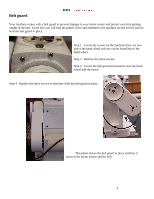
screws used to hold the belt guard in place. Step 1. Locate the screws on the machine there are two above the hand wheel and one can be found below the hand wheel. Step 2. Remove the three screws. Step 3. Locate the belt guard and position over the hand wheel and the motor. Step 4. Replace - Pfaff GrandQuilter 18.8 | Owner's Manual - Page 7
Quilter 18x8. This block is on the front of the machine or the needle side of the machine and is used for free motion quilting. This block is on the back of the Machine or the motor side of the machine and is used the block and place the front part of the block back in place help with your comfort. 7 - Pfaff GrandQuilter 18.8 | Owner's Manual - Page 8
your Grand Quilter 18.8 to your Carriage Assembly (Deck) and Controls on the Handles For one year after the purchase of the Pfaff GrandQuilter 18.8 longarm sewing machine, we will repair or replace (at our option), without any cost to you for either parts or labor, any machine or part that - Pfaff GrandQuilter 18.8 | Owner's Manual - Page 9
with the lever up. Because there is no tension on the thread the bottom stitches will be huge loops. How Do I Adjust the Height of the Hopping Foot adjust the foot to the level that clears the fabric when moving the machine around. You need to have about 1 thin dimes worth of space between the - Pfaff GrandQuilter 18.8 | Owner's Manual - Page 10
Next you will adjust the walk by loosing this bolt so that you can move this part up and down. Loosen this bolt here To move this arm up. Note: (Machine is shipped with this in the lowest position.) More Walk (higher) Less Walk (lower) Replace the side cover after you tighten the bolt. 10 - Pfaff GrandQuilter 18.8 | Owner's Manual - Page 11
every finished quilt place 3 to 4 drops of oil in the indicated spot. At this time make sure oil is present on dip stick. If not add 3-4 more drops of oil. Run machine to lubricate. For correct oil, when you are out of oil please purchase from Grand Quilter 18.8. (Note: the machine pictured here - Pfaff GrandQuilter 18.8 | Owner's Manual - Page 12
and Bobbins A bobbin winder is included with your machine. The thread on a properly wound bobbin should be snug and have even layers of thread. A sloppy or mushy wound bobbin will result in poor stitch quality. Bobbin Thread Bobbin Thread Guide How do I wind a Bobbin? 1. Insert an empty bobbin on - Pfaff GrandQuilter 18.8 | Owner's Manual - Page 13
is winding. Once it is full it will stop. 8. If you wind your bobbin only (When not quilting) ensure that you do not have thread in the needle to prevent jams. Also remove the bobbin and bobbin case to prevent damage. The bobbin will fill until the trip mechanism is pushed out by the thread. It will - Pfaff GrandQuilter 18.8 | Owner's Manual - Page 14
brush to wipe out the bobbin case and the bobbin area. Canned air only blows the lint around. By using the soft bristle brush you collect the dust on the brush. Each day before you start quilting, unthread your machine past the take up lever and remove the bobbin case, place a small drop of oil - Pfaff GrandQuilter 18.8 | Owner's Manual - Page 15
a diagram of the side of your long arm machine. The front of the machine faces the belly bar. The back of your machine has the electrical outlet and stitch regulator plugs. The numbers have been assigned in threading order. 1. Upper Thread Guide (note some machines do not have this) 2. Three Hole - Pfaff GrandQuilter 18.8 | Owner's Manual - Page 16
a light under it lit and the machine will complete one full turn. So if the needle up is on you can press the needle up and it will cycle and you can now pull you bobbin thread to the top. Left controller with Auto Stitch (stitch regulation) and Manual Stitch Knob adjust stitches per Inch in Auto - Pfaff GrandQuilter 18.8 | Owner's Manual - Page 17
been removed for a clear view for pictures only. Never run the machine without the guard in place, extreme head injury may occur. This as you will get pinched if your fingers get in this area. How Do I Thread the Machine? 1. Place a cone of thread on the thread holder. Figure 1 2. Pull thread through - Pfaff GrandQuilter 18.8 | Owner's Manual - Page 18
shown in picture. Figure 2 4. Weave thread as shown on three hole thread guide. Figure 3 Figure 3 Figure 4 5. Take thread between the two tension discs from back to front all the way around. Up down as you pull thread. Pull thread tightly to ensure the thread is in the tension disk. Figure 4 18 - Pfaff GrandQuilter 18.8 | Owner's Manual - Page 19
the thread guide just above the check spring. Figure 4 Takeup lever guard removed for photos only. Never run the machine without the guard guides on the left side. Figure 5 TIP: Use a dental floss threader to thread the guide directly above the needle. The threader will also thread your needle - Pfaff GrandQuilter 18.8 | Owner's Manual - Page 20
How Do I Change the Needle? A 134RSAN needle (size 18) will be installed on your Grand Quilter 18.8 from the factory. When it is time to replace the needle you can easily install one. Be sure the power switch is off on the machine. Remove the bobbin case. To remove the needle use the smaller teal - Pfaff GrandQuilter 18.8 | Owner's Manual - Page 21
use, such as a ball point or sharp point. Needle deflection, what is needle deflection? What causes needle deflection? How is needle deflection related to the stitches on my quilt? On a long arm quilting machine a stitch is mechanically created the same as a home sewing machine except the quilter - Pfaff GrandQuilter 18.8 | Owner's Manual - Page 22
and the quilt will create a drag on your machine's movement. Look at your bobbin, a sloppily wound bobbin will not create a good stitch. Make sure that the threads on the bobbin are snug and evenly wound. Check to see if there is a piece of lint in the bobbin case. Tension Trouble shooting checklist - Pfaff GrandQuilter 18.8 | Owner's Manual - Page 23
machine is stitching and the thread is flowing freely. Check the needle. Be sure it is all the way up into the shaft and the scarf is toward the back. If it has been used for some time, replace the needle. A blunt needle will make a popping sound as it penetrates the quilt sandwich. Machine Drags - Pfaff GrandQuilter 18.8 | Owner's Manual - Page 24
Check spring replacement/Tension Knob Fig 1: Tension Assembly with broken Spring (old tension knob) Fig 2: Tension Assembly with good spring (new Tension knob) Fig 3: Screw on inside of machine loosen only DO NOT REMOVE Fig 4: Remove assembly from machine. Be careful of release pin (see fig 6) - Pfaff GrandQuilter 18.8 | Owner's Manual - Page 25
New spring in place Fig 17: Insert the tension assembly back in barrel Fig 18: Insure that you are all the way in Fig 19: give the tension assembly . Make sure pin is still there Fig 21: Place the assembly back into your machine Fig 22: Once in ensure that your check spring is at 11:00 (refer - Pfaff GrandQuilter 18.8 | Owner's Manual - Page 26
for more tension Timing between needle and rotating hook Remove the two needle plate screws from your machine. You will also need to remove the three Face plate screws The protecting flange of the position bracket A should be engaged in the notch B of the bobbin case holder. D is set screw to - Pfaff GrandQuilter 18.8 | Owner's Manual - Page 27
its lowest position. At lowest position turn hand wheel to raise needle 2.5 mm (1/8" ) Hook point should be just above eye of needle. Hook Point This picture shows needle bar and hook point at the proper location. After needle bar rise. Note if hook point is not in this location reference drawing - Pfaff GrandQuilter 18.8 | Owner's Manual - Page 28
28
-
 1
1 -
 2
2 -
 3
3 -
 4
4 -
 5
5 -
 6
6 -
 7
7 -
8
-
9
-
10
-
11
-
12
-
13
-
14
-
15
-
16
-
17
-
18
-
19
-
20
-
21
-
22
-
23
-
24
-
25
-
26
-
27
-
28
 |
 |

Owner’s Manual