Pfaff ambition Essential Owner's Manual - Page 20
Buttons - 5 0 sewing machine
 |
View all Pfaff ambition Essential manuals
Add to My Manuals
Save this manual to your list of manuals |
Page 20 highlights
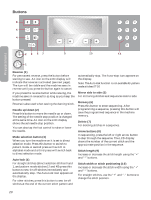
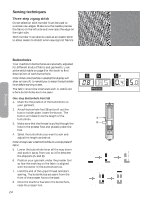
Buttons 8 6 4 Preparations 2 3 57 9 10 11 1 Reverse (1) For permanent reverse, press the button before starting to sew. An icon on the LCD display will indicate that reverse is activated (see next page). The icon will be visible and the machine sews in reverse until you press the button again to cancel. If you press the reverse button while sewing, the machine sews in reverse for as long as you keep the button pressed. Reverse is also used when sewing the darning stitch. Needle up/down (2) Press this button to move the needle up or down. The setting of the needle stop position is changed at the same time. An icon on the LCD display shows the set needle stop position. You can also tap the foot control to raise or lower the needle. Mode selection button (3) When you turn the machine on it is set to direct selection mode. Press this button to switch to pattern mode. A second press will switch to alphabet mode and a third press will switch back to direct selection mode. Auto-lock (4) For straight stitches (direct selection stitches 0 and 1, and pattern mode stitches 17 and 48) press this button to sew tie-off stitches immediately and automatically stop. The Auto-lock icon appears on the display. For other stitches, press this button to sew tie-off stitches at the end of the current stitch pattern and automatically stop. The Auto-stop icon appears on the display. Note: The Auto-lock function is not available for pattern mode stitches 07-16. Mirror side to side (5) For mirroring stitches and sequences side to side. Memory (6) Press this button to enter sequencing. After programming a sequence, pressing this button will save the programmed sequence in the machine memory. Delete (7) For deleting stitches in a sequence. Arrow buttons (8) In sequencing, press the left or right arrow button to step through the sequence. The LCD display shows the number of the current stitch and the approximate position in the sequence. Stitch length (9) Increase or decrease the stitch length using the "+" and "-" buttons. Stitch width or stitch positioning (10) Increase or decrease the stitch width using the "+" and "-" buttons. For straight stitches, use the "+" and "-" buttons to change the stitch position. 20
-
 1
1 -
2
-
3
-
4
-
5
-
6
-
7
-
8
-
9
-
10
-
11
-
12
-
13
-
14
-
 15
15 -
 16
16 -
 17
17 -
 18
18 -
 19
19 -
 20
20 -
 21
21 -
 22
22 -
 23
23 -
 24
24 -
 25
25 -
26
-
27
-
28
-
29
-
30
-
31
-
32
-
33
-
34
-
35
-
36
 |
 |
