Pfaff creative 1475CD Manual part 2 - Page 68
Linen, embroidery
 |
View all Pfaff creative 1475CD manuals
Add to My Manuals
Save this manual to your list of manuals |
Page 68 highlights
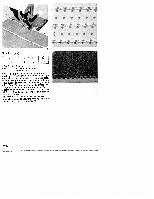
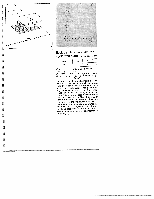
Linen embroidery Plain embroidery on linen is a widely known and popular ornamentation. The patterns illustrated can be made on your Pfaff Creative in a very short time by combining all kinds of stitches. Transfer the pattern illustrated onto the face side of the fabric either by ironing it on (iron-on pat tern) or with the aid of tracing paper. Always place two sheets of tissue paper under the fabric during embroidering. prog 06 10 117 156 + -1 -3+ 2A Thread: embroidery/darning thread The motif in Fig, 1 is sewn with the above-men tioned programs. First workstep: scallops • Program: 10 • Stitch width: 2.0 mm • Stitch length: 0.3 mm • Needle in down position • Stitch along the pre-traced contours. Second workstep: stems • Program: 06 • Stitch length: 2.5 mm • Follow the pre-traced stem lines with a pro gram 06 seam. Third workstep: leaves • Program: 117 • Stitch width: 5.0 mm • Press the "single pattern key. • Sew the leaf motifs slightly curved, starting a the stem. Fourth workstep: eyelets • Program: 156 • Press the "single pattern' key. • Sew the eyelets in the middle of the scallops according to their pre-traced position.
-
 1
1 -
2
-
3
-
4
-
5
-
6
-
7
-
8
-
9
-
10
-
11
-
12
-
13
-
14
-
15
-
16
-
17
-
18
-
19
-
20
-
21
-
22
-
23
-
24
-
25
-
26
-
27
-
28
-
29
-
30
-
31
-
32
-
33
-
34
-
35
-
36
-
37
-
38
-
39
-
40
-
41
-
42
-
43
-
44
-
45
-
46
-
47
-
48
-
49
-
50
-
51
-
52
-
53
-
54
-
55
-
56
-
57
-
58
-
59
-
60
-
61
-
62
-
 63
63 -
 64
64 -
 65
65 -
 66
66 -
 67
67 -
 68
68 -
 69
69
 |
 |
