Pfaff creative 7530 Owner's Manual - Page 160
Pfaff creative 7530 Manual
 |
View all Pfaff creative 7530 manuals
Add to My Manuals
Save this manual to your list of manuals |
Page 160 highlights
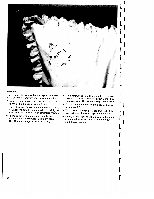
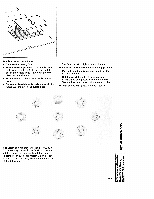
And here is how it is done: Remove the sewing foot. Place the eyelet plate onto the needle plate making sure that pin A fits into the middle cut out of the needle plate. Then push the eyelet plate down at the front. • Place the marked fabric in an embroidery hoop. • Cut one or two fabric threads and push the fabric over the pin in the eyelet plate. The fabric must fit tightly around the pin. • Place the presser foot lifter in darning position. • Pull up the bobbin thread and hold it tor the first few stitches. • Stitch around the cut with your chosen pro gram. While doing so, turn the hoop slowly. The stitches must be very close to each other. • Then secure with a few straight stitches. Tip: Select another program such as 150, 43 or 63. In this way the cut in the fabric will not be stitched around or only partly stitched around. To complete this, select program 32 and stitch around the cut uniformly. Thus you create beau tiful petal forms. 2 E G) 4 go ll 153
-
 1
1 -
2
-
3
-
4
-
5
-
6
-
7
-
8
-
9
-
10
-
11
-
12
-
13
-
14
-
15
-
16
-
17
-
18
-
19
-
20
-
21
-
22
-
23
-
24
-
25
-
26
-
27
-
28
-
29
-
30
-
31
-
32
-
33
-
34
-
35
-
36
-
37
-
38
-
39
-
40
-
41
-
42
-
43
-
44
-
45
-
46
-
47
-
48
-
49
-
50
-
51
-
52
-
53
-
54
-
55
-
56
-
57
-
58
-
59
-
60
-
61
-
62
-
63
-
64
-
65
-
66
-
67
-
68
-
69
-
70
-
71
-
72
-
73
-
74
-
75
-
76
-
77
-
78
-
79
-
80
-
81
-
82
-
83
-
84
-
85
-
86
-
87
-
88
-
89
-
90
-
91
-
92
-
93
-
94
-
95
-
96
-
97
-
98
-
99
-
100
-
101
-
102
-
103
-
104
-
105
-
106
-
107
-
108
-
109
-
110
-
111
-
112
-
113
-
114
-
115
-
116
-
117
-
118
-
119
-
120
-
121
-
122
-
123
-
124
-
125
-
126
-
127
-
128
-
129
-
130
-
131
-
132
-
133
-
134
-
135
-
136
-
137
-
138
-
139
-
140
-
141
-
142
-
143
-
144
-
145
-
146
-
147
-
148
-
149
-
150
-
151
-
152
-
153
-
154
-
 155
155 -
 156
156 -
 157
157 -
 158
158 -
 159
159 -
 160
160 -
 161
161 -
 162
162 -
 163
163 -
 164
164 -
 165
165 -
166
-
167
-
168
-
169
-
170
-
171
-
172
-
173
-
174
-
175
-
176
-
177
-
178
-
179
-
180
-
181
-
182
-
183
-
184
-
185
 |
 |
