Pfaff hobby 302 Owner's Manual - Page 32
Pfaff hobby 302 Manual
 |
View all Pfaff hobby 302 manuals
Add to My Manuals
Save this manual to your list of manuals |
Page 32 highlights
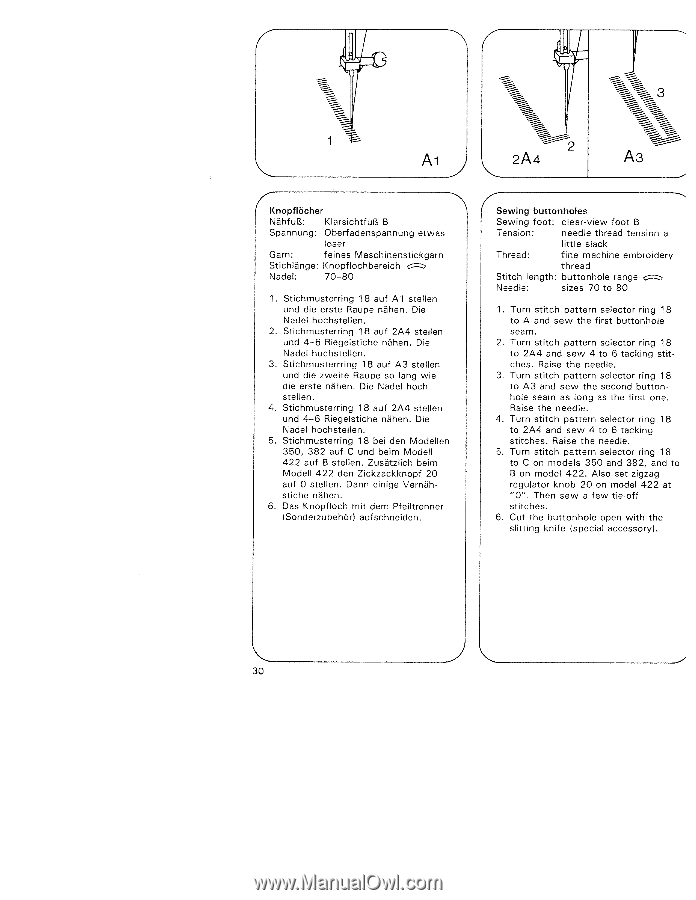
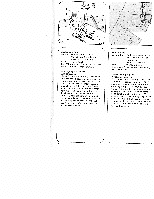
4 Knopflöcher NähfuB: KlarsichtfuS B Spannung: Oberfadenspannung etwas loser Garn: feines Maschinenstickgarn Stichlange: Knopflochbereich Nadel: 70-80 1. Stichmusterring 18 auf Al stellen und die erste Raupe nähen. Die Nadel hochstellen. 2. Stichmusterring 18 auf 2A4 stellen und 4-6 Riegelstiche nähen. Die Nadel hochstellen. 3. Stichmusterrring 18 auf A3 stellen und die zweite Raupe so lang wie die erste nähen. Die Nadel hoch stellen. 4. Stichmusterring 1 8 auf 2A4 stellen und 4-6 Riegelstiche nähen. Die Nadel hochstellen. 5. Stichmusterring 18 bel den Modellen 350, 382 auf C und beim Modell 422 auf B stellen. Zusãtzlich beim Modell 422 den Zickzackknopf 20 auf 0 stellen. Dann einige Vernäh stiche nãhen. 6. Das Knopfloch mit dem Pfeiltrenner (Sonderzubehör) aufschneiden. Sewing buttonholes Sewing foot: clear-view foot B Tension: needle thread tension a little slack Thread: fine machine embroidery thread Stitch length: buttonhole range czz, Needle: sizes 70 to 80 1. Turn stitch pattern selector ring 18 to A and sew the first buttonhole seam. 2. Turn stitch pattern selector ring 18 to 2A4 and sew 4 to 6 tacking stit ches. Raise the needle. 3. Turn stitch pattern selector ring 1 8 to A3 and sew the second button hole seam as long as the first one. Raise the needle. 4. Turn stitch pattern selector ring 18 to 2A4 and sew 4 to 6 tacking stitches. Raise the needle. 5. Turn stitch pattern selector ring 18 to C on models 350 and 382, and to B on model 422. Also set zigzag regulator knob 20 on model 422 at "0". Then sew a few tie-off stitches. 6. Cut the buttonhole open with the slitting knife lspecial accessoryl. 30
-
 1
1 -
2
-
3
-
4
-
5
-
6
-
7
-
8
-
9
-
10
-
11
-
12
-
13
-
14
-
15
-
16
-
17
-
18
-
19
-
20
-
21
-
22
-
23
-
24
-
25
-
26
-
 27
27 -
 28
28 -
 29
29 -
 30
30 -
 31
31 -
 32
32 -
 33
33 -
 34
34 -
 35
35 -
 36
36 -
 37
37 -
38
-
39
-
40
-
41
-
42
-
43
-
44
-
45
-
46
-
47
-
48
-
49
-
50
-
51
-
52
-
53
-
54
-
55
-
56
-
57
-
58
-
59
-
60
-
61
-
62
-
63
-
64
-
65
-
66
-
67
-
68
-
69
-
70
 |
 |