Pfaff hobby 4260 Owner's Manual - Page 55
Patchwork
 |
View all Pfaff hobby 4260 manuals
Add to My Manuals
Save this manual to your list of manuals |
Page 55 highlights
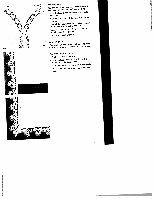
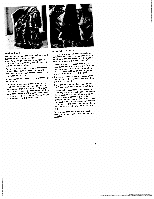
And here's how it's done: Patchwork quilt tPnoeafoctrhlctehhnfitinAoqgvumeearesnrfidwacbahqrniiuccihp.ltiiOwonnvgeeererearrteohwretiorgaymindeeaiatlnrilosytnoiutaslhmeahdasaknbeddyeiuvcsreealfot ped into a creative hobby. Pbpyaotschshaibwnidloi.trykNtqoouwimaltdsaakuyesse,ydohuotrowcebrveeearst,ievyweonuidehexaacvslueastihvreeealylity - tUpseeasmaticnmphglwaaytoleolrsouk,rw. coaTuwnhtcnetehtoeoerfmpc1pioe/lm4caetmiesnsecyrhscohiu(ao0lunl.y6led3eadvicnamfcioll)rau.bdyleoeuar - SasTaqcpnhcurdeoeasarwreddeialssltnqhwfcuoeeharsimrewcehsiptthhiyweeoictluheltoestcphaopenupanltttythbeineoernnffsrteaophwnnuedttnqtofutoofoigrlgytme.oetuhthsemeirn.rall in a much shorter time. A patchwork quilt always consists of three lay - Tquhieltisnega,mbuatllorawthaenrcethseayrearneottosebregesdmowohtehned ers of fabric: down, never ironed! AcpTscioseahonwmtinoscunfsbhmtiiiesswnonbtetnseohdtbrroeookfnoinutfohwnbdngedahieefsibofcbtpeaemhyircdeeetfkchnotteroitroismcvofabafstpforhfiilttaeeaehtbctoeeirqemocistuceno.isolpllaTtfatyohoywfeefaerhcb.rteirhrcenaiehcantitdqraeueursteaiuhqlateu.lnillyt - Baste the the fleece finished top ply of the insert and the bottom quilt quilt onto layer. - Tstwso3ohertnriiwratmsadhtmnihimpgtaeiorthooodstnqncgeeaueselewlxitdllti4tyithtunc2,teragoh6etrnh0dtmoweih)srs.ieapteftchAahashttselecsihwtnahmerpmaewerary,eo.loaslegnrfU.skrmagdeasb.fmewarmownifcouoiaoIttarpholseal(pttysrtrspehneeotrertieuxactsmcicphmhatabireca(geeosaterenlll0yy 58). You can then continue to making it into a cushion, sew your quilt. a wall hanging or a bedspread. 51
-
 1
1 -
2
-
3
-
4
-
5
-
6
-
7
-
8
-
9
-
10
-
11
-
12
-
13
-
14
-
15
-
16
-
17
-
18
-
19
-
20
-
21
-
22
-
23
-
24
-
25
-
26
-
27
-
28
-
29
-
30
-
31
-
32
-
33
-
34
-
35
-
36
-
37
-
38
-
39
-
40
-
41
-
42
-
43
-
44
-
45
-
46
-
47
-
48
-
49
-
 50
50 -
 51
51 -
 52
52 -
 53
53 -
 54
54 -
 55
55 -
 56
56 -
 57
57 -
 58
58 -
 59
59 -
 60
60 -
61
-
62
-
63
-
64
-
65
-
66
-
67
-
68
-
69
-
70
-
71
-
72
 |
 |
