Pfaff hobbylock 2.0 Owner's Manual
Pfaff hobbylock 2.0 Manual
 |
View all Pfaff hobbylock 2.0 manuals
Add to My Manuals
Save this manual to your list of manuals |
Pfaff hobbylock 2.0 manual content summary:
- Pfaff hobbylock 2.0 | Owner's Manual - Page 1
Owner's Manual - Pfaff hobbylock 2.0 | Owner's Manual - Page 2
the needle area, such as threading needle, changing needle, or changing presser foot, etc. • Always unplug sewing machine from the electrical outlet when removing covers, lubricating, or when making any other user servicing adjustments mentioned in the instruction manual. • Never drop or insert any - Pfaff hobbylock 2.0 | Owner's Manual - Page 3
13 Start sewing 13 Thread tension settings 14 Differential feed adjustment 15 Presser foot pressure adjustment 16 Stitch width settings 16 Stitch length settings 16 Stitch Ànger lever setting 17 Rolled edge sewing 17 Flatlock sewing 18 Corded overlock 19 Pin placement 19 - Pfaff hobbylock 2.0 | Owner's Manual - Page 4
Parts of the machine 7 8 9 10 1. Presser foot pressure adjustment knob 2. Left needle thread tension dial (blue) 3. Right needle thread tension dial (green) 4. Upper looper thread tension dial (red) 5. Lower looper thread tension dial (yellow) 6. Handle 7. Thread cutter 8. Presser foot lifter 9. - Pfaff hobbylock 2.0 | Owner's Manual - Page 5
Accessories 1. Needle pack including three needles, size #14/90 and two needles, size #12/80. Two needles, size #14/90, are in the machine on delivery. 2. Screwdriver 1 3. Tweezers 4. Thread unreeling discs (4) 5. Lint brush 6. Knife blade (for the stationary lower cutter) 7. 2-thread - Pfaff hobbylock 2.0 | Owner's Manual - Page 6
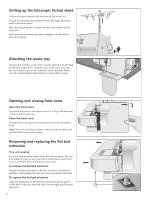
spools or cones over the cone holders on the spool pin. If the machine is already threaded, straighten the threads to prevent tangling. A Attaching the waste tray Position the machine so the front is nearly aligned with the edge of the table. Insert the U-shaped hooks of the waste tray onto the - Pfaff hobbylock 2.0 | Owner's Manual - Page 7
go. 3. Securely tighten the left (B) and/or right (A) needle clamp screw. Changing the presser foot A Turn off the main power switch and unplug the machine. 1. Raise the presser foot. 2. Turn the hand wheel toward you until the needles are in the highest position. 3. Push the white button on the - Pfaff hobbylock 2.0 | Owner's Manual - Page 8
over the fabric edge. Attaching the 2-thread overlock converter 2-thread overlock stitches are sewn using one needle thread and the lower looper thread. Before sewing, the two-thread converter must be attached to the upper looper, so the machine will sew with only two threads. 1. Open the front - Pfaff hobbylock 2.0 | Owner's Manual - Page 9
located inside the front cover for quick reference. When threading the machine, thread only in the following order: 1. Upper looper threading - (Red) 2. Lower looper threading - (Yellow) 3. Right needle threading - (Green) 4. Left needle threading - (Blue) Important: If the lower looper should come - Pfaff hobbylock 2.0 | Owner's Manual - Page 10
it is properly placed between the tension discs (3). 2 3 4. Thread the looper area of the machine following the red color coded thread guides (4-7). Use the tweezers to make the threading easier. 5. Use the tweezers to bring the thread behind the lower looper and thread into the hole in the upper - Pfaff hobbylock 2.0 | Owner's Manual - Page 11
wheel toward you until the lower looper is at the far right. 2 1 3 5. Thread the looper area of the machine following the yellow color coded thread guides (4-8). Use the tweezers to make the threading easier. 4 6. Pass the thread behind and over the tip of the lower looper (9A). Then pull it - Pfaff hobbylock 2.0 | Owner's Manual - Page 12
discs and pull it down to make certain it is properly placed between the tension discs (3). 4. Continue to thread points (4-7). Note: Be sure to pass the thread through the upper thread path of the thread guide (6). 5. Thread the eye of the right needle (8). Use the tweezers to make needle eye - Pfaff hobbylock 2.0 | Owner's Manual - Page 13
to test knot security. 4. Raise the presser foot. 5. First note tension dial settings and then turn the tension dials down to "0". 6. Pull the threads through the machine one at a time until the knots are in front of the needle. If the threads do not pull easily, check for tangles on thread guides - Pfaff hobbylock 2.0 | Owner's Manual - Page 14
settings Set the thread tension to suit the type of fabric and thread used. As the number on the thread tension discs increases, the thread tension becomes tighter. Lower looper thread and upper looper thread should be well balanced with the same tension (both looper threads should cross at the edge - Pfaff hobbylock 2.0 | Owner's Manual - Page 15
as knits and jersey, adjust the differential feed to a number between 1.0 and 2.0. The setting depends on the fabric being sewn. Test sew with different settings before sewing on your project. Stretch overlock (lightweight fabrics) When overedging light woven or loosely knit fabrics, such as silk - Pfaff hobbylock 2.0 | Owner's Manual - Page 16
Presser foot pressure adjustment The presser foot pressure is pre-set for sewing based on normal conditions. Adjustment might in some conditions be necessary. Increase or decrease the pressure until you are satisÀed with the result. Always test sew on a sample of your fabric before sewing on your - Pfaff hobbylock 2.0 | Owner's Manual - Page 17
as lawn, voile, organdy, crepe, etc. The rolled edge is achieved by adjusting the thread tension to make the fabric edge roll under the fabric while overlocking. Adjust the thread tension to change the degree of rolling. To sew rolled edge you need to set the stitch Ànger lever to "R". The minimum - Pfaff hobbylock 2.0 | Owner's Manual - Page 18
3-thread overlock stitch thread Flatlock: Attach the two-thread converter (see page 8). Thread the lower looper and the left needle. For 3-thread Flatlock: Thread the lower and upper looper and the left needle. 3. Set the thread so the seam is sewn with part of the stitch extending off the fabric. - Pfaff hobbylock 2.0 | Owner's Manual - Page 19
pins will be easy to remove and are away from the cutters. Warning: Sewing over pins will damage and might destroy the edge of the cutters. Securing the thread chain 1. Thread the chain into a large eyed, hand sewing needle. 2. Insert the needle into the end of the seam and pull the chain into - Pfaff hobbylock 2.0 | Owner's Manual - Page 20
the the fabric. - An overlock runs at a very high speed and needs to be oiled frequently to lubricate the internal working parts. Cleaning Turn off the main power switch and unplug the machine. Open the front cover and remove all the lint using the lint brush from the accessory case. Oiling Turn off - Pfaff hobbylock 2.0 | Owner's Manual - Page 21
the stationary cutter set screw (2). 5. edge of the stationary cutter. Storage When the machine is not in use, be sure to keep it unplugged. Cover the machine with the vinyl cover to protect it from the dust. Store the machine, so it is not exposed to direct sunlight or humidity. Servicing - Pfaff hobbylock 2.0 | Owner's Manual - Page 22
Trouble shooting Problem Fabric does not feed well Needle breaks Thread breaks Stitches skip Irregular stitches Fabric puckers Irregular trimming Fabric jams Machine Tighten needle set screw. - Use a larger size needle on heavy fabrics. - Check threading. - Check for tangled or caught thread. - - Pfaff hobbylock 2.0 | Owner's Manual - Page 23
settings shown in this table are our recommendations based on normal conditions. It may be necessary to adjust the thread tension according to the stitch, type of fabric and thread . Always test sew on a sample of your fabric before sewing on your garment. Combination Stitch 2-thread overlock, wide - Pfaff hobbylock 2.0 | Owner's Manual - Page 24
Combination Stitch 2-thread overlock, wrap, narrow Fabric Needle Stitch position length Stitch width Differential feed Stitch Ànger 2-thread Thread tension converter B G R Y - 3.5 - 2.0 - 4.0 - 2.0 1 Right 3 R(3.5) - 5.0 - 2.0 S Yes - 3.0 - 2.0 - 4.0 - 2.0 2-thread rolled edge Right - Pfaff hobbylock 2.0 | Owner's Manual - Page 25
Stitch 3-thread overlock stitch, wide Fabric Needle Stitch position length Stitch width Differential feed Stitch Ànger 2-thread Thread tension converter B G R Y 2.5 - 3.0 3.0 3.0 - 3.0 3.0 1 Left 3 R(3.5) 3.5 - 3.0 3.0 S No 2.5 - 3.0 3.0 3.0 - 3.0 3.0 3-thread overlock stitch - Pfaff hobbylock 2.0 | Owner's Manual - Page 26
7.0 No - 2.0 5.0 8.0 Not recommended Right 1 3 1 R No - 3.0 4.0 6.0 3-thread narrow edge Right 1 Right 1 Not recommended - 3.0 5.0 3.0 3 1 R No - 3.0 5.0 4.0 Not recommended 3 1 R No - 3.0 5.0 3.0 3-thread Áatlock stitch, wide 4-thread overlock stitch 26 Not recommended - Pfaff hobbylock 2.0 | Owner's Manual - Page 27
foot rise Needles Number of needles Number of threads Type of lamp Machine dimensions Width Depth Height Weight Maximum 1300 stitches/min 1.0-4.0 mm 0.7-2.0 Left needle: 5.2-6.7 mm Right needle: 3.0-4.5 mm Rolled hem: 1.5 mm 27 mm 4.5 mm INSPIRA overlock needles system ELx705 size: #14/90, #12/80 - Pfaff hobbylock 2.0 | Owner's Manual - Page 28
www.pfaff.com 413 17 36 - 26E • English • Inhouse • © 2010 KSIN Luxembourg II, S.ar.l. • All rights reserved • Printed in Sweden on environment friendly paper
-
 1
1 -
 2
2 -
 3
3 -
 4
4 -
 5
5 -
 6
6 -
 7
7 -
8
-
9
-
10
-
11
-
12
-
13
-
14
-
15
-
16
-
17
-
18
-
19
-
20
-
21
-
22
-
23
-
24
-
25
-
26
-
27
-
28
 |
 |

Owner’s Manual