Philips 13PR10G99 User manual
Philips 13PR10G99 Manual
 |
View all Philips 13PR10G99 manuals
Add to My Manuals
Save this manual to your list of manuals |
Philips 13PR10G99 manual content summary:
- Philips 13PR10G99 | User manual - Page 1
Read this manual first! Congratulations on purchasing this Philips product. We've included everything you need to get started. If you have any problems, Philips Representatives can help you get the most from your new product by explaining: • Hookups, • First Time Setup, and • Feature Operation. Do - Philips 13PR10G99 | User manual - Page 2
PHILIPS product. Sincerely, Philips Consumer Electronics Company P.S. Remember, to get the most from your PHILIPS OR BACK). NO USER-SERVICEABLE PARTS INSIDE. REFER SERVICING TO QUALIFIED SERVICE PERSONNEL. t This " closely to prevent operating and maintenance problems. WARNING: TO PREVENT FIRE OR - Philips 13PR10G99 | User manual - Page 3
accordance with the manufacturers instructions. 8. Do not Electronic Industries Alliance: www.eiae.org 16. Damage Requiring Service - The appliance should be serviced by qualified service Code, ANSI/NFPA No. 70-1984, provides information with respect to proper grounding of the mats and supporting - Philips 13PR10G99 | User manual - Page 4
) discussed in this manual will necessarily match those found with your television system. This is normal and does not require you contacting your dealer or requesting service. Auto Lock™, Auto Picture™, Auto Sound™ are all registered trademarks of Philips Consumer Electronics Company. Copyright - Philips 13PR10G99 | User manual - Page 5
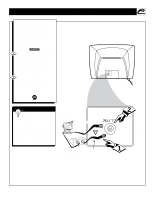
TV. SMART HELP Remember: Set the TV for the type signal you've just connected (see the "Tuner Mode" section on page 11 of this manual.) Cable TV Company Cable TV Signal Input To select only the channel numbers on your Cable system see "Auto Program" (page 12). If you use - Philips 13PR10G99 | User manual - Page 6
connected (see the "Tuner Mode" section on page 11 of this manual.) To set the TV to select only the channel numbers in your 12 (Auto Program section). To order any optional accessory contact your dealer or the Philips Parts Center at 1-800-851-8885. Combination VHF/UHF Antenna (Outdoor or Indoor) - Philips 13PR10G99 | User manual - Page 7
boxes are included) refer to your accessory VCR and Cable Converter Owner's Manual for details. Connect your Antenna or Cable TV signal to the IN FROM or to playback video from a 1 camera. Use the AV button on the remote to tune to the Front A/V Inputs. Round Cable 75Ω Supplied with VCR Audio - Philips 13PR10G99 | User manual - Page 8
by simply plugging them into the headphone jack located on the front of the television. Sound coming from the headphone jack is mono. Remote Sensor Window VIDEO AUDIO VIDEO INSTALL/MENU - VOLUME + CHANNEL Front Audio/Video Inputs (Mono) 1 The Front Audio/Video Input Jacks make it real - Philips 13PR10G99 | User manual - Page 9
DESCRIPTION OF REMOTE CONTROL BUTTONS QUADRA SURF Buttons - (Red, Green, Yellow, Blue) Allows you to store and surf up to 10 channels you choose for each colored button. - Philips 13PR10G99 | User manual - Page 10
the LANGUAGE control you can set the TV's on-screen menu to be shown in either English or Spanish. Press the MENU button on the remote to show the on-screen menu. Press the CURSOR UP v or DOWN w buttons to scroll through the on-screen menu until the word INSTALL is - Philips 13PR10G99 | User manual - Page 11
.) In the AUTO mode, when the AUTO PROGRAM feature is activated, the TV will automatically choose the correct mode. Press the MENU button on the remote to show the on-screen menu. Press the CURSOR UP v or DOWN w buttons to scroll through the on-screen menu until the word INSTALL is - Philips 13PR10G99 | User manual - Page 12
are pressed. Note: Make sure the antenna or cable signal connection has been completed before AUTO PROGRAM is activated. Press the MENU button on the remote to show the on-screen menu. Press the CURSOR UP v or DOWN w buttons to scroll through the on-screen menu until the word INSTALL is - Philips 13PR10G99 | User manual - Page 13
it easy for you to ADD or DELETE channels from the list of channels stored in the TV's memory. Press the MENU button on the remote to show the on-screen menu. Press the CURSOR UP v or DOWN w buttons to scroll through the on-screen menu until the word INSTALL is - Philips 13PR10G99 | User manual - Page 14
THE PICTURE ADJUSTMENT CONTROLS T o adjust your TV picture controls, select a channel and follow the steps shown below: Press the MENU button on the remote to display the on-screen menu. Press the CURSOR UP v or DOWN w buttons until the word PICTURE is highlighted. Press the CURSOR RIGHT ᮣ button - Philips 13PR10G99 | User manual - Page 15
(Dynamic Noise Reduction) control can help eliminate this type of interference and improve the quality of the picture. Press the MENU button on the remote to display the on-screen menu. Press the CURSOR UP v or CURSOR DOWN w button until the word PICTURE is highlighted. Main Picture Sound Features - Philips 13PR10G99 | User manual - Page 16
"sharpen" the picture quality. The black portions of the picture become richer in darkness and the whites become brighter. Press the MENU button on the remote to display the on-screen menu. Press the CURSOR UP v or CURSOR DOWN w button until the word PICTURE is highlighted. Press the CURSOR RIGHT - Philips 13PR10G99 | User manual - Page 17
Boost effects only the low frequency sound coming from the TV enhancing the lows. Main Picture Sound Features Install Press the MENU button on the remote to display the on-screen menu. Press the CURSOR UP v or CURSOR DOWN w button until the word SOUND is highlighted. Press the CURSOR RIGHT - Philips 13PR10G99 | User manual - Page 18
peaks and valleys that occur during program changes or commercial breaks. To turn the AVL ON, follow these steps. Press the MENU button on the remote to display the on-screen menu. Press the CURSOR UP v or CURSOR DOWN w button until the word SOUND is highlighted. Press the CURSOR RIGHT ᮣ button - Philips 13PR10G99 | User manual - Page 19
on and off at a specific time. It also can be set to tune to a specific channel at a specific time. Press the CLOCK button on the remote to display the Timer on-screen menu. Press the CURSOR UP v or DOWN w button to highlight one of the Timer controls you wish to set - Philips 13PR10G99 | User manual - Page 20
AutoLock offers various BLOCKING controls from which to choose: Access Code: An Access Code must be set to prevent children from unblocking questionable or programming set by their parents. Channel Block: After an access code has been programmed, you can block individual channels including the A/V - Philips 13PR10G99 | User manual - Page 21
and get a better understanding of the rating terms for certain programming. First, let's start by learning how to set a personal access code: Press the MENU button on the remote to display the on-screen menu. Press the CURSOR UP v or DOWN w button until the word FEATURES is highlighted. Press the - Philips 13PR10G99 | User manual - Page 22
code has been set (see previous page), you are now ready to select the channels you want to block out or censor. Press the NUMBERED (or CH +, -) buttons to tune the channel you wish to block or censor. Press the MENU button on the remote channel and enter your Access Code to view the channel, ALL - Philips 13PR10G99 | User manual - Page 23
steps explain how to CLEAR ALL blocked channels. Press the MENU button on the remote to show the on-screen menu. Press the CURSOR UP v or DOWN w screen. SMART HELP If you tune to a blocked channel and enter your Access Code to view the channel, ALL blocked channels will be viewable until the TV is - Philips 13PR10G99 | User manual - Page 24
can be set to block at the same time. Press the MENU button on the remote to show the on-screen menu. Press the CURSOR UP v or DOWN w button Press the CURSOR RIGHT ᮣ button. Enter the correct access code number. "XXXX" shows on the Access Code display as you press the NUMBERED buttons. AutoLock menu - Philips 13PR10G99 | User manual - Page 25
button until AutoLock is highlighted. Press the CURSOR RIGHT ᮣ button. The screen will prompt you for your Access Code. Using the NUMBERED buttons on the remote, enter your 4 digit Access Code. The AutoLock menu options will be displayed. Press the CURSOR UP v or DOWN w button to highlight the words - Philips 13PR10G99 | User manual - Page 26
w button to highlight the desired rating. Press the CURSOR RIGHT ᮣ button on the remote to turn the TV-Y or TV-G rating ON or OFF. Or, press the Press the CURSOR RIGHT ᮣ button on the remote to turn the option ON or OFF. AutoLock Block Channel Setup Code Clear All Block All Movie Rating TV Rating - Philips 13PR10G99 | User manual - Page 27
the censoring can be turned ON or OFF. Press the MENU button on the remote to show the on-screen menu. Press the CURSOR UP v or DOWN w Press the CURSOR RIGHT ᮣ button. Enter the correct access code number. "XXXX" shows on the Access Code display as you press the NUMBERED buttons. AutoLock menu - Philips 13PR10G99 | User manual - Page 28
, this feature uses on-screen "text boxes" to show dialogue and conversations while the TV program is in progress. Press the CC button on the remote to display the current Closed Caption set- ting. Press the CC button repeatedly to CC Off choose from the four Closed Caption options (CC Off - Philips 13PR10G99 | User manual - Page 29
in the morning with a test pattern screeching in your ears? Well, your TV can save you all that trouble by automatically turning itself off. Press the SLEEP button on the 15 Min remote control and the SLEEP timer display will appear on the screen. 30 Min Press the SLEEP button repeatedly to - Philips 13PR10G99 | User manual - Page 30
to automatically adjust the TV's Brightness, Color, Picture, Sharpness, Tint, Color Temperature, DNR and Contrast+ levels. Press the AUTO PICTURE button on the remote control. The current Auto Picture setting will appear in the middle of the screen. Press the AUTO PICTURE button repeatedly to select - Philips 13PR10G99 | User manual - Page 31
Bass, Treble, AVL, and Incredible Surround controls To select any of the options follow the directions below. Press the AUTO SOUND button on the remote control. The current Auto Sound setting will appear in the middle of the screen. Press the AUTO SOUND button repeatedly to toggle between the four - Philips 13PR10G99 | User manual - Page 32
up four different personal Surf lists using the colored buttons (on the remote control), each holding up to ten channels in its quick viewing"list." to add to one of the SURF lists. Press the SMILEY button on the remote control to ADD the channel to one of the SURF lists. Press the corresponding - Philips 13PR10G99 | User manual - Page 33
programmed channel for that surf list. While the colored "smiley" face still appears on the screen, press the same COLORED button on the remote to tune the second channel programmed for that specific surf list. Repeatedly pressing the same COLORED button while the "smiley" face appears will tune - Philips 13PR10G99 | User manual - Page 34
TROUBLESHOOTING TIPS Please make these simple checks before calling for service. These tips can save you time the TV ON. This should correct the problem. • Check the Picture menu options for proper control settings. • Pressthe Auto Picture button on the remote to change the color options. If the - Philips 13PR10G99 | User manual - Page 35
feature controls shown on the Television screen that are made available for user adjustments. Remote Sensor Window • A window or opening found on the Television control panel through which infrared remote control command signals are received. Quadra Surf • The feature that allows the programming of - Philips 13PR10G99 | User manual - Page 36
Features Front A/V Inputs 7 Access Code 21 Glossary of Terms 35 Block Remote Control Buttons 9 Explanation of Auto Lock 20 Remote Control Operation (Basic 8 Movie Rating Control 25 Safety Instructions TV Connection (Basic Connection 5 Troubleshooting Tips 34 Channel Edit Control 13 - Philips 13PR10G99 | User manual - Page 37
RENEWED 90 DAY LIMITED WARRANTY
-
 1
1 -
 2
2 -
 3
3 -
 4
4 -
 5
5 -
 6
6 -
 7
7 -
8
-
9
-
10
-
11
-
12
-
13
-
14
-
15
-
16
-
17
-
18
-
19
-
20
-
21
-
22
-
23
-
24
-
25
-
26
-
27
-
28
-
29
-
30
-
31
-
32
-
33
-
34
-
35
-
36
-
37
 |
 |

3121 235 20031
Read this manual first!
Congratulations on purchasing this Philips product.
We’ve included everything you need to get started.
If you have any problems, Philips Representatives can
help you get the most from your new product by explaining:
• Hookups,
• First Time Setup, and
• Feature Operation.
Do not attempt to return this product to the store.
For fast help, call us first!
1-800-531-0039
Thank you for making Philips a part of your home!