Philips 13PR10G99 User manual - Page 8
Emote, Perations, Elevision
 |
View all Philips 13PR10G99 manuals
Add to My Manuals
Save this manual to your list of manuals |
Page 8 highlights
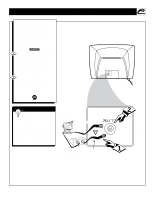
BASIC TV/REMOTE OPERATIONS TELEVISION Press the POWER button to turn the TV ON. Note: You can also press any button on the front of the TV to turn the TV ON. Press the VOLUME + button to increase the sound level, or the VOLUME - button to lower the sound level. Pressing both buttons at the same time will display the on-screen menu. Once in the menu, use these button to make adjustments or selections. Press the CHANNEL UP v or DOWN w button to select TV channels. REMOTE Point the remote control toward the remote sensor window on the TV when operating the TV with the remote. 7 MONO VIDEO AUDIO INSTALL/MENU - VOLUME + CHANNEL Headphone Jack Headphones can be used with this television by simply plugging them into the headphone jack located on the front of the television. Sound coming from the headphone jack is mono. Remote Sensor Window VIDEO AUDIO VIDEO INSTALL/MENU - VOLUME + CHANNEL Front Audio/Video Inputs (Mono) 1 The Front Audio/Video Input Jacks make it real easy to watch the playback of a video tape using a camcorder (or any accessory device) with Audio/Video Output Jacks. 23 BATTERY INSTALLATION T o load the supplied batteries into the remote: 1. Remove the battery compartment lid on the back of the remote. 2. Place the batteries (2- AA) in the remote. Be sure the (+) and (-) ends of the batteries line up correctly (inside of case is marked.) 3. Reattach the battery lid. SMART HELP Remember, the tuned channel number will always briefly appear when the TV is first turned ON (and with channel changes.) You can also press the STATUS/EXIT button (on the remote) to see what channel the TV is ON. 4 VOL Battery Lid Battery Compartment 2 "AA" Batteries Bottom of Remote Shown 8
-
 1
1 -
2
-
 3
3 -
 4
4 -
 5
5 -
 6
6 -
 7
7 -
 8
8 -
 9
9 -
 10
10 -
 11
11 -
 12
12 -
 13
13 -
14
-
15
-
16
-
17
-
18
-
19
-
20
-
21
-
22
-
23
-
24
-
25
-
26
-
27
-
28
-
29
-
30
-
31
-
32
-
33
-
34
-
35
-
36
-
37
 |
 |
