Philips 180P User Manual - Page 55
Connecting to Your PC, the Wall Mount Kit
 |
UPC - 037849907177
View all Philips 180P manuals
Add to My Manuals
Save this manual to your list of manuals |
Page 55 highlights
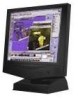
Connecting to Your PC Connecting to Your PC Your LCD Monitor : Front View Product Description • Accessory Pack • Connecting to Your PC • Getting Started • Optimizing Performance Accessories (optional) : Installing the USB Hub • Installing the Protective Cover • Installing the Wall Mount Kit Accessory Pack Unpack all the parts. 1) Audio in Cable (Option only available for Audio version) 2) Microphone out Cable (Option only available for Audio version) 3) Power Cable (socket may differ for different countries) 4) Macintosh Adapter (optional) file:///D|/Philips LCD/english/180P/INSTALL/CONNECT.HTM (1 of 5) [1/20/2001 3:20:11 PM]
-
 1
1 -
2
-
3
-
4
-
5
-
6
-
7
-
8
-
9
-
10
-
11
-
12
-
13
-
14
-
15
-
16
-
17
-
18
-
19
-
20
-
21
-
22
-
23
-
24
-
25
-
26
-
27
-
28
-
29
-
30
-
31
-
32
-
33
-
34
-
35
-
36
-
37
-
38
-
39
-
40
-
41
-
42
-
43
-
44
-
45
-
46
-
47
-
48
-
49
-
 50
50 -
 51
51 -
 52
52 -
 53
53 -
 54
54 -
 55
55 -
 56
56 -
 57
57 -
 58
58 -
 59
59 -
 60
60 -
61
-
62
-
63
-
64
-
65
-
66
-
67
-
68
-
69
-
70
-
71
-
72
-
73
-
74
-
75
-
76
-
77
-
78
-
79
-
80
-
81
-
82
-
83
-
84
-
85
-
86
-
87
-
88
-
89
-
90
-
91
-
92
-
93
-
94
-
95
 |
 |

Connecting to Your PC
Your LCD Monitor
:
Front View Product Description
•
Accessory Pack
•
Connecting to Your
PC
•
Getting Started
•
Optimizing Performance
Accessories (optional)
:
Installing the USB Hub
•
Installing the Protective Cover
•
Installing
the Wall Mount Kit
Accessory Pack
Unpack all the parts.
1)
Audio in
Cable
(Option only
available for
Audio
version)
2)
Microphone
out Cable
(Option only
available for
Audio
version)
3)
Power
Cable
(socket may
differ for
different
countries)
4)
Macintosh
Adapter
(optional)
Connecting to Your PC
file:///D|/Philips LCD/english/180P/INSTALL/CONNECT.HTM (1 of 5) [1/20/2001 3:20:11 PM]