Philips AEA3000 Quick start guide - Page 1
Philips AEA3000 Manual
 |
View all Philips AEA3000 manuals
Add to My Manuals
Save this manual to your list of manuals |
Page 1 highlights
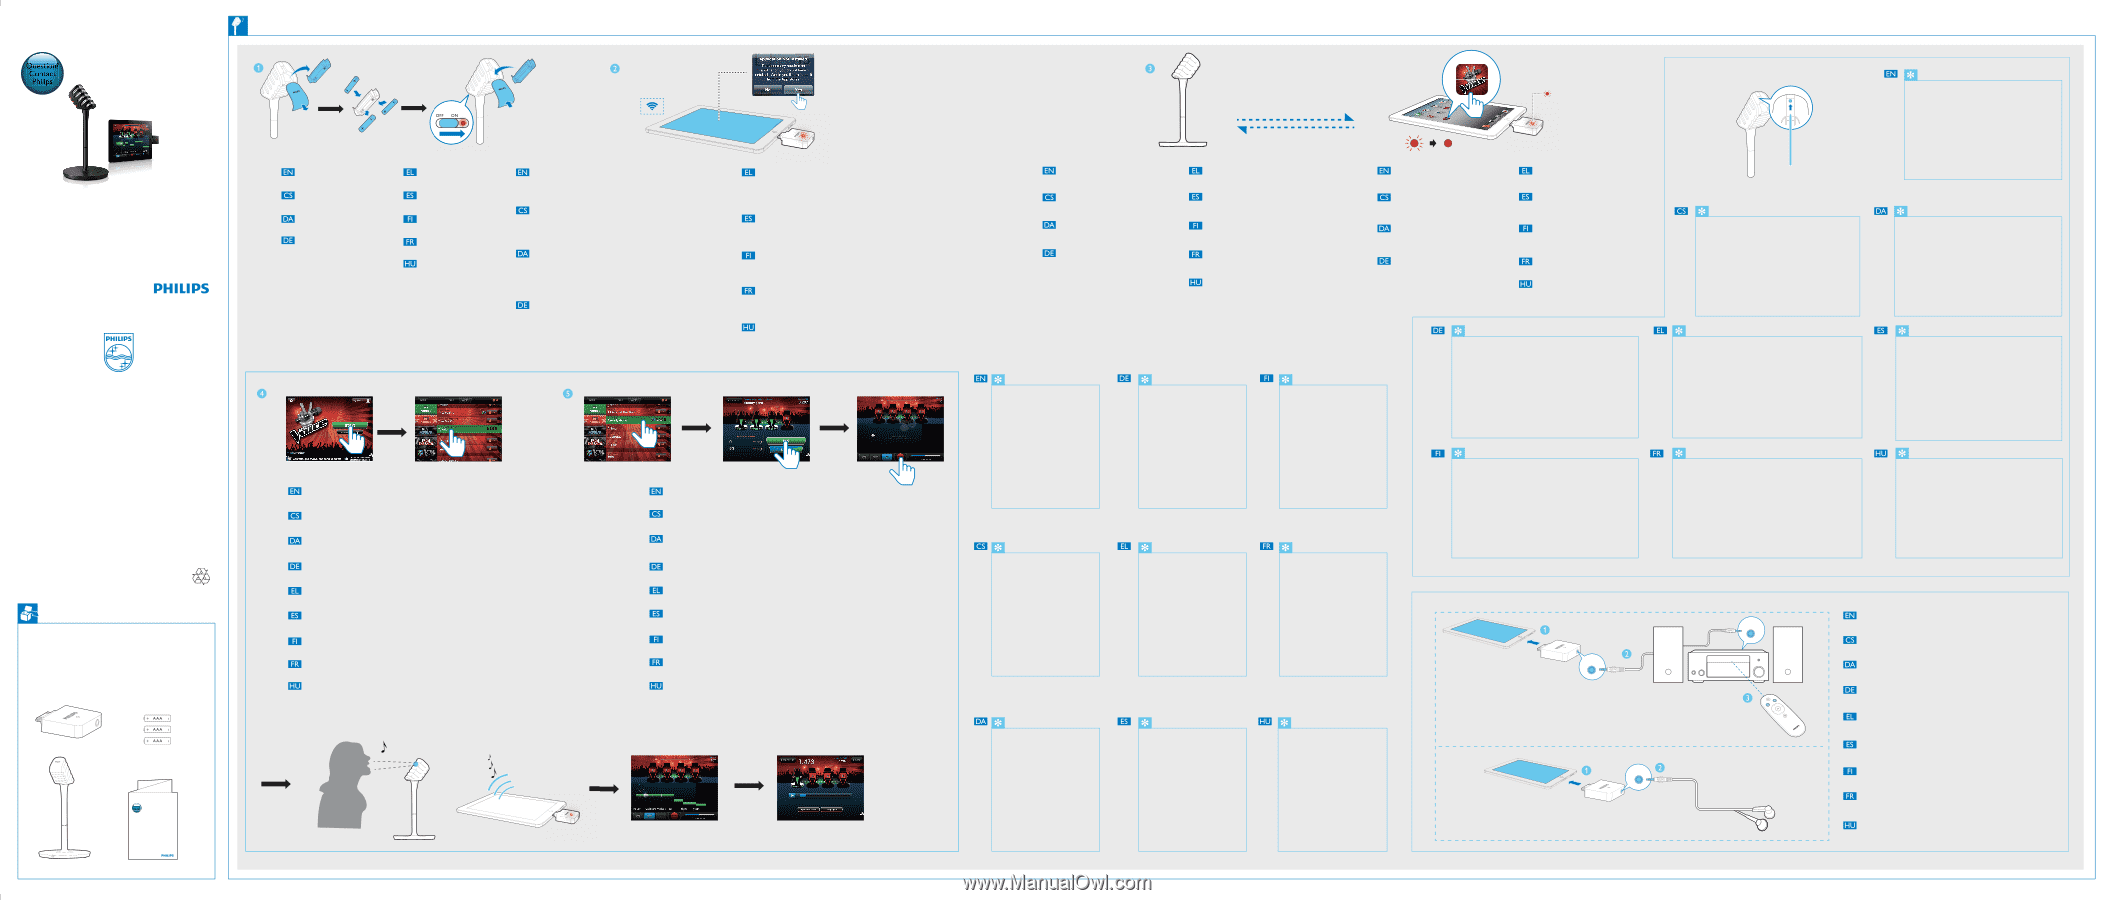
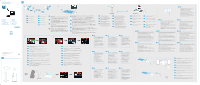
Always there to help you Register your product and get support at www.philips.com/welcome Question? Contact Philips AEA3000 EN Quick start guide CS Stručný návod k rychlému použití DA Lynvejledning DE Kurzanleitung EL ES Guía de configuración rápida FI Pikaopas FR Guide de démarrage rapide HU Gyors üzembe helyezési útmutató IT Guida rapida NL Snelstartgids NO Hurtigveiledning PL Skrócona instrukcja obsługi PT GManual de Início Rápido RU SK Stručná úvodná príručka SV Snabbstartguide TR Hızlı başlangıç kılavuzu All registered and unregistered trademarks are property of their respective owners. © 2012 Koninklijke Philips Electronics N.V. All rights reserved. AEA3000_00_QSG_V1.0 Always there to help you Register your product and get support at www.philips.com/welcome Question? Contact Philips Quick start guide Prepare the microphone. Připravte mikrofon. Forbered mikrofonen. Bereiten Sie das Mikrofon vor. Prepare el micrófono. Valmistele mikrofoni. Préparez le microphone. Készítse elő a mikrofont. Connect your iPad to the receiver, then follow the prompt to install The Voice: On Stage. If no prompt pops up on your iPad, you can go to Settings -> General -> About -> AEA3000 -> Find App for Accessory to install the app. Připojte zařízení iPad k přijímači, poté postupujte podle výzvy s pokyny k instalaci aplikace The Voice: On Stage. Pokud se na zařízení iPad nezobrazí žádná výzva, můžete přejít na možnost Settings -> General -> About -> AEA3000 -> Find App for Accessory a nainstalovat aplikaci. Tilslut din iPad til modtageren, og følg derefter beskeden for at installere The Voice: On Stage. Hvis beskeden ikke vises på din iPad, kan du gå til Settings -> General -> About -> AEA3000 -> Find App for Accessory (Indstillinger -> Generelt -> Om -> AEA3000 -> Find app til tilbehør) for at installere app'en. Verbinden Sie Ihr iPad mit dem Empfänger, und folgen Sie dann der Aufforderung zu Installation von The Voice: On Stage. Wenn keine Aufforderung auf Ihrem iPad angezeigt wird, können Sie zu Einstellungen -> Allgemein -> Info -> AEA3000 -> Find App for Accessory (App für Zubehör suchen), um die Anwendung zu installieren. iPad The Voice: On Stage iPad Settings General About AEA3000 -> Find App for Accessory Conecte el iPad al receptor y, a continuación, siga las indicaciones para instalar The Voice: On Stage. Si no aparece ningún mensaje emergente en el iPad, puede acceder a Settings -> General -> About -> AEA3000 -> Find App for Accessory (Ajustes > General > Acerca de > AEA3000 > Buscar aplicación para el accesorio) para instalar la aplicación. Kytke iPad vastaanottimeen ja seuraa The Voice: On Stage -sovelluksen asennusohjeita. Jos asennus ei käynnisty automaattisesti iPadissa, asenna sovellus valitsemalla Settings -> General -> About -> AEA3000 -> Find App for Accessory (Asetukset -> Yleiset -> Tietoja -> AEA3000 -> Etsi lisäsovellus). Connectez votre iPad au récepteur, puis suivez l'invite pour installer The Voice: On Stage. Si aucune invite ne s'affiche sur votre iPad, vous pouvez accéder à Settings -> General -> About -> AEA3000 -> Find App for Accessory (Réglages -> Général -> À propos de -> AEA3000 -> Trouver l'application pour l'accessoire) pour installer l'application. Csatlakoztassa az iPad készüléket a vevőkészülékhez, majd az utasításokat követve telepítse a The Voice: On Stage alkalmazást. Ha nem jelenik meg utasítás az iPad készüléken, a Settings -> General -> About -> AEA3000 -> Find App for Accessory opcióval telepítheti az alkalmazást. Run The Voice: On Stage to start automatic pairing and connection between the microphone and receiver. Spuštěním aplikace The Voice: On Stage spustíte automatické spárování a propojení mikrofonu a přijímače. Kør The Voice: On Stage for at starte automatisk parring og tilslutning mellem mikrofon og modtager. Starten Sie The Voice: On Stage, um die automatische Kopplung zu starten und die Verbindung zwischen dem Mikrofon und dem Empfänger herzustellen. The Voice: On Stage Ejecute The Voice: On Stage para iniciar automáticamente el emparejamiento y la conexión entre el micrófono y el receptor. Käynnistä automaattinen pariliitoksen muodostaminen mikrofonin ja vastaanottimen välille avaamalla The Voice: On Stage. Lancez The Voice: On Stage pour démarrer le couplage automatique et la connexion entre le microphone et le récepteur. Nyissa meg a The Voice: On Stage alkalmazást a mikrofon és a vevőkészülék automatikus párosításának és csatlakoztatásának megkezdéséhez. Tap Start, find and download the tutorial, then follow the tutorial for detailed usage of the app. Klepněte na možnost Start, najděte a stáhněte výukový program, ve kterém naleznete informace o podrobném používání aplikace. Tryk på Start, find og download vejledningen, og følg derefter vejledningen for at bruge app'en. Tippen Sie auf Start, suchen Sie das Lernprogramm, und laden Sie es herunter. Folgen Sie dann dem Lernprogramm für ausführliche Informationen zur Verwendung der App. Start Toque Start (Iniciar), busque y descargue el tutorial y sígalo para conocer el uso detallado de la aplicación. Valitse Start (Käynnistä) ja lataa opetusohjelma. Noudata opetusohjelmassa annettuja käyttöohjeita. Appuyez sur Start (Démarrer), recherchez et téléchargez le didacticiel, puis suivez le didacticiel sur l'utilisation détaillée de l'application. Érintse meg a Start elemet, majd keresse meg és töltse le a bemutatót, amelyből részletesen megismerheti az alkalmazás használatát. Select a song from the list, tap SING->RECORD, and then sing along. Vyberte ze seznamu skladbu, klepněte na možnost SING->RECORD a můžete si ji zazpívat. Vælg en sang på listen ved at trykke på SING->RECORD (Syng->Optag), og syng med. Wählen Sie ein Lied aus der Liste aus, tippen Sie auf SING->RECORD (SINGEN->AUFNEHMEN), und singen Sie dann mit. SING->RECORD Seleccione una canción de la lista, toque SING->RECORD (Cantar > Grabar) y comience a cantar. Valitse musiikkikappale luettelosta, napauta SING -> RECORD ja laula mukana. Sélectionnez une chanson dans la liste, appuyez sur SING>RECORD (CHANTER-> ENREGISTREMENT), puis chantez au son de la musique. Válasszon ki egy dalt a listából, érintse meg a SING->RECORD lehetőséget, és már énekelhet is. When you exit The Voice: On Stage or disconnect the iPad, the wireless microphone is disconnected from the receiver automatically. If the wireless microphone remains disconnected for more than 15 minutes, it switches to standby mode automatically. To switch it on from standby mode again, you need to slide the OFF/ON switch on the microphone to the OFF position and then back to the ON position. Wenn Sie The Voice: On Stage beenden oder die Verbindung zum iPad trennen, wird das kabellose Mikrofon automatisch vom Empfänger getrennt. Wenn das kabellose Mikrofon länger als 15 Minuten nicht verbunden ist, schaltet es automatisch in den Standby-Modus. Um es aus dem Standby-Modus wieder einzuschalten, müssen Sie den Schiebeschalter OFF/ON auf dem Mikrofon in die Position OFF und dann zurück in die Position ON schieben. Langattoman mikrofonin yhteys kaiuttimeen katkeaa automaattisesti, kun suljet The Voice: On Stage -sovelluksen tai irrotat iPadin. Jos langatonta mikrofonia ei käytetä yli 15 minuuttiin, se siirtyy automaattisesti valmiustilaan. Valmiustilassa voit käynnistää mikrofonin uudelleen siirtämällä sen OFF/ON-kytkimen OFF-asentoon ja takaisin ON-asentoon. Jakmile opustíte aplikaci The Voice: On Stage nebo odpojíte zařízení iPad, bezdrátový mikrofon se automaticky odpojí od přijímače. Pokud je bezdrátový mikrofon odpojený déle než 15 minut, automaticky se přepne do pohotovostního režimu. Chcete-li jej znovu zapnout z pohotovostního režimu, posuňte přepínač OFF/ON na mikrofonu do polohy OFF a pak zpět do polohy ON. The Voice: On Stage iPad 15 OFF/ON OFF ON. Lorsque vous quittez The Voice: On Stage ou déconnectez l'iPad, le microphone sans fil se déconnecte automatiquement du récepteur. Si le microphone sans fil reste déconnecté pendant plus de 15 minutes, il bascule automatiquement en mode veille. Pour le réactiver et quitter le mode veille, vous devez faire glisser le commutateur OFF/ON du microphone sur OFF puis le faire basculer à nouveau sur ON. Wait until the Bluetooth® indicator turns solid red. Počkejte, dokud se kontrolka Bluetooth® nerozsvítí červeně. Vent, til Bluetooth®-indikatoren lyser konstant rødt. Warten Sie, bis die Bluetooth®-Anzeige durchgehend rot leuchtet. Bluetooth Espere hasta que el indicador de Bluetooth® se ilumine en rojo de forma permanente. Odota, kunnes Bluetooth®-merkkivalo palaa punaisena. Attendez jusqu'à ce que le voyant Bluetooth® s'allume en rouge. Várjon, amíg a Bluetooth® jelzőfény folyamatos pirosra vált. Wenn die Bluetooth®-Anzeige weiterhin blinkt, das Mikrofon also nicht mit dem Empfänger gekoppelt werden kann, gehen Sie wie folgt vor, um die Kopplung manuell durchzuführen: 1. Schließen Sie den Empfänger erneut an Ihr iPad an. 2. Entfernen Sie die Batteriefachabdeckung des Mikrofons. 3. Drücken Sie mit einem dünnen Gegenstand (z. B. einer auseinandergebogenen Büroklammer) mehr als 5 Sekunden lang in das Verbindungsloch, bis die Bluetooth®-Anzeige schneller blinkt. 4.Warten Sie, bis die Bluetooth®-Anzeige durchgehend rot leuchtet. Vergewissern Sie sich, dass sowohl das kabellose Mikrofon als auch der Empfänger während dieses Vorgangs eingeschaltet sind. Jos Bluetooth®-merkkivalo vilkkuu, pariliitosta mikrofonin ja vastaanottimen välillä ei ole muodostettu.Tee tällöin pariliitos alla olevien ohjeiden mukaisesti: 1. Kytke vastaanotin iPadiin. 2. Irrota mikrofonin akkukotelon suojus. 3. Paina palautuspainiketta ohuella esineellä (kuten suoristetulla paperiliittimellä) yli viiden sekunnin ajan, kunnes Bluetooth®-merkkivalo vilkkuu nopeammin. 4. Odota, kunnes Bluetooth®-merkkivalo palaa punaisena. Varmista, että langattomaan mikrofoniin ja vastaanottimeen on kytketty vir ta. LINE-OUT Når du afslutter The Voice: On Stage eller frakobler din iPad, kobles den trådløse mikrofon automatisk fra modtageren. Hvis den trådløse mikrofon er frakoblet i over 15 minutter, skifter den automatisk til standbytilstand. For at tænde den igen fra standbytilstand skal du skubbe OFF/ON-kontakten på mikrofonen til positionen OFF og derefter tilbage til positionen ON. Al salir de The Voice: On Stage o desconectar el iPad, el micrófono inalámbrico se desconecta del receptor automáticamente. Si el micrófono inalámbrico sigue desconectado durante más de 15 minutos, se activa el modo de espera automáticamente. Para volver a encenderlo desde el modo de espera, debe deslizar el interruptor OFF/ON del micrófono a la posición OFF y, a continuación, de nuevo a la posición ON. Amikor kilép a The Voice: On Stage alkalmazásból, vagy szétcsatlakoztatja az iPad készüléket, a rendszer automatikusan bontja a vezeték nélküli mikrofon és a vevőkészülék közti csatlakozást. Ha a vezeték nélküli mikrofon több mint 15 percig nincs csatlakoztatva, akkor automatikusan készenléti üzemmódra vált. A készenléti üzemmódból történő bekapcsoláshoz csúsztassa a mikrofon OFF/ON kapcsolóját OFF állásba, majd vissza ON állásba. LINE-OUT If the Bluetooth® indicator stays flashing, that is, the microphone fails to pair with the receiver, follow the procedures below to start manual pairing: 1. Reconnect the receiver to your iPad. 2. Remove the battery cover on the microphone. 3. Insert a thin object (such as a straightened paper clip) into the pinhole and hold for more than 5 seconds until the Bluetooth® indicator flashes faster. 4. Wait until the Bluetooth® indicator turns solid red. Make sure that both the wireless microphone and receiver are powered on during this process. Pokud zůstane kontrolka Bluetooth® blikat, protože se mikrofonu nezdařilo spárovat s přijímačem, postupujte podle níže uvedeného postupu a začněte manuální spárování: 1. Znovu propojte přijímač a svůj iPad. 2. Sejměte kryt baterie na mikrofonu. 3. Do otvoru vložte tenký předmět (např. rovnou kancelářskou sponku) a držte jej 5 sekund, dokud nezačne kontrolka Bluetooth® blikat rychleji. 4. Počkejte, dokud se kontrolka Bluetooth® nerozsvítí červeně. Ujistěte se, že jsou během celého procesu napájeny bezdrátový telefon i přijímač. Bluetooth 1 iPad. 2 3 5 Bluetooth 4 Bluetooth Si le voyant Bluetooth® continue de clignoter, c'est-à-dire que le microphone ne parvient pas réaliser le couplage avec le récepteur, suivez les procédures ci-dessous pour démarrer le couplage manuel : 1. Reconnectez le récepteur à votre iPad. 2. Retirez le couvercle de la pile sur le microphone. 3. Insérez un objet fin (comme une attache trombone redressée) dans l'orifice et maintenez-le enfoncé pendant plus de 5 secondes jusqu'à ce que le voyant Bluetooth® clignote plus rapidement. 4. Attendez jusqu'à ce que le voyant Bluetooth® s'allume en rouge. Assurez-vous que le microphone sans fil et le récepteur sont alimentés durant ce processus. Hvis Bluetooth®-indikatoren bliver ved med at blinke, dvs. at mikrofonen ikke parres med modtageren, skal du følge nedenstående procedurer for at starte manuel parring: 1.Tilslut modtageren til din iPad. 2. Fjern batteridækslet på mikrofonen. 3. Indsæt en tynd genstand (f.eks. en udfoldet papirklips) i den lille åbning på afspilleren, og hold den nede i mere end 5 sekunder, indtil Bluetooth®-indikatoren blinker hurtigere. 4.Vent, til Bluetooth®-indikatoren lyser konstant rødt. Sørg for, at både den trådløse mikrofon og modtageren er tændt under denne proces. Si el indicador de Bluetooth® sigue parpadeando, es decir, si el micrófono no se empareja con el receptor, siga los procedimientos siguientes para iniciar el emparejamiento manual: 1.Vuelva a conectar el receptor al iPad. 2. Quite la tapa de las pilas del micrófono. 3. Inserte un objeto estrecho (como un clip enderezado) en el orificio y manténgalo durante 5 segundos hasta que el indicador de Bluetooth® parpadee más rápido. 4. Espere hasta que el indicador de Bluetooth® se ilumine en rojo de forma permanente. Asegúrese de que el micrófono inalámbrico y el receptor están encendidos durante este proceso. Ha a Bluetooth® jelzőfény továbbra is villog, vagyis a mikrofon nem tud párba rendeződni a vevőkészülékkel, kövesse az alábbi utasításokat a manuális párba rendezéshez: 1. Csatlakoztassa újra a vevőkészüléket az iPad-hez. 2.Távolítsa el az elemtartó fedelét a mikrofonon. 3. Helyezzen vékony tárgyat (pl. kiegyenesített gémkapcsot) a nyílásba és tartsa nyomva több mint 5 másodpercig, amíg a Bluetooth® jelzőfény nem kezd gyorsabban villogni. 4.Várjon, amíg a Bluetooth® jelzőfény folyamatos pirosra vált. Ügyeljen arra, hogy a művelet alatt mind a vezeték nélküli mikrofon, mind a vevőkészülék áram alatt legyen. MP3 LINK For optimal sound effect, connect the receiver to an existing Hi-Fi system (cable not supplied). Chcete-li dosáhnout optimálního zvuku, připojte přijímač ke stávajícímu Hi-Fi systému (kabel není součástí balení). For at opnå den bedste lydeffekt kan du slutte modtageren til et eksisterende Hi-Fi-system (kabel medfølger ikke). Für den besten Sound-Effekt verbinden Sie den Empfänger mit einem vorhandenen HiFi-System (Kabel nicht im Lieferumfang enthalten). Hi-Fi Para obtener un efecto de sonido óptimo, conecte el receptor a un sistema Hi-Fi existente (cable no incluido). Parhaan äänikokemuksen saat kytkemällä vastaanottimen hifijärjestelmääsi (kaapeli on lisävaruste). Pour un effet sonore optimal, connectez le récepteur à une chaîne hi-fi existante (câble non fourni). Az optimális hanghatás eléréséhez a vevőkészüléket csatlakoztassa egy meglévő Hi-Fi rendszerhez (kábel nincs mellékelve).
-
 1
1 -
 2
2
 |
 |