Philips AZ8289 Owners Manual - Page 2
POWER°, PROGRAM®, PRESETS®, TUNING, VOLUME, urneco, ne!tovez, maximum., AIfilv, setet, PAUSE
 |
View all Philips AZ8289 manuals
Add to My Manuals
Save this manual to your list of manuals |
Page 2 highlights
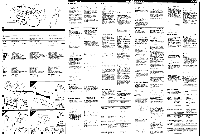
0 0- ® el a 34 5 6 - el \ 7 Almon ill. 8 'AZ .2019. • ..... 10 11 12 • . 0 O Oy eNzEX?T 1 ' (D 0 English at the back: 3.5mm headphone jack. Note: Inserting the plug will disconnect the speakers. Francais a l'arriere: pour casque stereo (3,5 mm). Des que vous • inserez la fiche, vous deconnectez les haut-parleurs. Espanol en la parte posterior: para auriculares con clavija de 3,5mm, Nota: Los altavoces se desconectaran al inserter la thvija. ® DBB to increase the bass level Dynamic Bass Boost . pour renforcer les notes graves para reales dinernice de graves ® MIC 3.5mm microphone jack (see RECORDING) prise microphone 3,5 mm (consulter le chapitre ENREGISTREMENT) enchufe de 3,5 mm pare micrefono (vease GRABACION) 0 VOLUME to adjust the volume level pour Molar le niveau du volume para ajustar el nivel de volumen 0 POWER * PROGRAM ® PRESETS -/+ (a) TUNING AV 0 BAND to select the sound source: CD-TAPE/OFF-RADIO RADIO: to program preset stations to select a preset station to tune to radio stations to select the wave band: to either FM and AM pour choisir la source CD-TAPE/OFF-RADIO ,4 TOUCHESRADIOr--- - i pour propgrammer les Ornetteurs radio • pour selectionner un emetteur radio preselection* ' permet de proceder a l'accord sur des emetteurs radio selection de la gamme d'ondes: FM et AM pare seleccionar la fuente de sonido: CD-TAPE/OFF-RADIO BOTONWDITUIDlasstu - lit para programar las presintonias para seleccionar presintonfas para sintonizar emisoras seleccign de banda: FM y AM 0 OPEN-CLOSE PLAY-PAUSE.. SEARCH 44 PM STOP • SHUFFLE REPEAT PROG CD PLAYER: to open/close the CD lid to start and to interrupt CD play to skip and to search forwards and backwards to stop play and to erase a program to play the CD in random order to repeat one track or to repeat the CD or program to program track numbers and to review the program TOUCHESDULECTEUR DE CO: BOTONES DE LECTOR DE CD: pour ouvrir le couvercle du CD para abrir/cerrar la tape de CO pour *looter et interrompre la lecture du CD pare iniciar e interrumpir la reproduccign de CD pour proceder, par saut, a la recherche en sens avant et ar riere pare salter y buscar hacia adelante y hacia atras pour arreter la lecture et pour effacer un programme pare detener la reproduccidn y para borrar un programa pour la lecture en ordre aleatoire para reproducir en un orden aleatorio pour *Ater une ou toutes les plages pare repetir una pista o el disco completo pour programmer les plages et passer le programme en revue para programar piezas y reviser el programa 0 g SENSOR display Infrared remote sensor for remote control reception afficheur recepteur infrarouge pour la telecommande pantalla sensor de infrarojos @ RECORD • PLAY In 44 l•• STOP-EJECT • . PAUSEII CASSETTE RECORDER: to start recording to start playback to rewind the tape to fast forward the tape to stop the tape and to open the cassette compartment to interrupt recording or playback CLAVIER DE LA PLATINE: pour *tauter l'enregistrement - pour *tauter la lecture pour rebobiner la bande pour bobiner a bande pour miter la cassette et ouvrir le compartiment pour interrompre la lecture ou l'enregistrement TECLASDELA PIA TINA DE CASETE: para dar comienzo a la grabacien para dar comienzo a la reproducci6n rebobinado avance rapid() para detener la cinta y para abrir la bandeja para interrumpir (pausal la grabacien/reproducciOn STOP • PLAY la A PREV/NEXT la VOLUME 4 la REMOTE CONTROL: CD: to stop CD play CD: to start CD play CD: to skip forwards and backwards to adjust the volume level TELBCOMMANDE: pour arreter la lecture du CD pour debuter la lecture du CO • pour proceder, par saut, avant et arriere pour *ler le niveau du volume MANDO A DISTANCIA: para dar comienzo a la reproduccien de CD para detener la reproduccien de CD para salter hacia adelante y hacia atras para ajustar el nivel de volumen lc) ED TAPE PAM it• 4. 4. 1E 6Jr04 21/441? I i) CD TUE RAM POWER° ON CO PUT MORE PROGRAM® PRESETS® 0 BAND TUNING VOLUME O MIC b R0341414 U FM AM \ a it sec 0R0 " LA No 0 •• 4 10 6) ' Leg* I z•z•s•i•••../ ourneco eCH • / (fY os m Instructions for Use I POWER SUPPLY see fig. 2-4 Batteries • Open the battery compartment and insert six batteries, type 920, UM-1 or fl-cells (preferably alkaline). • Remote control: Open the battery compartment and insert two batteries (type AAA, RO3 or UM4). • Remove the batteries if they are empty or the set is not to be used for a long time. • The battery supply is switched off when the set is connected to the AC power. To change over to battery supply, pull out the plug from the unit's AC MAINS jack. Note: When operating the set with batteries, always be sure to set the POWER selector to position OFF when the set is not used This will avoid a permanent power consumption. AC power 1 Check if the AC power voltage as shown on the type plate corresponds to your local AC power voltage. If it does not, consult your dealer or service organisation. If the set is equipped with a VOLTAGE ® selector, the AC power voltage will be indicated next to it. Set this selector to the local AC power voltage. 2 Connect the power lead to the outlet AC MAINS and the wall jack. The AC power supply is switched on. • To disconnect the set from the power completely, withdraw the power plug from the wall outlet. CD PLAYER see fig. 12-15 Playing a CD 1 Set the POWER selector to CD. 2 Open the lid by pressing OPEN•CLOSE. 3 Insert an audio CD (printed side up) and close the lid. 4 Press PLAYiPAUSE IP- to start CD play. 5 Adjust the sound using VOLUME and DBB. 6 You can interrupt CO play by pressing PLAY-PAUSE Continue CD play by pressing the button again_ 7 Press the STOP • button to stop CD play. 8 The set is switched off when the POWER selector is in position TAPE/OFF and the recorder keys are released. Note: CO play will also stop - if you open the !id, - if you move the POWER-ON selector, - if the end of the CD is reached Selecting another track • Briefly press the SEARCH 144 or me button once/several times to skip to the beginning of the current/previous or subsequent track(s). -•• During play: CD play continues auto- matically with the selected track. In stop position: press PLAY•PAUSE lige to start CD play. Searching for a passage during CD play 1 Hold down the SEARCH*. or Nise button to find a particular passage in forwards or backwards direction. CD play continues at a low volume. 2 Release the button when you have reached the desired passage. SHUFFLE - playing in random order 1 Press SHUFFLE before or during CD play. All the tracks will now be played in a random order. 2 To return to normal CD play, press SHUFFLE. Note. You can activate the different playing modes at the same time, e.g. to repeatedly play the entire CD orprogram inrandom order (SHUFFLE REPEAT ALL ). Programming track numbers You may select a number of tracks and store these in the memory in the desired sequence. You may store any track more than once. At most, 20 tracks can be stored in the memory, 1 Select with SEARCH 144 or p• the desired track. 2 As soon as the desired track is displayed, press the PROG button to store the track in the memory. 3 Select and store in this way all desired tracks. • You can review your settings by pressing PROG for more than two seconds: The display shows in sequence all stored track numbers. Playing the program • If you have selected the tracks in the STOP position, press PLAY-PAUSE • If you have selected the tracks during CD play, press first STOP • and then press PLAY-PAUSE Note: In the SHUFFLE and in REPEAT-I mode and when playing a program, searching is only possible within the particular track. Erasing the program from the STOP position • From the stop position. press STOP M. Repeating the entire CD or one track of the CD 1 Before or during CD play, press repeated REPEAT to cause the display showing the different repeating modes. -REPEAT the current track is played repeatedly. -REPEAT ALL-the entire CD or program is played repeatedly. Note: The program will also be erased - if you interrupt the power supply; - if you open the lid or - if you move the POWER ON selector. 2 To return to normal CD play, press REPEAT until the display indication disappears 'DISPLAY INDICATION - TOTAL TRACKS - in stop mode. - Current TRACK - during CD play. - SHUFR.E or REPEAT (ALL) - when the respective playing mode is activated. - Pnoanaram - when you play a programm. - Col ii7Pni hen the CD lid is open - Proc- when you store a track. - ES'S L - when you try, to store more than 20 tracks n 0 Pro - when you erase a program - Co' Eis is or n 0 o' :5 - when you make an error in operating the CD player or if the CD player cannot read the CD (see TROUBLESHOOTING). - no EEL- when you press PROG and there is no track selected. - VoL - when you adjust the volume - Srch - during automatic tuning. GENERAL INFORMATION The typeplate is located on the base of the set. Adjusting the sound The bass frequencies can also be emphasized if you place the set against a wall or bookshelf, (Do not cover any vents and leave sufficient room around the unit for ventilation.) Environmental information • All unnecessary packaging material has been omitted. We have done our utmost to make the packaging easy separable into three monomaterials: cardboard (box), expandable polystyrene (buffer), polyethylene (hugs, protective foam sheet). Your set consists of materials which can be recycled if disassembled by a specialized company. Please observe the local regulations regarding the disposal of packing materials, exhausted batteries and old equipment. General maintenance see fig. 16-17 • Da not expose the set, batteries, CDs or cassettes to humidity or rain, sand or to excessive heat caused by heating equipment or direct sunglight. • The mechanical parts of the set contain selflubricating bearings and must not be oiled or lubricated I • You can clean the set with a soft, slightly dampened chamois leather. Do not use any cleaning agents as they may have a corrosive effect. CD player maintenance and CD handling • The lens ® of the CD player should never be touched! (see fig. 15) • The lens may cloud over when the set is suddenly moved from cold to warm surroundings. Playing a CD is then not possible. Leave the CD player in a warm environment until the moisture evaporates. • To take the CD out of its box easiliy, press the center spindle while lifting the CD (see fig.13). • Always pick up the CD by the edge and put it back in its box after use. • To clean the CD, wipe it off in a straight line from the center towards the edge using a soft, lint-free cloth. A cleaning agent may damage the disc! lsee fig. 14) • Never write on a CD or attach any sticker to it. Tape deck see fig. 11 To ensure a good recording and playback quality of the tape deck, clean the parts (4)(3)C) after approx. 50 hours of operation. Use a cottonbaII slightly moistened with alcohol or a special head cleaning fluid. • Press PLAY and clean the rubber pressure rollers (g). • Press and clean the capstans ® and the heads A. Note: Cleaning of the heads* can also be done by playing a cleaning cassette through once. IiIIIIIIII ENGLISH Mode d'emploi It UBE I I FRANcAIS [RADIO see fig. Tuning to radio stations 1 Set the POWER selector to RADIO. 2 Select the desired waveband by repeatedly pressing BAND. 3 Press TUNING A or V for approx. one second and then release the button. The radio automatically tunes to a station with sufficient strength. 4 Repeat this procedure until you find the desired station. 5 To tune to a weak transmitter briefly press TUNING A or V as often as necessary for optimum reception, or until the correct frequency is indicated in the display. 6 Adjust the sound using the controls VOLUME and DBB. 7 The set is switched off when the POWER selector is in the position TAPE/OFF and the recorder keys are released. Improving the RADIO reception • For FM, pull out the telescopic antenna. To improve the FM signal, incline and turn the antenna. Reduce its length if the signal is too strong (usually occurs when very close to a transmitter). • For AM, direct the built-in antenna by turning the whole set. The telescopic antenna is not needed. Programming radio stations You can store up till 29 radio stations in the memory. When tuning to a preset station, the preset number (1 to 29) is indiated in the display. 1 Set the POWER selector to RADIO. 2 Press PROGRAM to enter the programming mode. 3 Tune to the desired station with TUNING A or V, as described earlier. If the frequency is already stored in the memory, the preset number will be displayed. 4 Press PRESETS - / + to allocate a number from 1 to 29 to the preset station. 5 Press PROGRAM to confirm the setting Tuning to preset stations • Press PRESETS - / until the desired preset number appears on the display. ILCASSETTE RECORDER Playing a cassette 1 Set the POWER selector to TAPE/OFF. 2 Press STOP-EJECT • to open the cassette compartment. 3 Insert a recorded cassette with the open side down. 4 Press PLAY, to start. 5 Adjust the sound using the controls VOLUME and DBB. 6 By pressing +•• or oioi fast winding of the tape is pbtsible in both directlens. 7 To stop the tape, press STOP EJECT • 8 The set is switched off when the POWER selector is in position TAPE/OFF and the recorder keys are released. see fig. 8-11; CD SYNCHRO - recording from the CD player 1 Set the POWER selector to CD. 2 Insert a CD, and if desired, program track numbers 3 Press STOP EJECT • to open the cassette compartment. 4 Insert a blank cassette with the open side down. 5 Press RECORD • to start recording. Playing of-the CO iripoisreoress..-fr • automatically. It is not necessary to start the CD player separately. 6 For brief interruptions, press PAUSEIt To resume recording, press PAUSEIIagain. 7 To stop recording, press STOPiEJECT M. General information on recording Recording is permissible insofar as copyright or other rights of third parties are not infringed. - For recording on this set you should use a cassette of the type "NORMAL" IIEC type I). This deck is not suited for recording on cassettes of the type "CHROME" (IEC II) or "METAL" (IEC IV). - The recording level is set automatically. The controls VOLUME and DBB do not affect the recording. At the very beginning and end of the tape, no recording will take place during the first seven seconds when the leader tape passes the recorder heads. Protecting tapes from accidental erasure • Keep the cassette side to be safeguarded in front of you and break out the left tab. Now, recording on this side is no longer possible. • To record againon this side of the casette tape, coverthe aperture with a piece of adhesive tape. Note: The recording can be started from different positions: - if the CD player is in the PAUSEposition, recording will start from this very position (use SEARCH« orne); - if the CD player is in the STOP position, recording will start from the beginning of the CD or program. Recording from the radio or with the microphone 1 Set the POWER selector to TAPE or RADIO. 2 Prepare the sound source for recording. -RADIO: Tune to a radio station. -TAPE (microphone): Connect a microphone with a 3.5mm plug to the MIC socket. Set the VOLUME control to zero (monitoring during microphone recording is not possible). 3 Press STOREJECT • to open the cassette compartment. 4 Insert a blank cassette with the open side down. 5 Press RECORD • to start recording. 6 For brief interruptions, press PAUSE Il. To resume recording, press PAUSEIIagain. 7 To stop recording. press STOP-EJECT M. Note: When recording from the radio or a CO. you can connect a microphone and mix the sounds. Otherwise, be sure there is no microphone connected that could disturb your recording. [TROUBLESHOOTING • If a problem occurs, first check the points listed below before taking the set for repair. • If you are unable to solve a problem by following these hints, consult your dealer or service center. WARNING: -e Under no circumstances should you fry to repair the set yourself, as this will invalidate the guarantee. Problem INo soundI no power Possible Cause VOLUME is not adiusted Headphones are connected Power cord is not securely connected Batteries are exhausted Batteries are merted incorrectly Changing over from power to battery supply Remedy Adiust the VOLUME Disconnect headphones Connect the AC power cord properly Insert new batteries Insert the batteries correctly Pus out the power plug from the units rack AC MAINS No reaction to Electrostatic discharge operation of any keys Poor radio reception Weak radio aerial signal Interference caused by the vicinity of electrical equipment like TVs, video recorders, computers, engines, etc. Disconnect the set from power supply reconnect it after a few seconds Aim the aerial for optimum reception: FM: incline and rotate telescopic aerial AM/MW: rotate the entire set Keep the radio away from electrical equipment EdEr- e or no 0' :SC CElis badly scratched or dirty ndication No CD inserted CO inserted upside down Laser lens is steamed up The CD skips tracks Co is damaged or dirty SHUFFLE or PROGRAM is active Poor CEMMitte sound quality Dust and dirt on the heads. capstan or pressure roller Use of not suited cassette types (METAL or CHROME) Recording does not Cassette tab(s) may be broken out work Remote control does not function properly Batteries are inserted incorrectly Batteries are exhausted Distance to the set is too large Replace or elezn the CD Insert a CD Insert a CD with label upwards Wait until the lens has acclimated Renlace or clean the CD Switch off SHUFFLE or PROGRAM play Clean the hears, capstan and pressure rater Only use NORMAL cassettes (IEC II for recording Apply a piece of adhesive tape over the missing tab space Insert batteries properly Replace tatteoes Reduce the distance [ ALIMENTATION Alimentation par piles • Ouvrez le compartment a piles et introdumez 6 piles, type R20. UMI ou D. selon le croquis (de preference alcalines). • Tolecommande:Ouvrez le compartiment piles et inserez deux piles (de type AM, UM4 ou R03) • Retirez les piles si elles sont arrivees epuisement ou si l'appareil ne doit pas etre utilise pendant Iongtemps • L'alimentation par piles est coupee quand I appareil est branche sur te secteur. Pour revenir a Ealimentation par piles, il taut retirer la fiche de la prise secteur. Remarque : Lorsque l'appareil fonctionne sur piles, assures-vous toujours que le selecteur POWER est place sur la position OFF afin deviter une consommation permanente de courant LECTEUR DE CD Lecture d'un CD 1 Placez le selecteur POWER sur CD. 2 Appuyez sur OPEN CLOSE pour ouvrir le couvercle du lecteur de CD. 3 Inserez un CD audio (l'etiquette dirigee vers le haut) et refermez le couvercle. 4 Appuyez sur PLAY PAUSEIf• afin de debuter la lecture du CD. 5 Ajustez le son avec les reglages VOLUME et DBB. 6 Vous pouvez interrompre la lecture du CD en apouvant sur la touche PLAY-PAUSE los Pour reprendre la lecture CD, appuyez a nouveau sur la touche PLAY-PAUSE la•. 7 Appuyez sur STOP • afin de finir la lecture du CD. L'appareil est mis hors circuit si le selecteur POWER ce trouve en pas.tion TAPE/OFF et as touches des platines cassette sont relachoes. Pemarque Le lecteur revient aussi a la cosition STOP sr vous ouvrez le couvercle, - si volts deplacez le selecteur POWER ou - a la fin du CO. Selection d'une autre plage • Appuyez brievement une fors/plusieurs fors sur SEARCH 44 au mii• afin de revenir au debut de la plage en cours, de la (des) plage(s) precedente(sl ou suivante(s). -• Pendant la lecture du CD: la lecture du CD se poursuit automatiquement par la plage selectionnee. --• En mode stop: appuyez sur PLAY-PAUSE I, afin de *tauter la lecture du CD. Recherche d'un passage determine en mode PLAY 1 Maintenez enfoncee la touche SEARCH 144 011 afin de retrouver un passage determine en avant ou en arriere. La lecture du CD se poursuit a un faible volume. 2 Rel3chez la touche lorsque vous aver atteint le oas sage desire Remarque En mode SHUFFLE (lecture aleatoirel ou REPEAT (repetition d'une theater pennant la lecture d'un programme, la recherche est uniquement possible a Einterieur d'une plage determines. INDICATION DE L'AFFICHEUR TOUTTS IFS PLACES - en mode stop - PLAGE EN courts pendant la lecture du CD. • SHUFFLE or REPEAT (Au.) - lorsque le mode de lecture respectif est active. - PROGRAM - lorsqu'un programme est disponsible. - Co' OPEn lorsque le couvercle du lecteur de CD est ouvert. - pr C- lorsque vous memorisez une plage. -L#Urt--ThrstIrtevous reglez le volume. GENERALITES Regina du son • Les freguences des graves seront egalement accentuees si vous placer l'appareil contre un mur ou sur une etagere. (N'obstruez pas les orifices et laissez suffisamment d'espace autour de l'appareil pour la ventilation). Informations relatives I l'environnement Tous les materiaux d'emballage superflus ont ete supprimes. Nous avons fait notre possible afin que l'emhallage soit facilement separable en Ira's types He materiau : carton (boite), polystyrene expansible (materiel tampon), polyethylene (sachets, panneau en matte plastique cellulaire de protection). Votre apparei l est compose de materiaux Pouvant etre recycles et reuntises s'il est demonte par une ftrme specialisee. Veuillez observer les reglements locaux-toreque veils veue deberr..... de ces materiaux d'emballage, des piles usees at de votre ancien appareil. Entretien voir fig. 16 617 • N'exposer pas l'appareil, les piles et les disoues ou les cassettes a la pluie et 3 Irhumidite, au sable, a la poussibre ou a une chaleur excessive provoquee par des appareils de chauffage ou par la lumiere threcte du soled, par exemple a l'interieur d'un vehicule gare en plein soleil. • siaproaalsrerlsest Pau pe de coussinets autolubrifiants qui ne doivent pas etre huiles gr g se • Vous pouvez nettoyer l'appareil a l'aide d'une oeau de chamois douce legerement humidifiee Nutilisez pas de produits de nettovage car 'Is nourraient avoir un effet orrosif voir fig. 2 a 4 Alimentation par secteur 1 Verifiez si la tension indiquee sur la plaquette signalenque (sous l'appareil) correspond au secteur local. Si cela n'est pas le cas, consulter le revendeur ou l'organisation de service apres-vente. Si l'appareil est OM* d'un selecteur de tension VOLTAGE ®, placez ce selecteur sur la tension secteur locale. 2 Branchez le cordon secteur sur la prise AC MAINS et la prise murale. L'alimentation secteur est alors en service. • Pour couper completement l'appareil du secteur, il taut retirer la fiche de la prise murate. voir fig. 12 A 15 Repetition de la totalite du CD ou d'une plage 1 En appuyant plusieurs fors sur REPEAT avant ou pendant la lecture, l'afficheur indique es differents modes de repetition : -REPEAT' la plage en sours de lecture est Mpetee. -REPEAT ALL: la totalite du CD est Moth*. 2 Pour •esenir a la lectve nnrmale du CD, appuvez sur REPEAT iusqu a ce due a symbole disparaisse de raft theur Lecture aleatoire Appuyez sur SHUFFLE avant ou pendant la lecture. Toutes les plages seront a present lues dans un ordre a leatoire. 2 Pour revenir a la lecture normale du CD, appuyez sur SHUFFLE. Remarque Vous pouvet actives en [name temps les differents modes de lecture, par exemple lire sans nesse la totalite du CO ou du programme dans un ordre altiatoire (SHUFFLE REPEAT ALL). Programmetion de plages Vous pouvez seiectionner un [virtu de titres et les stocker dans la m6moire dans l'ordre voulu. Un titre peut etre programme plus d'une seule fois. Un maximum de 20 titres peut etre programme dans la mernoire. 1 Choisissez la plage desiree avec les touches SEARCH *4 ou mis4. 2 Des que la plage desiree est affichee, appuyez sur PROG afin de la memoriser. 3 Selectionnez et programmez de cette maniere tous les titres desires. • Vous pouvez revoir vos reglages en appuyant sur PROG pendant plus de 2 secondes: Lathcheur montrera les titres programmes restants dans l'ordre choisi. Lecture d'un programme • Si VDUS aver selection* les plages en mode stop, appuyez sur PLAY-PAUSE P.. • Si vous aver selection* les plages pendant la lecture du CD, appuyez d'abord sur STOP • et ensuite sur PLAY-PAUSE IN- Eflacement d'un programme (en mode stop) • A partir de la position stop, appuyez sur STOP M. Rem. : Vous effacerez egalement le programme si vous interrompez lathentation, - Si yous ouvrez le compartiment ou - si vous deplacez le solecteur POWER. - L L - lorsque vous essayez de memonser plus He 20 plages - 0 Pro& - lorsque vous effacez un programme. - Ed Err or no d ISC- lorsquevousfaitez une erreur de commande ou si le lecteur ne peut lire le CD. - no EEL lorsque vous appuyez sur PROG snas avir selection* de plage au pree-labte-- - Srch- pendant l'accord automatique. Le plaguette signaltitigue est siren sur le dessous de Pepperell. Entretien du lecteur de CD et des disques compacts • La lentille ne dolt pas etre nettoyee, voir fig. 15. • De la buee peut se former sur la lentille si le lecteur est transporte souda mement d'un endroit froid a un endroit plus chaud. Si cela se produit, il n'est pas possible d'ecouter un disque. Laissez le lecteur de CD dans un endroit chauffe jusqu'a ce que l'humidite s'evapore. • Pour sortir facilement le CD de son heftier, appuyez sur a pante centrale de ce dernier tout en soulevant le CD, voir fig. 13. • Manipulez toujours les disques par le bord et remettez-les toujours dans leur bonier apres usage. • Pour nettoyer le CD, frottez en lire droite du centre vers la peripherie, a l'aide d'un chiffon doux non pelucheux, voir fig. 14. Un agent de nottoyage pout endnimnnger o disque! • Wecrivez ou ne collez jamais d'etiouette sur un CD. Entretien des platines cassette voir fig. 11 Afin de maintenir une bonne qualite d'enregistrement at de lecture, nettoyez les pieces (A)*(0) indiquees dans la figure toutes les 50 heures environ ou, en moyenne, une fois par mais. Utilisez un coton tige legarement imbibe d'alcool, ou d'un produit op\t:pepvsuusveaeuiresescei pffLeAt.Y • sur et nettoyez les galets • Appuyez sur PAUSE et ne!tovez les cabestans e et les tetes magnatiques Arz Remarque : Pour le nettoyage des tOtes C), vous pouvez egalement utiliser une cassette de nettoyage. RADIO Accord sur des emetteurs radio 1 Placez le solecteur POWER sur RADIO. 2 Selectionez la gamme d'ondes en appuyant plusieursbfois sur BAND. 3 Appuyez sur TUNING A ou v pendant environ une seconde et relachez ensuite cote touche. La radio s'accorde automatiquement sur un emetteur de puissance suffisante. 4 Repetez cette procedure jusqu'a ce que vous aye: trouve l'emetteur desire. 5 Pour proceder a l'accord sur un emetteur faible, appuyez brievement sur TUNING A ou v autant de fois que necessaire pour que la reception soit optimale ou jusqu'a ce que frequence correcte soit affichee. 6 Ajustez le son avec VOLUME et DBB. 7 L'appareil est mis hors circuit si selecteur POWER se trouve en position TAPE/OFF et les touches des platines casette sont relachees. Amelioration de la reception radio • Pour la FM, sodez Eartenne telescopique. puis incliner-la et onentez-la convenablement Si Eintensite du signal FM rept( est trop forte (proxlmile d'un ernetteurl, reduiser la longueur de lr'ainetsenAne,. • Ppour m l'appareil est (aquipe d'une antenne incotcoree. be scrte Cu 'I nest pas pbrotssup -1', ii ' o, Inoanna •nlatrnn ts, Orientez : reosemtrie ':apharcii voir fig. 5 a 7 Programmation des emetteurs radio Vous pouvez memoriser 29 emetteurs au maximum. Lors de l'accord sur un emetteur preselection* le numero de preselection 11 a 291 est indique sur Eafficheur. 1 Placer le selecteur POWER sur RADIO. 2 Appuyez sur PROGRAM afin de commuter en mode programmation. 3 Accordez l'emetteur a programmer a l'aide des touches TUNING A ou V. comme *cot precedemment SOi la frequence, est *0 memorisee, le numero preselectionne sera affiche. 4 Appuyez sur PRESETS - / + afin d'attribuer un numero allant de 1 a 29 a l'emetteur preselectionne 5 Appuyez sur PROGRAM pour confirmer le reglage. Accord sur un emetteur favori • Appuyez sur PRESETS - / + jusqu'a ce que le numero de preselection desire apparaisse sur Fat f icheur PLATINE CASSETTE voir fig. 8111] Lecture d'une cassette 1 Place: le selecteur POWER sur TAPE/OFF 2 Appuyez sur STOP-EJECT II pour ouvrir le compartiment cassette. 3 Inserez une cassette enregistree avec le tete omen en bas 4 Amuse: sur PLAY'''. et la lecture oornefxse 5 Ajuste: le can avec les reg ages '.1aUVE et F.BB 6 Fri annoyer"! sur 4/4 OU ie le bobinage rapide de la banes est possible dans les deux direct cos 7 Pour arreter a acute aciouver sur STOP EJECT • 8 L'appareil est nits hors crrrrt s le selecteur POWER se trouve en pastor TA'1 24 et Ms touches des platines cassette soot relachees. CD synchro - enregistrement die lecteur de CD Placer le selecteur POWER sur CD. 2 Introduisez un disque compact et, si desire, programmer des numeros de plage. 3 AT Ifilv; • insuecnSt EpsPsEe:JtEey pour ouvrir le T ta 4 ' - setet une ca
-
 1
1 -
 2
2
 |
 |
