Philips DCM250 Quick start guide - Page 2
Connect, Setup, Enjoy - 12
 |
UPC - 609585166295
View all Philips DCM250 manuals
Add to My Manuals
Save this manual to your list of manuals |
Page 2 highlights
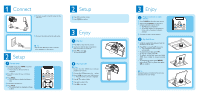
1 Connect 2 Connect one end to the DC socket on the main unit. 3 Connect the other end to the wall socket. E Tip • See the User Manual for how to connect other equipment to this system. 2 Setup A Set the clock 1 In standby mode, press PROG to activate the clock setting mode. » The 12 hour or 24 hour format is displayed. 2 Press J/K to select 12 hour or 24 hour format. 3 Press PROG. » The hour digits are displayed and begin to blink. 4 Press J/K to set the hour. 5 Press PROG. » The minute digits are displayed and begin to blink. 2 Setup 6 Press J/K to set the minute. 7 Press PROG to confirm. B 3 Enjoy A Play disc 1 Press CD to select the disc source. 2 Insert a disc into the disc compartment with the printed side facing up. 3 Press 2; to start play. L abel side • To stop play, press 9. B Play from USB D Note • Ensure that the USB device contains playable audio content. 1 Connect the USB device into the socket. 2 Press USB to select the USB source. » The total number of tracks is displayed. 3 Press 3 4 to select a folder. 4 Press J/K to select a file. 5 Press 2; to start play. 3 Enjoy C Program and tune to radio stations 1APress TUNER to select the tuner source. B 2 Press and hold PROG for 2 seconds to activate automatic program mode. » [AUTO] (auto) is displayed. » All available stations are programmed in the order of waveband reception strength. 3 Press J/K to select a preset number. DNotPelafoyriPporodd/uiPcht one 1 Install the supplied back plate, and load the iPod/iPhone in the dock. 2 Press iPod to select iPod/iPhone source. » The connected iPod/iPhone plays automatically. C • To pause/resume play, press 2; . • To skip to a track, press J/K. • To serach during play: press and hold 5/6, then release to resume normal play. • To navigate the menu: press MENU, and press 3 4 J K to select, then press OK to confirm. Note for product E Tip DetaNileodtefefaoturrpersoadnudcatdditional functions are described in the user manual.
-
 1
1 -
 2
2
 |
 |
