Philips DV910VHS99 User manual
Philips DV910VHS99 Manual
 |
View all Philips DV910VHS99 manuals
Add to My Manuals
Save this manual to your list of manuals |
Philips DV910VHS99 manual content summary:
- Philips DV910VHS99 | User manual - Page 1
Recorder Owner's Manual DV910VHS Important! Return your Warranty Registration Card within 10 days. See why inside. Read this manual first! Congratulations on purchasing this Philips product. We've included everything you need to get started. If you have any problems, Philips Representatives can - Philips DV910VHS99 | User manual - Page 2
PHILIPS product, you must return your Warranty Registration Card within 10 days. So please mail it to us right now! IN 10 DAY CAUTION RISK OF ELECTRIC SHOCK DO NOT OPEN CAUTION: TO REDUCE THE RISK OF ELECTRIC SHOCK, DO NOT REMOVE COVER (OR BACK). NO USER-SERVICEABLE PARTS INSIDE. REFER SERVICING - Philips DV910VHS99 | User manual - Page 3
cable entry as possible. High Quality This DVD/VCR has a High Quality (HQ) system and is compatible with Video Home System (VHS) equipment. Declaration of Conformity Model Number: DV910VHS Trade Name: Philips Responsible Party: Philips Consumer Electronics P.O. Box 14810 Knoxville,TN 37914 - Philips DV910VHS99 | User manual - Page 4
17-19 Setting the Clock 20 Daylight-Savings Time 21 Language Selection (VCR 22 On-Screen Status Displays (VCR) . . . .23 Description of Controls DVD/VCR Display Panel (DVD) . . . . .24 DVD/VCR Display Panel (VCR 25 Front Panel 26 Rear Panel 27 Remote Control Buttons 28-31 Basic VCR Operations - Philips DV910VHS99 | User manual - Page 5
the Disc menu by pressing the DVD button, then pressing the MENU button on the remote control. Details are on page 51. DVD Player Setup Menu... Some instructions explain how to use the DVD Player's Setup menu to set up features of the DVD player or the Disc.Access the DVD Player menu by pressing the - Philips DV910VHS99 | User manual - Page 6
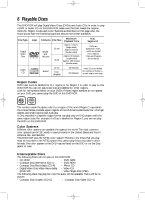
) 74 minutes 20 minutes Audio CDs are divided into numbered Tracks, i.e., a track may be one song. Region Codes DVDs also must be labelled for ALL regions or for Region 1 in order to play on this DVD/VCR.You can not play Discs that are labelled for other regions. Look for the symbols below - Philips DV910VHS99 | User manual - Page 7
01.8.9 10:26 AM Page 7 Playable Video Cassette Tapes 7 Playable Video Cassette Tapes This DVD/VCR has a High Quality (HQ) system and is compatible with existing Video Home System (VHS) equipment. Philips Consumer Electronics recommends that you use only video cassette tapes that have the mark - Philips DV910VHS99 | User manual - Page 8
your Stereo or TV.This connection is for DVD and VCR features. Before you begin... q Refer to the manuals of your TV,VCR, Stereo System or owner's manual for details. q Set the Stereo Receiver to the correct channel or "source" mode. q Depending on your connection, you may need to purchase additional - Philips DV910VHS99 | User manual - Page 9
(75 ohm) ANT-OUT CH3 CH4 3 Connect the supplied black RF coaxial cable to the ANT-OUT (Antenna Out) Jack on the back of the DVD/VCR and to the ANTENNA IN Jack on the TV. Antenna or Cable ANT-IN ANT-OUT 75 CAANBTLE/ 75Ω ANT / CABLE 4 CH3 CH4 Black - Philips DV910VHS99 | User manual - Page 10
are recording. q You can only program a timer recording for one channel at a time. Set the TV and the DVD/VCR to the Cable Box/DBS output channel (channel 03 or 04); set the DVD/VCR's CH3/CH4 switch to the same channel. Set your Cable Box/DBS to the channel you want - Philips DV910VHS99 | User manual - Page 11
the features of both the VCR and the DVD Player. 1 Cable Signal DVD/VCR ANT-IN ANT-OUT DVD/VCR OUT IN L AUDIO R DVD/VCR AUDIO OUT L VIDEO R CH3 Follow these steps: 1) Put the Cable Box/DBS on the same channel as the DVD/VCR's CH3/CH4 switch. Set the TV to the Cable Box/DBS output channel - Philips DV910VHS99 | User manual - Page 12
at your TV. If you are using the S-Video cable for DVD playback, choose the S-Video In channel at your TV. See your TV owner's manual for more details. Or, simply continue changing channels at the TV until you see VCR or DVD playback on the TV screen. 5 You are ready to turn - Philips DV910VHS99 | User manual - Page 13
on the Stereo, matching the cable colors to the jack colors. 3 Connect an optional component video cable to the COMPONENT VIDEO OUT jacks on the DVD/VCR and to the COMPONENT VIDEO IN jacks on the TV. The Component Video connection only supplies video (picture) for the - Philips DV910VHS99 | User manual - Page 14
, connect an audio optical cable (not supplied) to the OPTICAL jack on the DVD/VCR and to the OPTICAL DIGITAL AUDIO IN jack on the Receiver. Remove the features. 4 Plug in the power cords of the audio receiver,TV, and DVD/VCR.Turn on the audio receiver and select its Auxiliary IN channel.Turn on - Philips DV910VHS99 | User manual - Page 15
the battery compartment lid. Using the Remote Control q Point the remote control at the DVD/VCR's remote sensor (see 3 page 26) when using the remote control to operate the DVD/VCR. q Do not put objects between the remote control and the DVD/VCR. Recycling Guidelines/Battery Safety q Your - Philips DV910VHS99 | User manual - Page 16
DV910(H9100).QX33 01.8.9 10:26 AM Page 16 16 Turning on Your DVD/VCR Before turning on your DVD/VCR, make sure batteries are in the remote control and the DVD/VCR and TV are connected correctly. q You can not program channels if you are using a Cable Box or a Direct Broadcast System. 1 Press the - Philips DV910VHS99 | User manual - Page 17
Forward g button. SELECT op CHOOSE B → AUTO PROGRAMMING ADD/DELETE CH CH MEMORY REVIEW TV STEREO ON 2ND AUDIO MARKER POWER SETUP AUDIO SUBTITLE ANGLE MENU TITLE MODE OK RETURN DVD OUTPUT SELECT VCR SKIP/CHANNEL H/L CHANNEL/SKIP K/G B E D C REC /OTR F A-B CLEAR REPEAT DISPLAY - Philips DV910VHS99 | User manual - Page 18
longer watch some channels. q Before you begin, place the DVD/VCR in VCR mode. Press the OUTPUT SELECT button so that the green /STATUS/EXIT button. MARKER POWER SETUP AUDIO SUBTITLE ANGLE MENU TITLE MODE OK RETURN DVD OUTPUT SELECT VCR SKIP/CHANNEL H/L CHANNEL/SKIP K/G B E D C REC /OTR - Philips DV910VHS99 | User manual - Page 19
DV910(H9100).QX33 01.8.9 10:26 AM Page 19 Automatic Channel Setup (cont'd) 19 Reviewing Memorized Channels To see which TV channels the DVD/VCR has memorized, follow the steps below. q Before you begin, place the DVD/VCR in VCR mode. Press the OUTPUT SELECT button so that the green VCR OUTPUT - Philips DV910VHS99 | User manual - Page 20
CLEAR TO END PUSH EXIT 6 Press the DISPLAY/STATUS/EXIT button. Helpful Hints • Enter a 0 before a single-digit number. • Entries that do not match the DVD/VCR's clock or calendar will cause a question mark to appear on the screen. • To make corrections, press the CLEAR button until the space for - Philips DV910VHS99 | User manual - Page 21
DV910(H9100).QX33 01.8.9 10:26 AM Page 21 Daylight-Savings Time 21 You may program the DVD/VCR so the VCR clock will automatically move forward one hour in April and turn back one hour in October. Daylight-Savings Time is ON when you receive your DVD/VCR.Turn Daylight-Savings Time ON or - Philips DV910VHS99 | User manual - Page 22
onscreen displays and menus. q Before you begin, place the DVD/VCR in VCR mode. Press the OUTPUT SELECT button so that the green VCR ENGLISH ON ESPAÑOL MARKER POWER SETUP AUDIO SUBTITLE ANGLE MENU TITLE MODE OK RETURN DVD OUTPUT SELECT VCR SKIP/CHANNEL H/L CHANNEL/SKIP K/G B E D C REC - Philips DV910VHS99 | User manual - Page 23
function buttons.The contents of the status display will vary.To choose the status display mode, follow the steps below. q Before you begin, place the DVD/VCR in VCR mode. Press the OUTPUT SELECT button so that the green VCR OUTPUT light appears on the front of the - Philips DV910VHS99 | User manual - Page 24
light appears when the DVD/VCR is in DVD mode. You can only watch DVDs when the red DVD OUTPUT light is on.To make the red DVD OUTPUT light come on, press the OUTPUT button on the front of the DVD/VCR or the OUTPUT SELECT button on the remote control. POWER DVD OPEN/CLOSE DV D OUTPUT - Philips DV910VHS99 | User manual - Page 25
IN VIDEO L AUDIO R POWER VCR OUTPUT Light (Green) This light appears when the OUTPUT DVD/VCR is in VCR mode.You V C R CHANNEL TIMER SET VIDEO L can only watch the OUTPUT POWER Light SELECT button on the remote This light appears control or the OUTPUT button REC(ord)/OTR Light when the - Philips DV910VHS99 | User manual - Page 26
Details are on page 44. Press to select an item in the VCR menu. Remote Sensor Receives a signal from your remote control so you can work your DVD/VCR from a distance. SKIP/REV(erse), FWD(Forward)/SKIP Buttons (DVD) Press during playback to go to previous or subsequent Tracks or Chapters. Press and - Philips DV910VHS99 | User manual - Page 27
, another VCR, or an audio source here. Details are on page 40. DVD/VCR AUDIO OUT Jacks Connect the supplied audio cables here and to the Audio AC Power Cord Connect to a standard AC outlet to supply power to the DVD/VCR. COAXIAL Jack Connect an optional coaxial digital audio cable here and to the - Philips DV910VHS99 | User manual - Page 28
Disc menu. OK Button Press to confirm a setting or select an item in the DVD Player Setup menu or DVD Disc menu. DVD Button Press before using the remote control for DVD features. Fast Forward gButton DVD mode q Press to fast forward the Disc. Details are on page 54. Press the Pause k button, then - Philips DV910VHS99 | User manual - Page 29
's Setup menu or to remove the Setup menu from the TV screen. VCR Button Press before using the remote control for VCR features. Rewind h Button DVD mode q Press to view the DVD picture in fast reverse motion or to reverse playback of an Audio CD. Details are on page 54. VCR mode q When - Philips DV910VHS99 | User manual - Page 30
as the clock). Press to select TV channels at the DVD/VCR. Cable Users: Enter channel numbers as a two-digit number for the remote control to operate the DVD player and its features, press the DVD button on the remote control before pressing other DVD buttons. Make sure the DVD/VCR is in DVD - Philips DV910VHS99 | User manual - Page 31
Remote Control Buttons (cont'd) 31 TITLE Button Press to display the Title menu of the Disc, if available. Details are on page 51. MENU Button DVD recording, or press to select an item in the VCR menu. CLEAR Button DVD mode q Press to erase incorrect information when setting up features. VCR mode - Philips DV910VHS99 | User manual - Page 32
to rewind the tape. 6 After the tape stops, press the STOP/EJECT button on the DVD/VCR to remove the tape. S-VHS Quasi Play Back (SQPB) This unit allows you to OUTPUT light and the VCR/TV light will appear on the front of the DVD/VCR.) Then press the Play B button. • Other tape playback options and - Philips DV910VHS99 | User manual - Page 33
start recording. The REC(ord)/OTR light will appear on the front of the DVD/VCR. 7 To pause the recording, press the Pause k button once. The REC(ord)/OTR button while a tape without a record tab is in the DVD/VCR, the DVD/VCR will eject the tape and PROTECTED CASSETTE CANNOT RECORD will flash on the - Philips DV910VHS99 | User manual - Page 34
at the TV. Details are on page 12. 5 Press the VCR/TV button on the DVD/VCR remote control to put the DVD/VCR in VCR position. The VCR/TV light will appear on the front of the DVD/VCR.The channel being recorded will appear on the TV screen. 6 Press the Stop C button - Philips DV910VHS99 | User manual - Page 35
) appears on the screen. Recording will begin immediately.The REC(ord)/OTR light and the TIMER SET light will appear on the front of the DVD/VCR. OTR (0:30) CH12 3 To stop an OTR before recording is finished, press the Stop C button. To cancel the OTR but continue recording, press the - Philips DV910VHS99 | User manual - Page 36
the VCR's clock. q Put a tape in the cassette compartment of the DVD/VCR. Make sure the tape's record tab is intact and the tape is B → ONCE DAILY WEEKLY PROGRAM REVIEW 2-3 MARKER POWER SETUP AUDIO SUBTITLE ANGLE MENU TITLE MODE OK RETURN DVD OUTPUT SELECT VCR SKIP/CHANNEL H/L CHANNEL - Philips DV910VHS99 | User manual - Page 37
to enter the TV channel you want to record. q Cable Users, enter channel numbers as a two-digit number for the quickest results TO CORRECT PUSH CLEAR TO END PUSH EXIT Instructions continue on page 38. Helpful Hints • Entries that do not match the DVD/VCR's clock or calendar will cause a question - Philips DV910VHS99 | User manual - Page 38
button to choose VCR position.The VCR/TV light will appear. Press the OUTPUT SELECT button to choose VCR or DVD mode, then continue with other features as described in this manual. Tape Speeds This chart shows the recording/playback time for three types of video cassettes (T160,T120, and T60).There - Philips DV910VHS99 | User manual - Page 39
MODE 56 TIME SEARCH SLOW 89 ZOOM 1 4 Press the Fast Forward g button repeatedly to review all programmed timer recordings. If you don't press the Fast Forward g button within 10 seconds, the DVD/VCR will automatically display information about the next programmed timer recording.This will continue - Philips DV910VHS99 | User manual - Page 40
Duplication) VCR The instructions on this page show you how to copy tapes.The illustration uses two DVD/VCRs. Different VCRs channel 03 or 04, whichever channel the CH3/CH4 switch on DVD/VCR 2 is set to. 5 Point the remote control at DVD/VCR 2. Press the VCR button, then press the Number buttons - Philips DV910VHS99 | User manual - Page 41
SCREEN MODE AUDIO OUT LANGUAGE BLUE BACKGROUND ON TO END PUSH EXIT 5 Press the DISPLAY/STATUS/EXIT button. Now, when a tape has finished playing, the DVD/VCR will rewind it and start playback again. Helpful Hints • To cancel Repeat Play, follow steps 1-3 above.At step 4, press the Fast Forward - Philips DV910VHS99 | User manual - Page 42
real-time counter to zero. STOP TV STEREO 1:08 PM CH10 5 MARKER POWER SETUP AUDIO SUBTITLE ANGLE MENU TITLE MODE OK RETURN DVD OUTPUT SELECT VCR SKIP/CHANNEL H/L CHANNEL/SKIP K/G B E D C REC /OTR F A-B CLEAR REPEAT DISPLAY 1 23 STATUS/EXIT SEARCH MODE 4 56 TIME SEARCH SLOW 7 89 - Philips DV910VHS99 | User manual - Page 43
Number buttons 1, 2, 5. Or, for five minutes, press Number buttons 0, 0, 5. 3 Within 10 seconds, press the Fast Forward g button or the Rewind h button. The DVD/VCR will skip over the specified length of time, then begin playback. 2 MARKER POWER SETUP AUDIO SUBTITLE ANGLE MENU TITLE MODE OK - Philips DV910VHS99 | User manual - Page 44
Fast Forward g button or the Rewind h button, then press again. The DVD/VCR will now search in super high speed. Repeatedly pressing the Fast Forward g Still modes will automatically switch to Stop mode after five minutes to protect the DVD/VCR and the tape from damage. • SP/LP/SLP means this feature - Philips DV910VHS99 | User manual - Page 45
may get a better picture using the manual tracking controls (see below). Manual Tracking To manually adjust the tracking during normal playback and slow motion playback, press the CHANNEL o/p buttons on the DVD/VCR. (The CHANNEL o/p buttons on the remote control will not adjust tracking.) Tracking - Philips DV910VHS99 | User manual - Page 46
you press the DISPLAY/STATUS/EXIT button on the remote control. The indication 2ND AUD or TV STEREO that appears on this side of though a program is available in stereo or second audio, you still must program the DVD/VCR to receive or record the program. Follow the directions on page 47. NOTE: - Philips DV910VHS99 | User manual - Page 47
your selection. SELECT op CHOOSE B AUTO PROGRAMMING ADD/DELETE CH CH MEMORY REVIEW TV STEREO → 2ND AUDIO ON TO END PUSH EXIT 4 Press the 6 2-3 MARKER POWER SETUP AUDIO SUBTITLE ANGLE MENU TITLE MODE OK RETURN DVD OUTPUT SELECT VCR SKIP/CHANNEL H/L CHANNEL/SKIP K/G B E D C - Philips DV910VHS99 | User manual - Page 48
you'll need to follow steps 1-5. q Before you begin, place the DVD/VCR in VCR mode. Press the OUTPUT SELECT button so that the green VCR OUTPUT light recorded in Hi-Fi stereo. • If you play non-Hi-Fi tapes while the DVD/VCR is set to HIFI, HIFI will disappear from the status display and the tape will - Philips DV910VHS99 | User manual - Page 49
OFF, follow these steps. q Before you begin, place the DVD/VCR in VCR mode. Press the OUTPUT SELECT button so that the green VCR g button. 2-3 MARKER POWER SETUP AUDIO SUBTITLE ANGLE MENU TITLE MODE OK RETURN DVD OUTPUT SELECT VCR SKIP/CHANNEL H/L CHANNEL/SKIP K/G B E D C REC /OTR - Philips DV910VHS99 | User manual - Page 50
the TV screen when you try a feature. Either the feature is not available on the Disc, or the DVD/VCR can not access the feature at this time.This does not indicate a problem with the DVD/VCR. • If a Disc is dirty or scratched, the pictures may appear distorted and playback may stop. Remove - Philips DV910VHS99 | User manual - Page 51
the TITLE button. The Title Menu will appear. If a Title menu is not available, the symbol may appear on the TV screen. Or, if the DVD only has a main menu, it may appear when you press the TITLE button. 2 Press the Arrow buttons o p s B to select the desired Title, then press the - Philips DV910VHS99 | User manual - Page 52
AUDIO CD Pausing Playback 1 During disc playback, press the DVD button, then press the Pause k button on the remote control. Playback will pause and the sound will be muted. If you press the Pause F button repeatedly during DVD playback, the picture will advance one frame at a time with each button - Philips DV910VHS99 | User manual - Page 53
Info must be On. Details are on pages 74-75.) Pause k 1 MARKER POWER SETUP AUDIO SUBTITLE ANGLE MENU TITLE MODE OK RETURN DVD OUTPUT SELECT VCR SKIP/CHANNEL H/L CHANNEL/SKIP K/G B E D C REC /OTR F A-B CLEAR REPEAT DISPLAY 1 23 STATUS/EXIT SEARCH MODE 4 56 TIME SEARCH SLOW 7 89 - Philips DV910VHS99 | User manual - Page 54
Press the OUTPUT SELECT button so that the red DVD OUTPUT light appears on the front of the DVD/VCR. 1 During playback, press the DVD button, then press the Fast Forward g button or the Rewind h button on the remote control. q On a DVD, pressing the Fast Forward g or Rewind h button repeatedly will - Philips DV910VHS99 | User manual - Page 55
playback will begin. Press the Fast Forward g button repeatedly during slow motion playback to vary the speed of slow motion playback.You may play the DVD at 1/16, 1/8, or 1/2 the normal playback speed. Press the Fast Forward D button. X1/16 Press the Fast Forward D button again. X1/8 Press the Fast - Philips DV910VHS99 | User manual - Page 56
and down. MARKER POWER SETUP AUDIO SUBTITLE ANGLE MENU TITLE MODE OK RETURN DVD OUTPUT SELECT VCR SKIP/CHANNEL H/L CHANNEL/SKIP K/G B E D C . Zoom [Off] Helpful Hints • Zooming is not possible when you access the DVD Player's display screen. Details are on page 69. • To see Zoom [On - Philips DV910VHS99 | User manual - Page 57
4 56 TIME SEARCH SLOW 7 89 ZOOM +10 0 TIMER SET VCR/TV MEMORY SPEED Search Track: _ /26 C B C Using the SKIP H G Buttons to Select a Track Press the DVD button, then press the SKIP G button during playback to skip the current Track and move to the next Track. Press the SKIP G button repeatedly to - Philips DV910VHS99 | User manual - Page 58
MODE 4 56 TIME SEARCH SLOW 7 89 ZOOM +10 0 TIMER SET VCR/TV MEMORY SPEED 1 Helpful Hints • Title/Chapter playback is not available with some DVDs. • During DVD playback, press the SKIP buttons to go to the next chapter, return to the beginning of the current chapter, or go to a previous chapter. - Philips DV910VHS99 | User manual - Page 59
CD Starting Playback at a Specific Disc Time q Before you begin, place the DVD/VCR in DVD mode. Press the OUTPUT SELECT button so that the red DVD OUTPUT light appears on the front of the DVD/VCR. 1 During playback, press the DVD button, then press the SEARCH MODE button repeatedly so that the Time - Philips DV910VHS99 | User manual - Page 60
Press the REPEAT button to select [Title] Repeat Title.The entire current Title plays over and over. REPEAT and TITLE will appear on the DVD/VCR Display. Repeat [Chapter] Repeat [Off] Press the REPEAT button again to select Repeat Chapter.The current Chapter plays over and over. REPEAT and - Philips DV910VHS99 | User manual - Page 61
to the point at 1 which you want repeated playback to begin. 3 2 Press the A-B REPEAT button to set the starting point (A). Repeat A will appear on the DVD/VCR's display panel and on the TV screen briefly. Repeat [A - ] 4 Play or fast forward the Disc to the point at which you want repeated - Philips DV910VHS99 | User manual - Page 62
, then press the Number 2 button, then press the Number 6 button. MARKER POWER SETUP AUDIO SUBTITLE ANGLE MENU TITLE MODE OK RETURN DVD OUTPUT SELECT VCR SKIP/CHANNEL H/L CHANNEL/SKIP K/G B E D C REC /OTR F A-B CLEAR REPEAT DISPLAY 1 23 STATUS/EXIT SEARCH MODE 4 56 TIME SEARCH SLOW - Philips DV910VHS99 | User manual - Page 63
the Tracks on the disc have played once, playback will stop. MARKER POWER SETUP AUDIO SUBTITLE ANGLE MENU TITLE MODE OK RETURN DVD OUTPUT SELECT VCR SKIP/CHANNEL H/L CHANNEL/SKIP K/G B E D C REC /OTR F A-B CLEAR REPEAT DISPLAY 1 23 STATUS/EXIT SEARCH MODE 4 56 TIME SEARCH SLOW 7 89 - Philips DV910VHS99 | User manual - Page 64
playback.You can change the language only if multiple languages are available on the DVD. q Press the OUTPUT SELECT button so that the red DVD OUTPUT light appears on the front of the DVD/VCR. DVD 1 Press the DVD button, then press the AUDIO button during playback so the audio display appears in - Philips DV910VHS99 | User manual - Page 65
, the Disc does not have subtitles in that language. • The subtitles may be delayed for a few seconds. • Opening the disc tray or turning off the DVD/VCR's power will cancel your subtitle setting.The default setting of the disc will be active again. • When "Subtitle Not Available" appears on the TV - Philips DV910VHS99 | User manual - Page 66
angles Press the ANGLE button repeatedly to select another angle. 1 MARKER POWER SETUP AUDIO SUBTITLE ANGLE MENU TITLE MODE OK RETURN DVD OUTPUT SELECT VCR SKIP/CHANNEL H/L CHANNEL/SKIP K/G B E D C REC /OTR F A-B CLEAR REPEAT DISPLAY 1 23 STATUS/EXIT SEARCH MODE 4 56 TIME SEARCH - Philips DV910VHS99 | User manual - Page 67
a password before viewing.This feature will not limit viewing if the Disc maker did not code the Disc. So, make sure your Discs play according to your settings before you allow children access to the DVD/VCR. Follow the steps below to change your Parental Controls password. q Before you begin - Philips DV910VHS99 | User manual - Page 68
: SETUP 3 Press the Number buttons to enter your 4-digit password. 3 MARKER POWER SETUP AUDIO SUBTITLE ANGLE MENU TITLE MODE OK RETURN DVD OUTPUT SELECT VCR SKIP/CHANNEL H/L CHANNEL/SKIP K/G B E D C REC /OTR F A-B CLEAR REPEAT DISPLAY 1 23 STATUS/EXIT SEARCH MODE 4 56 TIME SEARCH - Philips DV910VHS99 | User manual - Page 69
AM Page 69 Display Screen (DVD) 69 DVD You can check information about the current DVD by pressing the DISPLAY/STATUS/EXIT button on the remote control.You can select or change Disc features using the Display Screen. q Before you begin, place the DVD/VCR in DVD mode. Press the OUTPUT SELECT button - Philips DV910VHS99 | User manual - Page 70
DISPLAY/STATUS/EXIT button on the remote control.You can select or change some Disc features using the Display screen. the DVD/VCR in DVD mode. Press the OUTPUT SELECT button so that the red DVD OUTPUT light appears on the front of the DVD/VCR. 1 Press the DVD button Track that is not part of the Program. - Philips DV910VHS99 | User manual - Page 71
button. The Disc time at the specified point will appear beside the Marker you selected. DVD Play Repeat [Off] Title 1 Chapter 3 Time 0:20:20 -1:20:36 Bit Rate you set. Helpful Hints • Opening the disc tray or turning off the DVD/VCR will erase all the Markers. • To erase a single Marker, press - Philips DV910VHS99 | User manual - Page 72
Audio Out, Dynamic Range, Down Mix Mode or Down Sampling. 1 2-3 MARKER POWER SETUP AUDIO SUBTITLE ANGLE MENU TITLE MODE OK RETURN DVD OUTPUT SELECT VCR SKIP/CHANNEL H/L CHANNEL/SKIP K/G B E D C REC /OTR F A-B CLEAR REPEAT DISPLAY 1 23 STATUS/EXIT SEARCH MODE 4 56 TIME SEARCH SLOW - Philips DV910VHS99 | User manual - Page 73
Off Parental Select : / / SSeett:: OEKNTER Cancel : EExxitit:: SSEETTUUPP MARKER POWER SETUP AUDIO SUBTITLE ANGLE MENU TITLE MODE OK RETURN DVD OUTPUT SELECT VCR SKIP/CHANNEL H/L CHANNEL/SKIP K/G B E D C REC /OTR F A-B CLEAR REPEAT DISPLAY 1 23 STATUS/EXIT SEARCH MODE 4 56 TIME - Philips DV910VHS99 | User manual - Page 74
Display, Angle Icon, Background Color, or Auto Power Off. 1 2,3 MARKER POWER SETUP AUDIO SUBTITLE ANGLE MENU TITLE MODE OK RETURN DVD OUTPUT SELECT VCR SKIP/CHANNEL H/L CHANNEL/SKIP K/G B E D C REC /OTR F A-B CLEAR REPEAT DISPLAY 1 23 STATUS/EXIT SEARCH MODE 4 56 TIME SEARCH - Philips DV910VHS99 | User manual - Page 75
-width pictures, with black bars at the top and bottom of the picture. q Select 16:9 Wide if you have connected a wide-screen TV to the DVD/VCR. q Select Bright, Dim, or Auto to adjust the brightness of the display panel.Auto dims the display only during disc playback. TV Aspect Panel - Philips DV910VHS99 | User manual - Page 76
10:28 AM Page 76 76 Language Settings q Before you begin, place the DVD/VCR in DVD mode. Press the OUTPUT SELECT button so that the red DVD OUTPUT light appears on the front of the DVD/VCR. DVD 1 While playback is stopped, press the DVD button, then press the SETUP button. The setup screen appears - Philips DV910VHS99 | User manual - Page 77
Menu screen, press four Number buttons to enter the country code you desire, then press the RETURN button. Refer to POWER SETUP AUDIO SUBTITLE ANGLE MENU TITLE MODE OK RETURN DVD OUTPUT SELECT VCR SKIP/CHANNEL H/L CHANNEL/SKIP K/G B on the remote control instead to select different languages for the audio - Philips DV910VHS99 | User manual - Page 78
5955 5964 5961 5960 6047 6051 6061 6149 6164 6159 6247 6265 5247 6258 6266 6265 6367 6459 6461 6467 Language Country Code S Samoan Sangho Sanskrit Serbian Serbo-Croatian Sesotho Setswana Shona Sindhi Singhalese Siswat Slovak Slovenian Somali Spanish Sundanese Swahili Swedish T Tagalog Tajik Tamil - Philips DV910VHS99 | User manual - Page 79
Disc in its protective case when it is not in use. Checking the Laser • If the DVD/VCR does not operate as described in this owner's manual, the laser may be dirty. Consult an Authorized Service Center for inspection and cleaning of the laser. Specifications Video Heads Four heads - Hi-Fi Antenna - Philips DV910VHS99 | User manual - Page 80
problems with your product, check this list of problems and possible solutions before requesting service.You may be able to solve the problem yourself. If you need to call a customer service representative, please know the model 's manual for details. • Insert a Disc that is playable on this DVD/VCR - Philips DV910VHS99 | User manual - Page 81
VCR/TV button to choose VCR position. The VCR/TV light will appear. Press the OUTPUT SELECT button to choose DVD mode, then continue with other DVD features as described in this manual. Remember to press the DVD button on the remote control before continuing to use the remote control to operate the - Philips DV910VHS99 | User manual - Page 82
set correctly. Details are on pages 36-39. • Make sure a tape is in the DVD/VCR and the tape has a record tab. Details are on page seven. If, after Details are on page 30. TV programs cannot be watched normally. • Put the DVD/VCR in VCR mode, then put it in TV position. Press the OUTPUT SELECT - Philips DV910VHS99 | User manual - Page 83
Input mode. See your TV owner's manual for details. • When you connect the DVD/VCR AUDIO OUT jacks on the DVD/VCR to the AUDIO IN jacks on dirty. If so, use a commercially-available head cleaner or have an authorized servicer clean the video heads. Eventually, the heads may need to be replaced. The - Philips DV910VHS99 | User manual - Page 84
showing proof of date of purchase.Attach it to the owner's manual and keep both nearby.Also keep part replacement because of improper installation, abuse, neglect, misuse, accident, unauthorized repair or other cause not within the control of Philips Consumer Electronics. • reception problems - Philips DV910VHS99 | User manual - Page 85
INSTRUCTIONS If your product is defective, you may be able to exchange it at the store from which it was purchased purchase, there is no cost to you. • If you exchange the product more than 90 days after but less than one year after the day of original purchase, contact Philips Service Model - Philips DV910VHS99 | User manual - Page 86
starts immediately and records for 30 minutes to eight hours. Remote Control: the device that came with your DVD/VCR; allows you to operate your DVD/VCR from a distance. RF coaxial cable: A black cable supplied with your DVD/VCR. Use it to connect your DVD/VCR to your TV (or Cable Box or DBS).The - Philips DV910VHS99 | User manual - Page 87
25 ch3/ch4 switch 8-14, 27 channel adding 18 deleting 18 reviewing 19 selection 30 setup 16-17 o/p buttons 26, 30, 45 chapters of 4 controls dvd/vcr 26 remote 28-31 copyright protection 40, 83 counter only mode 23 cst. in light 25 daylight-savings time 21 display/status/exit - Philips DV910VHS99 | User manual - Page 88
with your DVD/VCR, but they are designed for use with your new DVD/VCR. To order these optional accessories, contact us at: Philips Parts & #M61104 Six High-grade,VHS,T-120 Cassettes #MHG1206 This owner's manual is made of recyclable materials. Remember to recycle! IB8317E002 Printed In China 0VMN02800
-
 1
1 -
 2
2 -
 3
3 -
 4
4 -
 5
5 -
 6
6 -
 7
7 -
8
-
9
-
10
-
11
-
12
-
13
-
14
-
15
-
16
-
17
-
18
-
19
-
20
-
21
-
22
-
23
-
24
-
25
-
26
-
27
-
28
-
29
-
30
-
31
-
32
-
33
-
34
-
35
-
36
-
37
-
38
-
39
-
40
-
41
-
42
-
43
-
44
-
45
-
46
-
47
-
48
-
49
-
50
-
51
-
52
-
53
-
54
-
55
-
56
-
57
-
58
-
59
-
60
-
61
-
62
-
63
-
64
-
65
-
66
-
67
-
68
-
69
-
70
-
71
-
72
-
73
-
74
-
75
-
76
-
77
-
78
-
79
-
80
-
81
-
82
-
83
-
84
-
85
-
86
-
87
-
88
 |
 |

DV910VHS
Digital Video Disc Player &
Video Cassette Recorder
Owner’s Manual
Read this manual first!
Congratulations on purchasing this Philips product.
We’ve included everything you need to get started.
If you have any problems, Philips Representatives can
help you get the most from your new product by explaining:
• Hookups,
• First Time Setup, and
• Feature Operation.
Do not attempt to return this product to the store.
For fast help, call us first!
1-800-531-0039
Thank you for making Philips a part of your home!
Important!
Return your
Warranty
Registration Card
within 10 days.
See why inside.
DV910(H9100).QX33
01.8.9 10:26 AM
Page 1