Philips DV910VHS99 User manual - Page 13
the DVD/VCR.
 |
View all Philips DV910VHS99 manuals
Add to My Manuals
Save this manual to your list of manuals |
Page 13 highlights
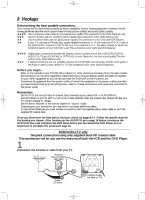
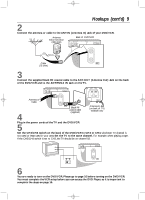
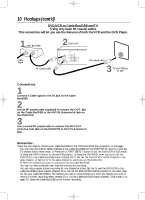
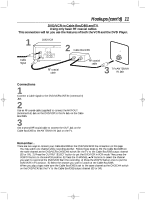
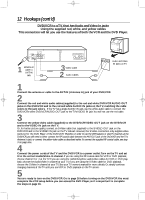
DV910(H9100).QX33 01.8.9 10:26 AM Page 13 Hookups (cont'd) 13 DVD/VCR to a Stereo and to a TV that has Component Video In jacks 1 antenna/cable signal DVD/VCR DVD/VCR OUT IN ANT-IN L AUDIO R DVD/VCR AUDIO OUT L ANT-OUT VIDEO R 1 CH3 CH4 DIGITAL AUDIO OUT COMPONENT PCM / BITSTREAM VIDEO OUT Y Cr Cb S-VIDEO OPTICAL COAXIAL OUT COMPONENT VIDEO IN Y Cb/B-Y AUDIO (LEFT) IN Cr/R-Y 3 Back of TV (example only) AUDIO (RIGHT) IN 2 Back of Stereo (example only) 1 Connect the antenna or cable to the ANT-IN (Antenna In) jack of your DVD/VCR. 2 Connect the red and white audio cables to the red and white DVD/VCR AUDIO OUT Jacks on the DVD/VCR and to the red and white AUDIO IN jacks on the Stereo, matching the cable colors to the jack colors. 3 Connect an optional component video cable to the COMPONENT VIDEO OUT jacks on the DVD/VCR and to the COMPONENT VIDEO IN jacks on the TV. The Component Video connection only supplies video (picture) for the DVD Player of the DVD/VCR. Therefore, in order to use the VCR features or view TV channels at the DVD/VCR, you still need to either connect the RF coaxial cable between the ANT-OUT jack of the DVD/VCR and the TV's Antenna In jack, or connect the yellow video cable.To connect the supplied RF coaxial cable, see step 3 on page nine.To connect the supplied yellow video cable, see step 3 on page 12. 4 Connect the power cords of all the equipment to a power outlet. Turn on the Stereo and select the Stereo's Auxiliary IN station.Turn on the TV and set it to the Component Video In channel. If you are using the RF coaxial cable for VCR playback, choose channel 3 or 4 at the TV. If you are using the red/white/yellow audio/video cables for VCR playback, choose the Audio/Video In channel at your TV. Or, simply continue changing channels at the TV until you see VCR or DVD playback on the TV screen. 5 You are ready to turn on the DVD/VCR. Go to page 16 before turning on the DVD/VCR.You must complete the VCR setup before you can access the DVD Player, so it is important to complete the steps on page 16. 6 After you complete the VCR setup as described on page 16, set Dolby Digital and DTS to Off on the DVD/VCR. Details are on pages 72-73. If you play a DVD when the settings are wrong, the sound will be distorted or you may damage the speakers.
-
 1
1 -
2
-
3
-
4
-
5
-
6
-
7
-
 8
8 -
 9
9 -
 10
10 -
 11
11 -
 12
12 -
 13
13 -
 14
14 -
 15
15 -
 16
16 -
 17
17 -
 18
18 -
19
-
20
-
21
-
22
-
23
-
24
-
25
-
26
-
27
-
28
-
29
-
30
-
31
-
32
-
33
-
34
-
35
-
36
-
37
-
38
-
39
-
40
-
41
-
42
-
43
-
44
-
45
-
46
-
47
-
48
-
49
-
50
-
51
-
52
-
53
-
54
-
55
-
56
-
57
-
58
-
59
-
60
-
61
-
62
-
63
-
64
-
65
-
66
-
67
-
68
-
69
-
70
-
71
-
72
-
73
-
74
-
75
-
76
-
77
-
78
-
79
-
80
-
81
-
82
-
83
-
84
-
85
-
86
-
87
-
88
 |
 |
