Philips FWP880 User manual - Page 10
Optional Connections, Inserting batteries into the, Remote Control - manual
 |
View all Philips FWP880 manuals
Add to My Manuals
Save this manual to your list of manuals |
Page 10 highlights
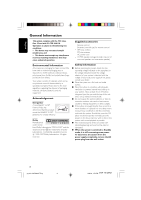
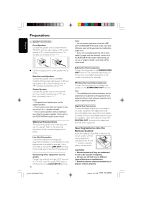
English Preparations C Speakers Connection Front Speakers Connect the speaker wires to the SPEAKERS (FRONT) terminals, right speaker to "R" and left speaker to "L", colored (marked) wire to "+" and black (unmarked) wire to "-". 1 2 G Clip the stripped portion of the speaker wire as shown. Rear Surround Speakers Connect the speaker wires to the REAR SURROUND terminals, right speaker to "R" and left speaker to "L", colored (marked) wire to "+" and black (unmarked) wire to "-". Center Speaker Connect the speaker wires to the CENTER terminal, colored (marked) wire to "+" and black (unmarked) wire to "-". Notes: - For optimal sound performance, use the supplied speakers. - Do not connect more than one speaker to any one pair of +/- speaker terminals. - Do not connect speakers with an impedance lower than the speakers supplied. Please refer to the SPECIFICATIONS section of this manual. Optional Connections The optional equipment and connecting cords are not supplied. Refer to the operating instructions of the connected equipment for details. Line Out Connection Connect this output to any analog audio equipment for playback or recording (CD recorder, tape recorder or amplifier for example). Use a cinch cable to connect the LINE OUT terminals to the analog audio in terminals of the equipment. Connecting other equipment to your system Connect the audio left and right OUT terminals of a TV,VCR, Laser Disc player, DVD player or CD Recorder to the AUX/CDR IN terminals. 10 pg 001-032/P880/37-Eng 10 Notes: - Do not connect equipment to both the LINE OUT and AUX/CDR IN terminals at the same time. Otherwise, noise will be generated and malfunction might occur. - If you are connecting equipment with a mono output (a single audio out terminal), connect it to the AUX/CDR IN left terminal. Alternatively, you can use a "single to double" cinch cable (still be mono sound). Subwoofer Out Connection Connect the subwoofer to the SUBWOOFER OUT terminal. The subwoofer reproduces just the low bass sound effect (explosions or the rumble of spaceships, for example). Wireless Surround Out Connection Connect the transmitter unit of wireless rear speakers to the SURROUND OUT terminal. Note: - The availability of a wireless transmitter and its peripherals are subjected to the approval of local authorities. Please check with your respective local safety or approving authority. Digital Out Connection Connect this digital output when recording on any audio equipment with digital input (CD Recorder, Digital Audio Tape [DAT] deck, Digital to Analog Converter and Digital Signal Processor, for example). Use a cinch cable to connect the DIGITAL OUT terminal to the digital input terminal of the equipment. Inserting batteries into the Remote Control Insert two batteries (Type R06 or AA) into the remote control with the correct polarity as indicated by the + and - symbols inside the battery compartment. CAUTION! - Remove batteries if they are exhausted or not to be used for a long time. - Do not use old and new or different types of batteries in combination. - Batteries contain chemical substances, so dispose of them properly. 12/8/00, 1:54 PM 3139 115 20421
-
 1
1 -
2
-
3
-
4
-
 5
5 -
 6
6 -
 7
7 -
 8
8 -
 9
9 -
 10
10 -
 11
11 -
 12
12 -
 13
13 -
 14
14 -
 15
15 -
16
-
17
-
18
-
19
-
20
-
21
-
22
-
23
-
24
-
25
-
26
-
27
-
28
-
29
-
30
-
31
-
32
 |
 |