Philips MCD139 Quick start guide - Page 3
Setting DVD menu options, Setting the clock - cables
 |
View all Philips MCD139 manuals
Add to My Manuals
Save this manual to your list of manuals |
Page 3 highlights
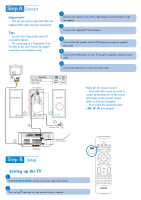
Setting the clock 1 In standby or power on mode, press and hold CLOCK on the remote control. The clock digits flash on the display. 2 Press ¡ / ™ repeatedly to set the hours. 3 Press à / á repeatedly to set the minutes. 4 Press CLOCK again to store the setting. CLOCK DISC A-B AUX MODE TUNER DISPLAY OSD CLOCK SLEEP/TIMER SYSTEM MENU DISC MENU OK AUDIO MUTE + VOL 1 4 7 PROG 2 3 GOTO 5 6 ZOOM 8 9 DSC 0 SUBTITLE DBB Setting DVD menu options IMPORTANT! If the progressive scan feature is activated but the connected TV does not support progressive signals or the video cables are not connected accordingly, see the user manual for proper progressive scan setup or deactivate the progressive scan feature as below: 1) Turn off your TV progressive scan mode then turn on to interlaced mode. 2) Select "OFF" in PROGRESSIVE menu of the system setup menu to turn off progressive scan, then press SYSTEM MENU on the remote to exit the system menu. Or To turn off progressive scan, you may also first open the disc door, then hold down ™ on the front panel, and press numeric key "1" on the remote. SETUP MENU TV DISPLAY TV TYPE PROGRESSIVE SCREEN SAVER NORMAL/PS MULTI OFF ON GOTO PICTURE SETUP PAGE NIGHT MODE OFF TEST TONE OFF GOTO SOUND SETUP PAGE AUDIO SUBTITLE DISC MENU ENGLISH ENGLISH ENGLISH GOTO LANGUAGE SETUP PAGE OSD LANG 8 ADULT CHANGE ENGLISH RESET GOTO FEATURE SETUP PAGE Tip See chapters "Getting Started" and "DVD menu operations" in the User Manual for detailed descriptions. DISC A-B AUX MODE TUNER DISPLAY OSD CLOCK SLEEP/TIMER SYSTEM MENU DISC MENU SYSTEM MENU OK AUDIO MUTE + VOL 1 4 7 PROG 2 3 GOTO 5 6 ZOOM 8 9 DSC 0 SUBTITLE DBB
-
 1
1 -
 2
2 -
 3
3 -
 4
4
 |
 |
