Philips MCM196D Quick start guide (English) - Page 2
Connection, Setting the clock - remote
 |
View all Philips MCM196D manuals
Add to My Manuals
Save this manual to your list of manuals |
Page 2 highlights
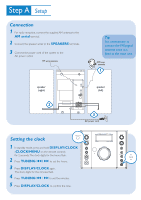
Connection 1 For radio reception, connect the supplied AM antenna to the AM aerial terminal. 2 Connect the speaker wires to the SPEAKERS terminals. 3 Connect the power cord of the system to the AC power outlet. FM wire antenna Tip It is unnecessary to connect the FM pigtail antenna since it is fixed to the main unit. AM loop antenna 1 speaker (right) FM AERIAL AM AERIAL n speaker (left) 2 3 AC power cord Setting the clock 1 In standby mode, press and hold DISPLAY/CLOCK (CLOCK/MENU on the remote control) for 2 seconds.The clock digits for the hours flash. 2 Press TUNING ¡1 / 2™ to set the hours. 3 Press DISPLAY/CLOCK again. The clock digits for the minutes flash. 4 Press TUNING ¡1 / 2™ to set the minutes. 5 Press DISPLAY/CLOCK to confirm the time. MICRO SYSTEM MCM196D
-
 1
1 -
 2
2 -
 3
3 -
 4
4
 |
 |
