Philips MCW770 User manual - Page 36
Installing a PC server
 |
View all Philips MCW770 manuals
Add to My Manuals
Save this manual to your list of manuals |
Page 36 highlights
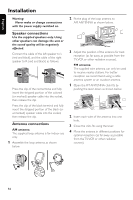
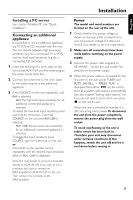
Installation English Installing a PC server See chapter Wireless PC Link "Quick installation". Connecting an additional appliance It is possible to use an additional appliance, e.g.TV,VCR or CD recorder with the unit. You can choose between high level input sensitivity (e.g. for a connected TV or VCR) and low level input sensitivity (e.g. for a connected CD recorder). 1 Insert the red plug of a cinch cable to the red socket AUX IN R and the white plug to the white socket AUX IN L. 2 Connect the other end of the cinch cable to the audio outputs of the additional appliance. 3 Press SOURCE on the unit repeatedly until AUX is selected. ➜ AUX: the high level input sensitivity for an additional connected appliance is selected. To select the low level input sensitivity press and hold for more than 2 seconds SOURCE on the unit until AUX CDR is selected. ➜ AUX CDR: the low level input sensitivity for an additional connected appliance is selected. To toggle the input sensitivity press SOURCE again for 2 seconds on the unit. or Press AUX on the remote control repeatedly until the desired input sensitivity (AUX or AUX CDR) is displayed. Note: It is not possible to connect a turntable directly to AUX IN L/R. If you wish to use a turntable, you have to connect an RIAA-amplifier to AUX IN L/R on the unit. Then connect the turntable to the RIAA-amplifier. Power The model and serial numbers are located on the rear of the unit. 1 Check whether the power voltage as shown on the type plate corresponds to your local power voltage. If it does not, consult your dealer or service organization. 2 Make sure all connections have been made before switching on the power supply. 3 Connect the power cable supplied to AC MAINS ~ and to the wall socket.This switches on the power supply. 0 When the power cable is connected for the first time to the wall socket TUNER and AUTO INSTALL - PRESS PLAY is displayed. Press either ÉÅ on the unit to store all available radio stations automatically (see also chapter "Storing radio stations") or if you do not wish to store them now press Ç on the unit to exit. When the unit is switched to standby, it is still consuming some power. To disconnect the unit from the power completely, remove the power plug from the wall socket. To avoid overheating of the unit a safety circuit has been built in. Therefore your unit may disconnect under extreme conditions. If this happens, switch the unit off and let it cool down before reusing it. 17
-
 1
1 -
2
-
3
-
4
-
5
-
6
-
7
-
8
-
9
-
10
-
11
-
12
-
13
-
14
-
15
-
16
-
17
-
18
-
19
-
20
-
21
-
22
-
23
-
24
-
25
-
26
-
27
-
28
-
29
-
30
-
 31
31 -
 32
32 -
 33
33 -
 34
34 -
 35
35 -
 36
36 -
 37
37 -
 38
38 -
 39
39 -
 40
40 -
 41
41 -
42
-
43
-
44
-
45
-
46
-
47
-
48
-
49
-
50
-
51
-
52
-
53
-
54
-
55
-
56
-
57
-
58
-
59
-
60
-
61
 |
 |
