Philips SA4010 User manual - Page 10
Upgrade your player
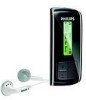 |
UPC - 609585126190
View all Philips SA4010 manuals
Add to My Manuals
Save this manual to your list of manuals |
Page 10 highlights
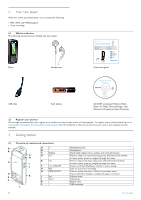
Tip You can pause and resume a recording anytime with 2; key. 5.2.2 Play back recordings You can find your recordings in the Recordings mode. 1 From the root menu, select RECORDINGS to enter the Recordings mode. Your player will play all your recordings alphabetically and playback will start with the last recording made. 2 Press 2; to pause the recording on playback. 3 Press J( or )K to play the next or previous recordings. 4 Press and hold J( or )K to fast forward or fast rewind the current recording on playback. 5.2.3 Upload recordings to the computer 1 Connect your player to your computer. 2 Select your player in Windows Explorer. > You will find a Media > Voice folder. This folder contains the recordings. 3 Copy and paste the recordings to any desired location on the computer. 5.2.4 Delete recordings Recordings can only be deleted on the computer. 1 Connect your player to your computer. 2 Select your player in Windows Explorer. 3 Double click the Media > Voice folder. 4 Select the files you want to delete and press Delete on your computer keyboard. Note Data files stored in the Data folder cannot be read directly from your player. These data files can only be read in your computer after you transfer them from your player to your computer. 6 Upgrade your player Your player is controlled by an internal program called the firmware. Newer versions of the firmware may have been released after you have purchased your player. A software program called Philips Device Manager will monitor the firmware status of your player and notify you if a new firmware is available. You need an Internet connection for this. Install Philips Device Manager from the supplied CD or download the latest version from www.philips.com/support or www.philips.com/usasupport (for U.S. residents) After the installation of Philips Device Manager, every time you connect your player to your computer, Philips Device Manager will automatically connect to the Internet and check for updates. 6.1 Manually verify whether your firmware is up to date 1 Connect your player to the computer. 3 4 5 5.3 Settings You can set your preferences in your player to suit your needs. 1 Press MENU and select SETTINGS. 2 Press J( / )K to browse through the various options and press 2; to confirm your selection. 3 Press MENU to exit the current settings screen. Settings Playmode Equalizer Language Backlight Information Further Options Off / Shuffle all / Repeat 1 / Repeat all Rock / Jazz / Pop / Classical / Off English / French / German / Spanish / Dutch / Italian / Portuguese / Polish / Hungarian / Swedish / Chinese Simplified / Chinese Traditional /Japanese /Korean / Russian Timer: 10 sec / 30 sec / Always on / Off Colour: White / Red / Yellow / Green / Blue / Purple / Cobalt / Random FW (Firmware) version / Free space 2 Launch Philips Device Manager from Start > Programs > Philips Device Manager. 3 Select your device. 4 Click Update. > Philips Device Manager will check whether a new firmware is available on the Internet and install it on your player. 5.4 Use your player to store and carry data files You can use your player to store and carry data files by copying data files into the Data folder of your player with Windows Explorer. 8 Detailed operation
-
 1
1 -
2
-
3
-
4
-
 5
5 -
 6
6 -
 7
7 -
 8
8 -
 9
9 -
 10
10 -
 11
11 -
 12
12 -
 13
13 -
 14
14 -
 15
15 -
16
 |
 |
